
User manual
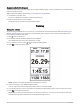
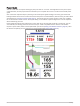


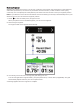
Table Of Contents
- Table of Contents
- Introduction
- Training
- My Stats
- Performance Measurements
- Training Status Levels
- About VO2 Max. Estimates
- Training Load
- Training Load Focus
- Viewing Cycling Ability
- About Training Effect
- Recovery Time
- Getting Your FTP Estimate
- Viewing Your Real-Time Stamina
- Viewing Your Stress Score
- Turning Off Performance Notifications
- Viewing Your Power Curve
- Pausing Your Training Status
- Personal Records
- Training Zones
- Performance Measurements
- Navigation
- Locations
- Courses
- Map Settings
- Route Settings
- Connected Features
- Pairing Your Phone
- Bluetooth Connected Features
- Safety and Tracking Features
- Incident Detection
- Assistance
- Adding Emergency Contacts
- Viewing Your Emergency Contacts
- Requesting Assistance
- Turning Incident Detection On and Off
- Cancelling an Automated Message
- Sending a Status Update After an Incident
- Turning On LiveTrack
- Starting a GroupTrack Session
- Setting the Bike Alarm
- Playing Audio Prompts on Your Phone
- Safety and Tracking Features
- Wi‑Fi Connected Features
- Wireless Sensors
- History
- Customizing Your Device
- Connect IQ Downloadable Features
- Profiles
- About Training Settings
- Phone Settings
- System Settings
- Setting Up Extended Display Mode
- Device Information
- Troubleshooting
- Appendix

Acquiring Satellite Signals
The device may need a clear view of the sky to acquire satellite signals. The time and date are set automatically
based on the GPS position.
TIP: For more information about GPS, go to www.garmin.com/aboutGPS.
1 Go outdoors to an open area.
The front of the device should be oriented toward the sky.
2 Wait while the device locates satellites.
It may take 30–60 seconds to locate satellite signals.
Training
Going for a Ride
If you are using a wireless sensor or accessory, it can be paired and activated during initial setup (Pairing Your
Wireless Sensors, page 51). If your device was packaged with a wireless sensor, they are already paired and
can be activated during initial setup.
1 Hold to turn on the device.
2 Go outside, and wait while the device locates satellites.
The satellite bars turn green when the device is ready.
3 From the home screen, select or to change the biking profile.
4 Press to start the activity timer.
NOTE: History is recorded only while the activity timer is running.
5 Swipe left or right to view additional data screens.
You can swipe down from the top of the data screens to view the widgets.
6 If necessary, tap the screen to view status overlay data (including battery life) or return to the home screen.
7 Press to stop the activity timer.
TIP: Before you save this ride and share it on your Garmin Connect
™
account, you can change the ride type.
Accurate ride type data is important for creating bike friendly courses.
6 Training