EDGE 1040 ® Owner’s Manual
© 2022 Garmin Ltd. or its subsidiaries All rights reserved. Under the copyright laws, this manual may not be copied, in whole or in part, without the written consent of Garmin. Garmin reserves the right to change or improve its products and to make changes in the content of this manual without obligation to notify any person or organization of such changes or improvements. Go to www.garmin.com for current updates and supplemental information concerning the use of this product.
Table of Contents Introduction......................................1 Device Overview...................................... 2 Home Screen Overview....................... 3 Viewing Widgets.................................. 4 Viewing Glances.................................. 5 Using the Touchscreen....................... 5 Locking the Touchscreen................ 5 Acquiring Satellite Signals...................... 6 Training............................................6 Going for a Ride........................
Locations............................................... 31 Marking Your Location...................... 31 Saving Locations from the Map....... 31 Navigating to a Location................... 32 Navigating Back to Start................... 32 Stopping Navigation.......................... 33 Editing Locations............................... 33 Deleting a Location........................... 33 Courses.................................................. 33 Planning and Riding a Course..........
Deleting a Ride................................... 56 Viewing Data Totals.............................. 56 Deleting Data Totals............................. 56 Garmin Connect.................................... 56 Sending Your Ride to Garmin Connect.............................................. 57 Data Recording...................................... 57 Data Management................................ 57 Connecting the Device to Your Computer...........................................
Tips for Using the Edge 1040 Solar Device.................................................... 79 Improving GPS Satellite Reception...... 80 My device is in the wrong language..... 80 Setting Your Elevation........................... 81 Temperature Readings......................... 81 Replacement O-rings............................ 81 Getting More Information..................... 81 Appendix........................................ 82 Data Fields............................................. 82 VO2 Max.
Introduction WARNING See the Important Safety and Product Information guide in the product box for product warnings and other important information. Always consult your physician before you begin or modify any exercise program.
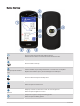
Device Overview Press to enter sleep mode and wake the device. Hold to turn the device on and off and lock the touchscreen. Press to mark a new lap. USB port (under weather cap) Lift the weather cap to charge the device or connect it to a computer. Replace the weather cap to prevent damage to the USB port. Press to start and stop the activity timer. Select to open the main menu. Glances Swipe up or down on the home screen to view the glances. Select to open the glance or menu.
Biking profile Swipe down from the top of the screen to view the widgets, then swipe left or right to view more widgets. Widgets Charge using an external power accessory. Electrical contacts NOTE: Go to buy.garmin.com to purchase optional accessories. Home Screen Overview The home screen gives you quick access to all the features of the Edge device. Battery status GPS signal strength Bluetooth status ® Sync in progress Select to go for a ride. Use the arrows to change the biking profile.
Viewing Widgets Your device is preloaded with several widgets, and more are available when you pair your device with a phone or other compatible device. 1 From the home screen, swipe down from the top of the screen. The settings widget appears. A flashing icon means the device is searching for a signal. A solid icon means the signal was found or the sensor is connected. You can select any icon to change the settings. 2 Swipe left or right to view more widgets.
Viewing Glances Glances provide quick access to health data, activity information, built-in sensors, and more. • From the home screen, swipe up or down. The device scrolls through the glances. • Select a glance to view additional information. • Select to customize the glances (Customizing the Glances, page 66). Using the Touchscreen • When the timer is running, tap the screen to view the timer overlay. The timer overlay allows you to return to the home screen during a ride.
Acquiring Satellite Signals The device may need a clear view of the sky to acquire satellite signals. The time and date are set automatically based on the GPS position. TIP: For more information about GPS, go to www.garmin.com/aboutGPS. 1 Go outdoors to an open area. The front of the device should be oriented toward the sky. 2 Wait while the device locates satellites. It may take 30–60 seconds to locate satellite signals.
8 Select Save. 9 Select . Training Plans You can set up a training plan in your Garmin Connect account and send the training plan workouts to your device. All scheduled workouts sent to the device appear in the training calendar. Using Garmin Connect Training Plans Before you can download and use a training plan, you must have a Garmin Connect account (Garmin Connect, page 56), and you must pair the Edge device with a compatible phone. 1 From the Garmin Connect app, select or .
Power Guide You can create and use a power strategy to plan your effort on a course. Your Edge device uses your FTP, the course elevation, and the projected time it will take you to complete the course to create a customized power guide. One of the most important steps in planning a successful power guide strategy is choosing your effort level. Putting a harder effort into the course will increase the power recommendations, while choosing an easier effort will reduce them (Creating a Power Guide, page 9).
Creating a Power Guide Before you can create a power guide, you must pair a power meter with your device (Pairing Your Wireless Sensors, page 51). 1 Select Training > Power Guide > . 2 Select an option: • Select Use Saved Course to use a saved course, and select the course. • Select Course Creator to create a new course, and select > Create Power Guide. 3 Enter a name for the power guide, and select . 4 Select a riding position. 5 Select a gear weight. 6 Select Save.
Repeating Workout Steps Before you can repeat a workout step, you must create a workout with at least one step. 1 Select Add New Step. 2 Select an option: • Select Repeat to repeat a step one or more times. For example, you can repeat a 5-mile step ten times. • Select Repeat Until to repeat a step for a specific duration. For example, you can repeat a 5-mile step for 60 minutes or until your heart rate reaches 160 bpm. 3 Select Back To Step, and select a step to repeat. 4 Select to save the step.
Starting a Workout 1 Select Training > Workouts. 2 Select a workout. 3 Select Ride. 4 Select to start the activity timer. After you begin a workout, the device displays each step of the workout, the target (if any), and current workout data. An audible alarm sounds when you are about to finish a workout step. A message appears, counting down the time or distance until a new step begins. Stopping a Workout • At any time, select to end a workout step and begin the next step.
Using the Strava Segment Explore Widget The Strava Segment Explore widget allows you to view and ride nearby Strava segments. 1 From the Strava Segment Explore widget, select a segment. 2 Select an option: • Select to star the segment in your Strava account. • Select Download > Ride to download a segment to your device and ride it. • Select Ride to ride a downloaded segment. 3 Select or to view your segment times, the best times of your friends, and the time of the segment leader.
Racing a Segment Segments are virtual race courses. You can race a segment, and compare your performance to past activities, other riders' performance, connections in your Garmin Connect account, or other members of the cycling community. You can upload your activity data to your Garmin Connect account to view your segment position. NOTE: If your Garmin Connect account and Strava account are linked, your activity is automatically sent to your Strava account so you can review the segment position.
Viewing Segment Details 1 Select Training > Segments. 2 Select a segment. 3 Select an option: • Select Map to view the segment on the map. • Select Elevation to view an elevation plot of the segment. • Select Leaderboard to view the ride times and average speeds for the segment leader, group leader or challenger, your personal best time and average speed, and other riders (if applicable). TIP: You can select a leaderboard entry to change your segment race goal.
Using an ANT+ Indoor Trainer Before you can use a compatible ANT+ indoor trainer, you must mount your bike on the trainer and pair it with your device (Pairing Your ANT+ Indoor Trainer, page 14). You can use your device with an indoor trainer to simulate resistance while following a course, activity, or workout. While using an indoor trainer, GPS is turned off automatically. 1 Select Training > Smart Trainer. 2 Select an option: • Select Free Ride to manually adjust the resistance level.
Creating an Interval Workout 1 Select Training > Intervals > Edit > Intervals > Target Type. 2 Select an option. TIP: You can create an open-ended interval by setting the type to Open. 3 If necessary, enter a high and low value for the interval. 4 Select Duration, enter a time interval value, and select . 5 Select . 6 Select Rest > Target Type. 7 Select an option. 8 If necessary, enter a high and low value for the rest interval. 9 Select Duration, enter time value for the rest interval, and select .
Setting a Training Target The training target feature works with the Virtual Partner feature so you can train toward a set distance, distance and time, or distance and speed goal. During your training activity, the device gives you real-time feedback about how close you are to achieving your training target. 1 Select Training > Set a Target. 2 Select an option: • Select Distance Only to select a preset distance or enter a custom distance. • Select Distance and Time to select a distance and time target.
Power curve: The power curve displays your sustained power output over time. You can view your power curve for the previous month, three months, or twelve months. Training Status Levels Training status shows you how your training affects your fitness level and performance. Your training status is based on changes to your training load and VO2 max. over an extended time period. You can use your training status to help plan future training and continue improving your fitness level.
Getting Your VO2 Max. Estimate Before you can view your VO2 max. estimate, you must put on the heart rate monitor, install the power meter, and pair them with your device (Pairing Your Wireless Sensors, page 51). If your device was packaged with a heart rate monitor, the device and sensor are already paired. For the most accurate estimate, complete the user profile setup (Setting Up Your User Profile, page 59), and set your maximum heart rate (Setting Your Heart Rate Zones, page 48).
Red Poor VO2 max. data and analysis is provided with permission from The Cooper Institute . For more information, see the appendix (VO2 Max. Standard Ratings, page 90), and go to www.CooperInstitute.org. ® Tips for Cycling VO2 Max. Estimates The success and accuracy of the VO2 max. calculation improves when your ride is a sustained and moderately hard effort, and where heart rate and power are not highly variable.
Getting Your Training Load Estimate Before you can view your training load estimate, you must put on the heart rate monitor, install the power meter, and pair them with your device (Pairing Your Wireless Sensors, page 51). If your device was packaged with a heart rate monitor, the device and sensor are already paired. For the most accurate estimate, complete the user profile setup (Setting Up Your User Profile, page 59), and set your maximum heart rate (Setting Your Heart Rate Zones, page 48).
Training Load Focus In order to maximize performance and fitness gains, training should be distributed across three categories: low aerobic, high aerobic, and anaerobic. Training load focus shows you how much of your training is currently in each category and provides training targets. Training load focus requires at least 7 days of training to determine if your training load is low, optimal, or high.
Viewing Cycling Ability Before you can view your cycling ability, you must have a 7-day training history, VO2 max. data recorded in your user profile (About VO2 Max. Estimates, page 18), and power curve data from a paired power meter (Viewing Your Power Curve, page 29). Cycling ability is a measurement of your performance across three categories: aerobic endurance, aerobic capacity, and anaerobic capacity. Cycling ability includes your current rider type, such as climber.
About Training Effect Training Effect measures the impact of an activity on your aerobic and anaerobic fitness. Training Effect accumulates during the activity. As the activity progresses, the Training Effect value increases. Training Effect is determined by your user profile information and training history, and heart rate, duration, and intensity of your activity. There are seven different Training Effect labels to describe the primary benefit of your activity.
Viewing Your Recovery Time Before you can use the recovery time feature, you must have a Garmin device with wrist-based heart rate or a compatible chest heart rate monitor paired with your device (Pairing Your Wireless Sensors, page 51). If your device was packaged with a heart rate monitor, the device and sensor are already paired.
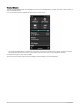
Getting Your FTP Estimate The device uses your user profile information from the initial setup to estimate your functional threshold power (FTP). For a more accurate FTP value, you can conduct an FTP test using a paired power meter and heart rate monitor (Conducting an FTP Test, page 27). Select > My Stats > Power > FTP. Your FTP estimate appears as a value measured in watts per kilogram, your power output in watts, and a position on the color gauge.
Conducting an FTP Test Before you can conduct a test to determine your functional threshold power (FTP), you must have a paired power meter and heart rate monitor (Pairing Your Wireless Sensors, page 51). 1 Select > My Stats > Power > FTP > > FTP Test > Ride. 2 Select to start the activity timer. After you begin your ride, the device displays each step of the test, the target, and current power data. A message appears when the test is complete. 3 Select to stop the activity timer. 4 Select Save.
Viewing Your Real-Time Stamina Your device can provide real-time stamina estimates based on your heart rate data and VO2 max. estimate (About VO2 Max. Estimates, page 18). How hard you are working during an activity affects how quickly your stamina drains. Real-time stamina tracking works by combining your physiological metrics with your recent and long-term activity history, such as training duration, distance covered, and training load accumulation (Performance Measurements, page 17).
Potential stamina estimate. Think of potential stamina as the total capacity of your fuel tank. It will decrease quickly if you are riding at a high effort level. Reducing your effort or resting results in a slower decline of your potential stamina. Current stamina estimate. Your current stamina reflects how much you have left in the tank at your current level of effort. This estimate combines general fatigue with anaerobic cycling activities, such as sprints, climbs, and attacks. Red: Stamina is depleting.
Pausing Your Training Status If you are injured or sick, you can pause your training status. You can continue to record fitness activities, but your training status, training load focus, recovery feedback, and workout recommendations are temporarily disabled. Select an option: • From your Edge device, select > My Stats > Training Status > > Pause Training Status. • From your Garmin Connect settings, select Performance Stats > Training Status > > Pause Training Status.
Navigation Navigation features and settings also apply to navigating courses (Courses, page 33) and segments (Segments, page 11). • Locations and finding places (Locations, page 31) • Planning a course (Courses, page 33) • Route settings (Route Settings, page 39) • Map settings (Map Settings, page 38) Locations You can record and store locations in the device. Marking Your Location Before you can mark a location, you must locate satellites.
Navigating to a Location 1 Select Navigation. 2 Select an option: • Select MTB Trail Navigation to navigate to a mountain bike trail network. • Select Browse Map to navigate to a location on the map. • Select Search to navigate to a point of interest, city, address, intersection, or known coordinates. • Select Saved Locations to navigate to a saved location. TIP: You can select to enter specific search information. • Select Recent Finds to navigate to one of the last 50 locations you have found.
Stopping Navigation 1 Scroll to the map. 2 Tap the screen. 3 Select Stop Navigation > . Editing Locations 1 2 3 4 5 Select Navigation > Saved Locations. Select a location. Select the information bar at the top of the screen. Select . Select an attribute. For example, select Change Elevation to enter a known altitude for the location. 6 Enter the new information, and select . Deleting a Location 1 2 3 4 Select Navigation > Saved Locations. Select a location.
Planning and Riding a Course You can create and ride a custom course. A course is a sequence of waypoints or locations that leads you to your final destination. TIP: You can also create a custom course in the Garmin Connect app and send it to your device (Following a Course From Garmin Connect, page 35). 1 Select Navigation > Courses > > Course Creator. 2 Select to add a location. 3 Select an option: • To select your current location on the map, select Current Location.
Creating and Riding a Round-Trip Course The device can create a round-trip course based on a specified distance, starting location, and direction of navigation. 1 Select Navigation > Courses > > Round-Trip Course. 2 Select Distance, and enter the total distance for the course. 3 Select Start Location. 4 Select an option: • To select your current location, select Current Location. • To select a location on the map, select Use Map, and select a location.
Tips for Riding a Course • Use turn guidance (Course Options, page 37). • If you include a warmup, select to begin the course, and warm up as normal. • Stay away from your course path as you warm up. When you are ready to begin, head toward your course. When you are on any part of the course path, a message appears. NOTE: As soon as you select , your Virtual Partner starts the course and does not wait for you to warm up. • Scroll to the map to view the course map.
Using ClimbPro The ClimbPro feature helps you manage your effort for the upcoming climbs on a course. You can view details about the climbs, including when they occur, average gradient, and total ascent. The climb categories, based on length and gradient, are indicated by color. TIP: After your ride, you can view the climb splits in the ride history. 1 Enable the ClimbPro feature for the activity profile (Updating Your Activity Profile, page 60).
Rerouting a Course You can choose how the device recalculates the route when you go off course. When you go off course, select an option: • To pause navigation until you get back on course, select Pause Navigation. • To choose from rerouting suggestions, select Re-route. NOTE: The first rerouting option is the shortest route back to the course and starts automatically after 10 seconds. Stopping a Course 1 Scroll to the map. 2 Swipe down from the top of the screen, and scroll to the controls widget.
Changing the Map Orientation 1 2 3 4 Select > Activity Profiles. Select a profile. Select Navigation > Map > Orientation. Select an option: • Select North Up to show north at the top of the page. • Select Track Up to show your current direction of travel at the top of the page. Map Themes You can change the map theme to adjust the appearance of the map for your ride type. Select > Activity Profiles, select a profile, and select Navigation > Map > Appearance > Map Theme.
Pairing Your Phone To use the connected features of the Edge device, it must be paired directly through the Garmin Connect app, instead of from the Bluetooth settings on your phone. 1 From the app store on your phone, install and open the Garmin Connect app. 2 Hold to turn on the device. The first time you turn on the device, you will select the device language. The next screen prompts you to pair with your phone.
Safety and Tracking Features CAUTION The safety and tracking features are supplemental features and should not be relied on as a primary method to obtain emergency assistance. The Garmin Connect app does not contact emergency services on your behalf. NOTICE To use these features, the Edge 1040 device must have GPS enabled and be connected to the Garmin Connect app using Bluetooth technology. You can enter emergency contacts in your Garmin Connect account.
Adding Emergency Contacts Emergency contact phone numbers are used for the safety and tracking features. 1 From the Garmin Connect app, select or . 2 Select Safety & Tracking > Safety Features > Emergency Contacts > Add Emergency Contacts. 3 Follow the on-screen instructions. Viewing Your Emergency Contacts Before you can view your emergency contacts on your device, you must set up your rider information and emergency contacts in the Garmin Connect app. Select > Safety & Tracking > Emergency Contacts.
Turning On LiveTrack Before you can start your first LiveTrack session, you must set up contacts in the Garmin Connect app. 1 Select > Safety & Tracking > LiveTrack. 2 Select an option: • Select Auto Start to start a LiveTrack session each time you start this type of activity. • Select LiveTrack Name to update the name of your LiveTrack session. The current date is the default name. • Select Recipients to view recipients. • Select Course Sharing if you want your recipients to see your course.
Starting a GroupTrack Session Before you can start a GroupTrack session, you must have a smartphone with the Garmin Connect app paired to your device (Pairing Your Phone, page 40). During a ride, you can see the riders in your GroupTrack session on the map. 1 On the Edge device, select > Safety & Tracking > GroupTrack to enable viewing connections on the map screen. 2 From the Garmin Connect app, select or . 3 Select Safety & Tracking > LiveTrack > > Settings > GroupTrack > All Connections.
Tips for GroupTrack Sessions The GroupTrack feature allows you to keep track of other riders in your group using LiveTrack directly on the screen. All riders in the group must be your connections in your Garmin Connect account. • Ride outside using GPS. • Pair your Edge 1040 device with your phone using Bluetooth technology. • In the Garmin Connect app, select or , and select Connections to update the list of riders for your GroupTrack session.
Wi‑Fi Settings Select > Connected Features > Wi-Fi. Wi-Fi: Enables Wi‑Fi wireless technology. NOTE: Other Wi‑Fi settings appear only when Wi‑Fi is enabled. Auto Upload: Allows you to upload activities automatically over a known wireless network. Add Network: Connects your device to a wireless network. Wireless Sensors Your device can be paired and used with wireless ANT+ or Bluetooth sensors (Pairing Your Wireless Sensors, page 51).
Putting On the Heart Rate Monitor NOTE: If you do not have a heart rate monitor, you can skip this task. You should wear the heart rate monitor directly on your skin, just below your sternum. It should be snug enough to stay in place during your activity. 1 Snap the heart rate monitor module onto the strap. The Garmin logos on the module and the strap should be right-side up.
Setting Your Heart Rate Zones The device uses your user profile information from the initial setup to determine your heart rate zones. You can manually adjust the heart rate zones according to your fitness goals (Fitness Goals, page 48). For the most accurate calorie data during your activity, you should set your maximum heart rate, resting heart rate, and heart rate zones. 1 Select > My Stats > Training Zones > Heart Rate Zones. 2 Enter your maximum, lactate threshold, and resting heart rate values.
Installing the Speed Sensor NOTE: If you do not have this sensor, you can skip this task. TIP: Garmin recommends you secure your bike on a stand while installing the sensor. 1 Place and hold the speed sensor on top of the wheel hub. 2 Pull the strap around the wheel hub, and attach it to the hook on the sensor. The sensor may be tilted when installed on an asymmetrical hub. This does not affect operation. 3 Rotate the wheel to check for clearance. The sensor should not contact other parts of your bike.
3 Pull the bands around the crank arm, and attach them to the hooks on the sensor. 4 Rotate the crank arm to check for clearance. The sensor and bands should not contact any part of your bike or shoe. NOTE: The LED flashes green for five seconds to indicate activity after two revolutions. 5 Take a 15 minute test ride and inspect the sensor and bands to ensure there is no evidence of damage. About the Speed and Cadence Sensors Cadence data from the cadence sensor is always recorded.
Pairing Your Wireless Sensors Before you can pair, you must put on the heart rate monitor or install the sensor. Pairing is the connecting of ANT+ or Bluetooth wireless sensors, for example, connecting a heart rate monitor with your Garmin device. 1 Bring the device within 3 m (10 ft.) of the sensor. NOTE: Stay 10 m (33 ft.) away from other riders' sensors while pairing. 2 Select > Sensors > Add Sensor. 3 Select an option: • Select a sensor type. • Select Search All to search for all nearby sensors.
Pedal-Based Power Rally measures pedal-based power. Rally measures the force you apply a few hundred times every second. Rally also measures your cadence or rotational pedaling speed. By measuring the force, the direction of force, the rotation of the crank arm, and time, Rally can determine power (watts). Because Rally independently measures left and right leg power, it reports your left-right power balance. NOTE: The single-sensing Rally system does not provide left-right power balance.
Using Cycling Dynamics Before you can use cycling dynamics, you must pair the power meter with your device using ANT+ technology (Pairing Your Wireless Sensors, page 51). NOTE: Recording cycling dynamics uses additional device memory. 1 Go for a ride. 2 Scroll to the cycling dynamics screen to view your power phase data , total power , and platform center offset . 3 If necessary, hold a data field to change it (Adding a Data Screen, page 61).
Customizing Cycling Dynamics Features Before you can customize Rally features, you must pair a Rally power meter with your device. 1 Select > Sensors. 2 Select the Rally power meter. 3 Select Sensor Details > Cycling Dynamics. 4 Select an option. 5 If necessary, select the toggle switches to turn on or off torque efficiency, pedal smoothness, and cycling dynamics. Updating the Rally Software Using the Edge Device Before you can update the software, you must pair your Edge device with your Rally system.
Using Electronic Shifters Before you can use compatible electronic shifters, such as Shimano Di2 shifters, you must pair them with your Edge device (Pairing Your Wireless Sensors, page 51). You can customize the optional data fields (Adding a Data Screen, page 61). The Edge device displays current adjustment values when the sensor is in adjustment mode.
Viewing Your Time in Each Training Zone Before you can view your time in each training zone, you must pair your device with a compatible heart rate monitor or power meter, complete an activity, and save the activity. Viewing your time in each heart rate and power zone can help you adjust your training intensity. You can adjust your power zones (Setting Your Power Zones, page 51) and your heart rate zones (Setting Your Heart Rate Zones, page 48) to match your goals and abilities.
Plan your training: You can choose a fitness goal and load one of the day-by-day training plans. Share your activities: You can connect with friends to follow each other's activities or post links to your activities on your favorite social networking sites. Sending Your Ride to Garmin Connect • Sync your Edge device with the Garmin Connect app on your smartphone. • Use the USB cable that came with your Edge device to send ride data to your Garmin Connect account on your computer.
Transferring Files to Your Device 1 Connect the device to your computer. On Windows computers, the device appears as a removable drive or a portable device. On Mac computers, the device appears as a mounted volume. NOTE: Some computers with multiple network drives may not display device drives properly. See your operating system documentation to learn how to map the drive. 2 On your computer, open the file browser. 3 Select a file. 4 Select Edit > Copy.
Downloading Connect IQ Features Using Your Computer 1 2 3 4 Connect the device to your computer using a USB cable. Go to apps.garmin.com, and sign in. Select a Connect IQ feature, and download it. Follow the on-screen instructions. Profiles The Edge has several ways for you to customize the device, including profiles. Profiles are a collection of settings that optimize your device based on how you are using it. For example, you can create different settings and views for training and mountain biking.
Updating Your Activity Profile You can customize ten activity profiles. You can customize your settings and data fields for a particular activity or trip. TIP: You can also customize the activity profiles from the device settings in the Garmin Connect app. 1 Select > Activity Profiles. 2 Select an option: • Select a profile. • Select Create New to add or copy a profile. 3 If necessary, select to edit the name, color, and default ride type for the profile.
Adding a Data Screen 1 2 3 4 5 6 Select > Activity Profiles. Select a profile. Select Data Screens > Add New > Data Screen. Select a category, and select one or more data fields. Select . Select an option. • Select another category to select more data fields. • Select . 7 Select or to change the layout. 8 Select . 9 Select an option. • Tap a data field, then tap another data field to rearrange them. • Double-tap a data field to change it. 10 Select .
Setting Range Alerts If you have an optional heart rate monitor, cadence sensor, or power meter, you can set up range alerts. A range alert notifies you when the device measurement is above or below a specified range of values. For example, you can set the device to alert you when your cadence is below 40 RPM and over 90 RPM. You can also use a training zone for the range alert (Training Zones, page 30). 1 Select > Activity Profiles. 2 Select a profile. 3 Select Alerts and Prompts.
Auto Lap Marking Laps by Position You can use the Auto Lap feature to mark the lap at a specific position automatically. This feature is helpful for comparing your performance over different parts of a ride (for example, a long climb or training sprints). During courses, you can use the By Position option to trigger laps at all of the lap positions saved in the course. 1 Select > Activity Profiles. 2 Select a profile. 3 Select Alerts and Prompts > Lap. 4 Turn on the Auto Lap alert.
Customizing the Lap Banner You can customize the data fields that appear in the lap banner. 1 Select > Activity Profiles. 2 Select a profile. 3 Select Alerts and Prompts > Lap. 4 Turn on the Auto Lap alert. 5 Select Custom Lap Banner. 6 Select a data field to change it. Using Auto Sleep You can use the Auto Sleep feature to automatically enter sleep mode after 5 minutes of inactivity. During sleep mode, the screen is turned off and the ANT+ sensors, Bluetooth, and GPS are disabled.
Changing the Satellite Setting For increased performance in challenging environments and faster GPS position location, you can enable MultiGNSS or Multi-GNSS Multi-band. Using GPS and another satellite together reduces battery life more quickly than using only GPS. 1 Select > Activity Profiles. 2 Select a profile. 3 Select Satellite Systems. 4 Select an option. Phone Settings Select > Connected Features > Phone. Enable: Enables Bluetooth.
Customizing the Glances 1 Scroll to the bottom of the home screen. 2 Select . 3 Select an option: • Select to add a glance to the glance loop. • Select to drag the glance up or down to change the location of the glance in the glance loop. • Swipe left on a glance, and select to remove the glance from the glance loop. Customizing the Widget Loop You can change the order of widgets in the widget loop, remove widgets, and add new widgets. 1 Select > System > Widgets.
Setting Up Extended Display Mode You can use your Edge 1040 device as an extended display to view data screens from a compatible Garmin multisport watch. For example, you can pair a compatible Forerunner device to display its data screens on your Edge device during a triathlon. 1 From your Edge device, select > Extended Display > Connect New Watch. 2 From your compatible Garmin watch, select Settings > Sensors & Accessories > Add New > Extended Display.
4 Plug the AC adapter into a standard wall outlet. When you connect the device to a power source, the device turns on. 5 Charge the device completely. After you charge the device, close the weather cap. About the Battery WARNING This device contains a lithium-ion battery. See the Important Safety and Product Information guide in the product box for product warnings and other important information.
5 Align the tabs on the back of the device with the bike mount notches . 6 Press down slightly and turn the device clockwise until it locks into place. Installing the Out-Front Mount NOTE: If you do not have this mount, you can skip this task. 1 Select a secure location to mount the Edge device where it does not interfere with the safe operation of your bike. 2 Use the hex key to remove the screw from the handlebar connector . 3 Place the rubber pad around the handlebar: • If the handlebar diameter is 25.
5 Replace and tighten the screw. NOTE: Garmin recommends tightening the screw so the mount is secure, with a maximum torque specification of 7 lbf-in. (0.8 N-m). You should check the tightness of the screw periodically. 6 Align the tabs on the back of the Edge device with the bike mount notches . 7 Press down slightly and turn the Edge device clockwise until it locks into place. Releasing the Edge 1 Turn the Edge clockwise to unlock the device. 2 Lift the Edge off the mount.
Installing the Mountain Bike Mount NOTE: If you do not have this mount, you can skip this task. 1 Select a secure location to mount the Edge device where it does not interfere with the safe operation of your bike. 2 Use the 3 mm hex key to remove the screw from the handlebar connector . 3 Select an option: • If the handlebar diameter is 25.4 mm or 26 mm, place the thicker pad around the handlebar. • If the handlebar diameter is 31.8 mm, place the thinner pad around the handlebar.
5 Use the 3 mm hex key to loosen the screw on the mount arm, position the mount arm, and tighten the screw. NOTE: Garmin recommends tightening the screw so the mount arm is secure, with a maximum torque specification of 20 lbf-in. (2.26 N-m). You should check the tightness of the screw periodically. 6 If necessary, use the 2 mm hex key to remove the two screws on the back side of the mount , remove and rotate the connector, and replace the screws to change the orientation of the mount.
Product Updates Your device automatically checks for updates when connected to Bluetooth or Wi‑Fi. You can manually check for updates from the system settings (System Settings, page 65). On your computer, install Garmin Express (www.garmin.com/express). On your phone, install the Garmin Connect app.
HRM-Dual Specifications Battery type User-replaceable CR2032, 3 V Battery life Up to 3.5 yr. at 1 hr./day Operating temperature range From -5° to 50°C (from 23° to 122°F) Wireless frequency 2.4 GHz @ 2 dBm maximum Water rating 1 ATM1 NOTE: This product does not transmit heart rate data while swimming. Speed Sensor 2 and Cadence Sensor 2 Specifications Battery type User-replaceable CR2032, 3 V Battery life Approximately 12 mo. at 1 hr./day Speed sensor storage Up to 300 hr.
Cleaning the Device NOTICE Even small amounts of sweat or moisture can cause corrosion of the electrical contacts when connected to a charger. Corrosion can prevent charging and data transfer. 1 Wipe the device using a cloth dampened with a mild detergent solution. 2 Wipe it dry. After cleaning, allow the device to dry completely. Caring for the Heart Rate Monitor NOTICE You must unsnap and remove the module before washing the strap.
Replacing the Heart Rate Monitor Battery 1 Use a small Phillips screwdriver to remove the four screws on the back of the module. 2 Remove the cover and battery. 3 Wait 30 seconds. 4 Insert the new battery with the positive side facing up. NOTE: Do not damage or lose the O-ring gasket. 5 Replace the back cover and the four screws. NOTE: Do not overtighten. After you replace the heart rate monitor battery, you may need to pair it with the device again.
Replacing the Speed Sensor Battery The device uses one CR2032 battery. The LED flashes red to indicate a low battery level after two revolutions. 1 Locate the circular battery cover on the front of the sensor. 2 3 4 5 Twist the cover counter-clockwise until the cover is loose enough to remove. Remove the cover and the battery . Wait 30 seconds. Insert the new battery into the cover, observing polarity. NOTE: Do not damage or lose the O-ring gasket.
Replacing the Cadence Sensor Battery The device uses one CR2032 battery. The LED flashes red to indicate a low battery level after two revolutions. 1 Locate the circular battery cover on the back of the sensor. 2 Twist the cover counter-clockwise until the marker points to unlocked and the cover is loose enough to remove. 3 Remove the cover and the battery . 4 Wait 30 seconds. 5 Insert the new battery into the cover, observing polarity. NOTE: Do not damage or lose the O-ring gasket.
Clearing User Data and Settings You can clear all user data and restore the device to its initial setup. This removes your history and data, such as rides, workouts, and courses, and resets the device settings and activity profiles. This will not remove any files you added to the device from your computer. Select > System > Device Reset > Delete Data and Reset Settings > . Maximizing Battery Life • • • • • • • Turn on Battery Saver (Turning On Battery Save Mode, page 79).
• During an activity, scroll to the solar data page. The solar data page highlights the intensity of the current light conditions and the accumulated ride time gained from the solar energy, taking into account the current usage and battery consumption of the device. Improving GPS Satellite Reception • Frequently sync the device to your Garmin account: ◦ Connect your device to a computer using the USB cable and the Garmin Express application.
Setting Your Elevation If you have accurate elevation data for your present location, you can manually calibrate the altimeter on your device. 1 Select Navigation > > Set Elevation. 2 Enter the elevation, and select . Temperature Readings The device may display temperature readings that are higher than the actual air temperature if the device is placed in direct sunlight, held in your hand, or is charging with an external battery pack.
Appendix Data Fields NOTE: Not all data fields are available for all activity types. Some data fields require ANT+ or Bluetooth accessories to display data. Some data fields appear in more than one category on the device. TIP: You can also customize the data fields from the device settings in the Garmin Connect app. Cadence Fields Name Description Avg Cadence Cycling. The average cadence for the current activity. Cadence Cycling. The number of revolutions of the crank arm.
Name Description Time Standing The time spent standing while pedaling for the current activity. Distance Fields Name Description Distance The distance traveled for the current track or activity. Lap Distance The distance traveled for the current lap. Last Lap Distance The distance traveled for the last completed lap. Distance Ahead The distance ahead or behind the Virtual Partner. Odometer A running tally of distance traveled for all trips.
Gears Name Description Di2 Battery Level The remaining battery power of a Di2 sensor. Di2 Shift Mode The current shift mode of a Di2 sensor. Front Gear The front bike gear from a gear position sensor. Gear Battery The battery status of a gear position sensor. Gear Combo The current gear combination from a gear position sensor. Gears The front and rear bike gears from a gear position sensor. Gear Ratio The number of teeth on the front and rear bike gears, as detected by a gear position sensor.
Heart Rate Fields Name Description %Heart Rate Reserve The percentage of heart rate reserve (maximum heart rate minus resting heart rate). %Max Heart Rate The percentage of maximum heart rate. Aerobic Training Effect The impact of the current activity on your aerobic fitness level. Anaerobic Training Effect The impact of the current activity on your anaerobic fitness level. Avg %HRR The average percentage of heart rate reserve (maximum heart rate minus resting heart rate) for the current activity.
MTB Performance Name Description 60s Flow The 60-second moving average of the flow score. 60s Grit The 60-second moving average of the grit score. Flow The measurement of how consistently you maintain speed and smoothness through turns in the current activity. Grit The measurement of difficulty for the current activity based on elevation, gradient, and rapid changes in direction. Lap Flow The overall flow score for the current lap. Lap Grit The overall grit score for the current lap.
Other Fields Name Description Battery Level The remaining battery power. Calories The amount of total calories burned. GPS Signal Strength The strength of the GPS satellite signal. Laps The number of laps completed for the current activity. Performance Condition The performance condition score is a real-time assessment of your ability to perform. Sunrise The time of sunrise based on your GPS position. Sunset The time of sunset based on your GPS position.
Name Description Last Lap Power The average power output for the last completed lap. Lap Watts/kg The average power output in watts per kilogram for the current lap. Max. Lap Power The top power output for the current lap. Max. Power The top power output for the current activity. Normalized Power The Normalized Power for the current activity. Pedal Smoothness The measurement of how evenly a rider is applying force to the pedals throughout each pedal stroke. Power Cycling.
Timer Fields Name Description Avg Lap Time The average lap time for the current activity. The total time recorded. For example, if you start the activity timer and run for 10 minutes, then Elapsed Time stop the timer for 5 minutes, then start the timer and run for 20 minutes, your elapsed time is 35 minutes. Lap Time The stopwatch time for the current lap. Last Lap Time The stopwatch time for the last completed lap. Timer The current time of the countdown timer.
VO2 Max. Standard Ratings These tables include standardized classifications for VO2 max. estimates by age and gender. Males Percentile 20–29 30–39 40–49 50–59 60–69 70–79 Superior 95 55.4 54 52.5 48.9 45.7 42.1 Excellent 80 51.1 48.3 46.4 43.4 39.5 36.7 Good 60 45.4 44 42.4 39.2 35.5 32.3 Fair 40 41.7 40.5 38.5 35.6 32.3 29.4 Poor 0–40 <41.7 <40.5 <38.5 <35.6 <32.3 <29.4 Females Percentile 20–29 30–39 40–49 50–59 60–69 70–79 Superior 95 49.6 47.
Heart Rate Zone Calculations Zone % of Maximum Heart Rate Perceived Exertion Benefits 1 50–60% Relaxed, easy pace, rhythmic breathing Beginning-level aerobic training, reduces stress 2 60–70% Comfortable pace, slightly deeper breathing, conversation possible Basic cardiovascular training, good recovery pace 3 70–80% Moderate pace, more difficult to hold conversation Improved aerobic capacity, optimal cardiovascular training 4 80–90% Fast pace and a bit uncomfortable, breathing forceful Im
Wheel Size and Circumference Your speed sensor automatically detects your wheel size. If necessary, you can manually enter your wheel circumference in the speed sensor settings. The tire size is marked on both sides of the tire. This is not a comprehensive list. You can also measure the circumference of your wheel or use one of the calculators available on the internet. Tire Size Wheel Circumference (mm) 20 × 1.
Tire Size Wheel Circumference (mm) 27 × 1-1/4 2161 27 × 1-3/8 2169 29 x 2.1 2288 29 x 2.2 2298 29 x 2.
support.garmin.