
User manual


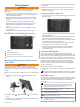
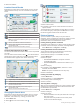

Table Of Contents
- Table of Contents
- Getting Started
- Vehicle Profiles
- Driver Awareness Features and Alerts
- Finding and Saving Locations
- Finding a Location Using the Search Bar
- Finding an Address
- Location Search Results
- Changing the Search Area
- Points of Interest
- Search Tools
- Parking
- Viewing Recently Found Locations
- Viewing Current Location Information
- Saving Locations
- Following a Route
- Using the Map
- Live Services, Traffic, and Smartphone Features
- Traffic
- Vehicle and Driver Tools
- Voice Command
- Using the Apps
- Settings
- Device Information
- Device Maintenance
- Troubleshooting
- Appendix
- Index

Current time. Select to set the time (Setting the Time, page 19).
Battery charge level.
Garmin Drive
™
app connection status(Pairing with Your
Smartphone, page 11).
Temperature. Select to view the weather forecast (Viewing the
Weather Forecast, page 16).
Using the On-Screen Buttons
On-screen buttons allow you to navigate the pages, menus, and
menu options on your device.
• Select to return to the previous menu screen.
• Hold to quickly return to the main menu.
• Select or to scroll through lists or menus.
• Hold or to scroll faster.
• Select to see a context-based menu of options for the
current screen.
Adjusting the Volume
1
Select Volume.
2
Select an option:
• Use the slider bar to adjust the volume.
• Select to mute the device.
• Select a check box to enable or disable additional sound
options.
Using the Audio Mixer
You can use the audio mixer to set the volume levels for
different audio types, such as navigation prompts or phone calls.
The level for each audio type is a percentage of the master
volume.
1
Select Volume.
2
Select Mixer.
3
Use the sliders to adjust the volume for each audio type.
Adjusting the Screen Brightness
1
Select Settings > Display > Brightness.
2
Use the slider bar to adjust the brightness.
Vehicle Profiles
WARNING
Entering your vehicle profile characteristics does not guarantee
that your vehicle's characteristics will be accounted for in all
route suggestions or that you will receive the warning icons in all
cases. Limitations may exist in the map data such that your
device cannot account for these restrictions or road conditions in
all cases. Always defer to all posted road signs and road
conditions when making driving decisions.
Routing and navigation are calculated differently based on your
vehicle profile. The activated vehicle profile is indicated by an
icon in the status bar. The navigation and map settings on your
device can be customized separately for each vehicle type.
When you activate a truck vehicle profile, the device avoids
including restricted or impassable areas in routes based on the
dimensions, weight, and other characteristics you entered for
your vehicle.
Adding a Vehicle Profile
You can add a vehicle profile that includes the weight,
dimensions, and other characteristics for your vehicle.
1
Select Settings > Vehicle Profile > .
2
Select an option:
• To add a straight truck with a permanently attached cargo
area, select Straight Truck.
• To add a tractor or a tractor-trailer combination, select
Tractor.
• To add a bus, select Bus.
3
Follow the on-screen instructions to enter the vehicle
characteristics.
After you add a vehicle profile, you can edit the profile to enter
additional detailed information, such as the vehicle identification
number or trailer number (Editing a Vehicle Profile, page 2).
Switching the Vehicle Profile
Each time you turn on your device, it prompts you to select a
vehicle profile. You can manually switch another vehicle profile
at any time.
1
From the status bar, select the vehicle profile icon, such as
or .
2
Select a vehicle profile.
The vehicle profile information appears, including
measurements and weight.
3
Select Select.
Changing Your Trailer Information
Before you can change your trailer information, you must enter a
vehicle profile for a tractor (Adding a Vehicle Profile, page 2).
When you change the trailer on your tractor, you can change the
trailer information in your vehicle profile without changing the
tractor information. You can switch quickly between frequently
used trailers.
1
Select Settings > Vehicle Profile.
2
Select the tractor vehicle profile to use with the trailer.
3
Select .
4
Select an option:
• To use a recent trailer configuration, select a trailer
configuration from the list.
• To enter a new trailer configuration, select New
Configuration, and enter the trailer information.
Editing a Vehicle Profile
You can edit a vehicle profile to change vehicle information or to
add detailed information to a new vehicle profile, such as the
vehicle identification number, trailer number, or odometer
reading. You can also rename or delete a vehicle profile.
1
Select Settings > Vehicle Profile.
2
Select the vehicle profile to edit.
3
Select an option:
• To edit the vehicle profile information, select , and select
a field to edit.
• To rename a vehicle profile, select > > Rename
Profile.
• To delete the vehicle profile, select > > Delete.
Driver Awareness Features and Alerts
CAUTION
The driver alerts and speed limit features are for information
only and do not replace your responsibility to abide by all posted
speed limit signs and to use safe driving judgment at all times.
Garmin
®
is not responsible for any traffic fines or citations you
receive for failing to follow all applicable traffic laws and signs.
Your device provides features that can help encourage safer
driving and increase efficiency, even when you are driving in a
2 Vehicle Profiles