DĒZL OTR700 / LGV700 ™ Owner’s Manual
© 2020 Garmin Ltd. or its subsidiaries All rights reserved. Under the copyright laws, this manual may not be copied, in whole or in part, without the written consent of Garmin. Garmin reserves the right to change or improve its products and to make changes in the content of this manual without obligation to notify any person or organization of such changes or improvements. Go to www.garmin.com for current updates and supplemental information concerning the use of this product.
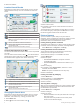
Table of Contents Getting Started............................................................... 1 dēzl OTR700 / LGV700 Device Overview .................................. 1 Mounting and Powering the dēzl Device in Your Vehicle ........... 1 Turning the Device On or Off ...................................................... 1 Acquiring GPS Signals ............................................................... 1 Status Bar Icons .........................................................................
Setting Up Garmin eLog Features On Your dēzl Device ..... 15 Viewing Garmin eLog Information on Your dēzl Device ...... 15 Viewing Garmin eLog Diagnostic and Malfunction Events .. 15 IFTA .......................................................................................... 15 Entering Fuel Data ............................................................... 15 Editing Fuel Data ................................................................. 15 Viewing and Exporting a Jurisdiction Summary ............
Getting Started WARNING See the Important Safety and Product Information guide in the product box for product warnings and other important information. • Update the maps and software on your device (Map and Software Updates, page 20). • Mount the device in your vehicle and connect it to power (Mounting and Powering the dēzl Device in Your Vehicle, page 1). • Acquire GPS signals (Acquiring GPS Signals, page 1).
Current time. Select to set the time (Setting the Time, page 19). Battery charge level. Garmin Drive™ app connection status(Pairing with Your Smartphone, page 11). Temperature. Select to view the weather forecast (Viewing the Weather Forecast, page 16). Using the On-Screen Buttons On-screen buttons allow you to navigate the pages, menus, and menu options on your device. • Select to return to the previous menu screen. • Hold to quickly return to the main menu. • Select or to scroll through lists or menus.
familiar area. The device plays an audible tone or message and displays information for each alert. You can enable or disable the audible tone for some types of driver alerts. Not all alerts are available in all areas. Schools: The device plays a tone and displays the speed limit (if available) for an upcoming school or school zone. Speed limit exceeded: The device plays a tone and displays a red border on the speed limit icon when you exceed the posted speed limit for the current road.
5 Select the address. Location Search Results By default, the location search results appear in a list, with the nearest location at the top. You can scroll down to view more results. 3 Select a search area. 4 If necessary, follow the on-screen instructions to select a specific location. The selected search area appears next to . When you search for a location using any of the options in the Where To? menu, the device suggests locations near this area first. Select a location to view the option menu.
• Select a subcategory, if necessary, and select a destination. Foursquare Foursquare is a location-based social network. Your device includes pre-loaded Foursquare points of interest, which are indicated by the Foursquare logo in your location search results. You can connect to your Foursquare account using the Garmin Drive app on your compatible smartphone. This allows you to view Foursquare location details, check in to a location, and search for points of interest in the online Foursquare database.
1 2 3 4 Select Where To?. Search for a location. From the location search results, select a location. Select . A list of parking areas near the selected location appears. 5 Select Filter Parking, and select one or more categories to filter parking by availability, type, price, or payment methods (optional). NOTE: Detailed parking data is not available in all areas or for all parking locations. 6 Select a parking location. 7 Select Go!.
• You can start navigating to your destination quickly using the recommended route, or you can select an alternate route (Starting a Route, page 7). • If there are specific roads you need to use or avoid, you can customize the route (Shaping Your Route, page 8). • You can add multiple destinations to a route (Adding a Location to Your Route, page 8). Starting a Route 1 Select Where To?, and search for a location (Finding and Saving Locations, page 3). 2 Select a location.
Arriving at Your Destination When you approach your destination, the device provides information to help you complete your route. • indicates the location of your destination on the map, and a voice prompt announces you are approaching your destination. • When you approach some destinations, the device automatically suggests parking areas. You can select More to view a full list of suggested parking areas (Parking Near Your Destination, page 8).
Stopping the Route From the map, select > Stop. Using Suggested Routes Before you can use this feature, you must save at least one location and enable the travel history feature (Device and Privacy Settings, page 19). Using the myTrends™ feature, your device predicts your destination based on your travel history, the day of the week, and the time of day.
3 Select an option: • • • • Drag the map to pan left, right, up, or down. To zoom in or out, select or . To switch between North Up and 3-D views, select . To filter the displayed points of interest by category, select . • To start a route, select a location on the map, and select Go! (Starting a Route by Using the Map, page 7). Map Tools Map tools provide quick access to information and device functions while you view the map. When you activate a map tool, it appears in a panel at the edge of the map.
• Select a data field in the trip data tool , and select the information to show in the field. • Select the customizable map data field , and select the information to show in the field. Viewing the Trip Information Page The trip information page displays your speed and provides statistics about your trip. From the map, select Speed. Resetting Trip Information 1 From the map, select Speed. 2 Select > Reset Field(s).
Disabling Bluetooth Features (iPhone ) ® By default, all compatible Bluetooth features are enabled when you pair your phone. You can disable specific Bluetooth features and remain connected to the other features. 1 Select Settings > Wireless Networks. 2 Select an option: • To disable hands-free calling, select the phone name, and clear the Phone calls check box. TIP: appears colored next to the phone name used for hands-free calling.
• To search for a business name, enter all or part of the name. • To search for a city, enter the city and state. As you type, suggestions appear below the search field. 3 Select a suggested search result. The app displays the location on a map. 4 Select Go! to start a route. The dēzl device starts navigating to the selected location, and the location is added to your recent searches in the Where To? menu.
Receiving Traffic Data Using a Traffic Receiver NOTICE Heated (metallized) windshields could degrade the performance of the traffic receiver. A traffic receiver receives traffic data from an over-the-air broadcast signal, where available. To receive over-the-air traffic data, the device must be connected to vehicle power using a traffic-compatible power cable. A traffic receiver is included with some product models (Traffic, page 13). . Traffic data is not available in all areas.
Garmin eLog adapter is paired with your compatible mobile device, you can view hours of service information on your dēzl device. The Garmin eLog adapter is not available in all areas. For more information, or to purchase a Garmin eLog adapter, go to garmin.com/elog. NOTE: Garmin eLog features are not available when using the car vehicle profile. Entering Fuel Data 1 Select Apps > IFTA > At the Pump. 2 Enter the fuel price per gallon. 3 Select the Fuel Used field. 4 Enter the amount of fuel purchased.
3 Open the IFTA folder. 4 Open the .csv file. Logging Service History You can log the date and odometer reading when service or maintenance is performed on your vehicle. The device provides several service categories, and you can add custom categories (Adding Service Categories, page 16). 1 Select Apps > Service History. 2 Select a service category. 3 Select Add Record. 4 Enter the odometer reading, and select Next. 5 Enter a comment (optional). 6 Select Done.
Viewing Weather Near a Different City 1 Select Apps > Weather > Current Location. 2 Select an option: • To view weather for a favorite city, select a city in the list. • To add a favorite city, select Add City, and enter a city name. Viewing the Weather Radar Before you can use this feature, your device must be connected to a supported phone running the Garmin Drive app (Live Services, Traffic, and Smartphone Features, page 11). 1 Select Apps > Weather Radar. 2 Select to animate the radar map.
photoLive Traffic Cameras myMaps: Sets which installed maps the device uses. Before you can use this feature, your device must be connected to the Garmin Drive app (Live Services, Traffic, and Smartphone Features, page 11). photoLive traffic cameras provide live images of traffic conditions on major roadways and intersections. The photoLive service is not available in all areas. Enabling Maps Viewing and Saving photoLive Traffic Cameras You can view live images from nearby traffic cameras.
Driver Assistance Settings Select Settings > Driver Assistance. Driver Alerts: Allows you to enable or disable alerts for upcoming zones or road conditions (Driver Awareness Features and Alerts, page 2). Speeding Alert: Alerts you when you are exceeding the speed limit. Route Preview: Shows a preview of the major roads in your route when you start navigation. Break Planning: Reminds you to take a break and shows upcoming services after you drive for an extended time.
Device Information Viewing E-label Regulatory and Compliance Information 1 From the settings menu, swipe to the bottom of the menu. 2 Select Device > Regulatory. Specifications Operating temperature From -20° to 55°C (from -4° to 131°F) range Charging temperature From 0° to 45°C (from 32° to 113°F) range Radio frequency/ protocol 2.4 GHz @ 13 dBm Power input Vehicle power using the included vehicle power cable. AC power using an optional accessory (for home and office use only).
Never use a hard or sharp object to operate the touchscreen, or damage may result. Cleaning the Outer Casing NOTICE Avoid chemical cleaners and solvents that can damage plastic components. 1 Clean the outer casing of the device (not the touchscreen) using a cloth dampened with a mild detergent solution. 2 Wipe the device dry. 4 When your dēzl device prompts you to enter file transfer Cleaning the Touchscreen 1 Use a soft, clean, lint-free cloth. 2 If necessary, lightly dampen the cloth with water.
Appendix 3 Insert a new fast-blow fuse that has the same current, such as 1 A or 2 A. 4 Place the silver tip in the end piece. 5 Push in the end piece and rotate it clockwise to lock it back into the vehicle power cable . Troubleshooting The suction cup will not stay on my windshield 1 Clean the suction cup and windshield with rubbing alcohol. 2 Dry with a clean, dry cloth. 3 Mount the suction cup (Mounting and Powering the dēzl Device in Your Vehicle, page 1).
• For Apple computers, select the device, and select File > Eject. 2 Disconnect the cable from your computer. ® Viewing GPS Signal Status Hold for three seconds. Purchasing Additional Maps 1 Go to your device product page at garmin.com. 2 Click the Maps tab. 3 Follow the on-screen instructions. Purchasing Accessories Go to garmin.com/accessories.
Index Symbols 2-D map view 11 3-D map view 11 A accessories 23 active lane guidance 7 addresses, finding 3, 12 alerts 2 audio 19 proximity points 19 answering calls 13 audio, proximity points 19 avoidances 9 area 9 deleting 9 disabling 9 road 9 road features 9 tolls 9 B backup camera 19 battery charging 1, 20, 22 maximizing 22 problems 22 Bluetooth technology 11–13, 15, 22 pairing a phone 11 settings 18 Bluetooth Technology, disabling calls 11, 12 break planning 14 breakdown directory 4 brightness 2, 16
saving, current location 6 screen, brightness 2 screenshots 19 search bar 3 service history categories 16 deleting 16 editing 16 records 16 settings 18, 19 shaping a route 8 simulated locations 18 sleep mode 1 smartphone features 11, 12 connecting 11 disabling calls 11, 12 software updating 20 version 19, 21 speaking commands 16 specifications 20 speech recognition 16 speed cameras 3 suction cup 21 T theft, avoiding 21 time settings 19 timer 14 tolls, avoiding 9 tools, maps 10 traffic 11, 13, 14, 19 adding
support.garmin.