™ GARMIN DASH CAM TANDEM Owner’s Manual
© 2019 Garmin Ltd. or its subsidiaries All rights reserved. Under the copyright laws, this manual may not be copied, in whole or in part, without the written consent of Garmin. Garmin reserves the right to change or improve its products and to make changes in the content of this manual without obligation to notify any person or organization of such changes or improvements. Go to www.garmin.com for current updates and supplemental information concerning the use of this product.
Table of Contents Specifications........................................ 16 Getting Started................................. 1 Appendix........................................ 17 Mounting Considerations....................... 1 Connecting the Device to Vehicle Power....................................................... 4 Pairing with Your Smartphone............... 5 Device Overview...................................... 6 Dash Cam Recording........................ 8 Turning Audio Recording On or Off.....
Getting Started WARNING See the Important Safety and Product Information guide in the product box for product warnings and other important information. 1 If you are using a third-party memory card, install and format the memory card (Installing a Memory Card, page 15). 2 Choose a mounting location on your windshield, and mount the camera (Mounting Considerations, page 1). 3 Connect the camera to a power outlet in your vehicle (Connecting the Device to Vehicle Power, page 4).
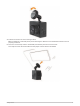
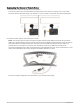
Installing the Camera on Your Windshield NOTICE The adhesive mount is intended for a long-term installation and can be difficult to remove. You should carefully consider the mounting location before you install the mount. Before you can install the adhesive mount onto your windshield, you should review the windshield mounting considerations (Mounting Considerations, page 1).
4 Position the mount over the mounting location. TIP: The adhesive is extremely sticky. Avoid touching the adhesive to the windshield until the mount is properly positioned. 5 Press the mount firmly onto the windshield, and maintain pressure for 30 seconds. This helps to ensure the mount adhesive has proper contact with the windshield.
Connecting the Device to Vehicle Power 1 Plug the power cable into the USB port on the camera. You can use either of the included cables to provide power to the camera. The longer 4 m (13 ft.) cable connects with the cable pointing up. The shorter 1.5 m (5 ft.) cable connects with the cable pointing down. 2 Route the power cable to your vehicle power outlet. NOTE: You should power the camera using the included vehicle power adapter and avoid using a vehicle USB port.
3 Plug the Garmin Dash Cam Tandem power cable into the included vehicle power adapter. 4 Plug the vehicle power adapter into the power outlet in your vehicle. 5 If necessary, turn on the vehicle ignition switch to provide power to the power outlet in your vehicle. The camera turns on and starts recording. Turning Off the Device Manually The camera does not have a power button. It turns on automatically when it receives power, and it turns off when it stops receiving power.
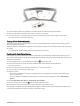
Device Overview Press to enable or disable audio recording. Hold to format the memory card (Formatting the Memory Card, page 15). Press to save a picture and a video clip. Hold to enter pairing mode (Pairing with Your Smartphone, page 5).
Status LEDs The microphone LED and the status LED show the device status. Microphone LED Activity Status Red The device is recording audio. Off The device is not recording audio. Flashing green, alternating with status LED An update is being installed. Status LED Activity Status Green The device is connected to a computer in mass storage mode. The memory card is being formatted. Flashing green The device is preparing to record.
Dash Cam Recording NOTICE Some jurisdictions regulate or prohibit use of this device. It is your responsibility to know and comply with applicable laws and rights to privacy in jurisdictions where you plan to use this device. The dash cam records video to the camera memory card (Installing a Memory Card, page 15). By default, the device immediately starts recording video when it turns on, and it continues recording until it is turned off.
Viewing and Exporting Video and Photos Viewing the Live Camera Feed You can view the live camera feed from both camera lenses using the Garmin Drive app. 1 From the Garmin Drive app on your smartphone, select Live View. The app scans for available cameras. 2 Select your camera from the list of available devices. The live view appears. By default, the app shows the front lens or the lens you most recently viewed. 3 Select View Interior or View Front to switch between the camera views.
Editing and Exporting a Video You can trim the length of your video to remove unnecessary footage before exporting it to your phone storage. 1 While viewing a video, drag the trimming handles on the video progress bar left or right to trim the video length. 2 Select the Include Audio check box to include the recorded audio (optional). 3 For a dual lens or multi-camera video, select a picture-in-picture (PIP) video source, and select the corner where the PIP video should appear (optional). 4 Select Export.
Videos and Photos on Your Computer NOTE: Some media players might not support high-resolution playback. Videos and photos are stored in the DCIM directory on the camera memory card. Videos are stored in MP4 file format, and photos are stored in JPG format. You can view and transfer photos and videos by connecting the memory card or the device to your computer (Connecting the Camera to Your Computer, page 10). The videos and photos are sorted into several folders.
Multiple Camera Network You can install multiple dash cameras in the same vehicle, such as front and rear cameras, and create composite picture-in-picture videos from the simultaneous recordings. You can pair multiple dash cameras with the Garmin Drive app. If a GPS-connected camera is part of the network, you can add location information to saved videos for all cameras on the network.
Camera Settings in the Garmin Drive App From the Garmin Drive app, select , and select the camera name. Camera Setup: Enables you to choose a camera name, and displays a live video feed so you can adjust the position of the camera. Front: Allows you to adjust the video quality and exposure level for the front lens, which records the exterior view. Interior: Allows you to adjust the exposure level for the interior lens. NOTE: The interior lens always records at a video quality of 720p, 30fps.
Renaming a Camera You can change the name of your camera to help differentiate it from other cameras in a multiple camera network. 1 Select . 2 Select a camera. 3 Select Camera Setup. 4 Select a camera name from the Camera Name field. TIP: You can select Custom to enter a custom camera name. Device Information Memory Card Specifications The camera requires a memory card with these specifications. Go to garmin.com/dashcamcards to view a list of recommended memory cards.
Installing a Memory Card To record video, you must install a compatible memory card (Memory Card Specifications, page 14). 1 Insert the memory card into the slot . 2 Press it in until it clicks. Formatting the Memory Card The device requires a memory card formatted using the FAT32 file system. You can use the device to format your card using this file system. You should format your memory card at least one time every 6 months to help extend the useful life of the memory card.
Removing the Camera Mount from the Windshield The adhesive mount is intended for a long-term installation and can be difficult to remove. 1 Firmly grip the mount. 2 Pull the mount up and away from the windshield, applying steady pressure until the adhesive releases from the windshield or mount. 3 Remove all remaining adhesive from the windshield and mount. 4 Clean the windshield and mount. You can replace the adhesive on the mount (Replacing the Adhesive on the Mount, page 16).
Appendix Parked Video Recording NOTICE Due to privacy regulations, this feature is not available in all areas. It is your responsibility to know and comply with applicable laws and rights to privacy in your jurisdiction. Before you can record videos while parked, you must connect your camera to the Dash Cam parking mode cable accessory (Connecting the Parking Mode Cable Accessory to Power, page 17).
My memory card has degraded and needs to be replaced All microSD memory cards wear out after they are overwritten a large number of times. Periodically formatting the card can extend the useful life and improve performance. Because the dash camera records continuously, you may need to replace the memory card periodically (Installing a Memory Card, page 15). Your device detects memory card errors automatically and alerts you when it is time to format or replace your memory card.
Index B Bluetooth technology, pairing a phone 5 C camera, renaming 14 cameras, dash cam 15 cleaning, device 15, 18 computer, connecting 10 D dash cam 18 memory card 15 recording audio 8 recording video 8 device overview 6 E event detection 8 G Garmin Express 16 updating software 16 L language 11 LED 7 M memory card 14, 15, 18 installing 15 microSD card 14, 15, 18 mount 16 removing, removing mount 16 mounting, windshield 2 multiple cameras 12 O operating temperature 17 P pairing, phone 5 par
support.garmin.