
Owner's Manual
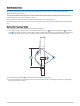
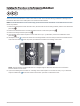
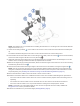
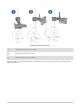
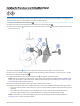

Table Of Contents
- Important Safety Information
- Tools Needed
- Mounting Considerations
- Installing the Transducer on the Perspective Mode Mount
- Installing the Transducer on a Trolling Motor Barrel
- Installing the Transducer on the Trolling Motor Shaft
- Installing the Transducer on a Pole
- Installing the Transducer Using Low Profile Mounting Hardware
- Mounting the GLS 10 Black Box Device
- Transducer Settings and Operation
- Specifications

Parts Bags
The installation hardware for the transducer is included in labeled bags. As you complete the installation
process, each procedure begins with a reference to the label on the parts bag needed to complete the
procedure. You can use this table to review or verify the parts bags needed for the installation procedures.
NOTE: You should leave all parts in the labeled bags until you are instructed to open a bag in the instructions.
Not all hardware is used for all installation types.
Contains parts needed when installing the perspective mount
Contains parts needed when installing the perspective or shaft mount
Contains parts needed when installing the perspective, shaft, or barrel mount
Contains parts needed when installing the barrel mount
Contains parts needed when installing the shaft mount
Contains the optional low-profile mounting screws
Mounting Considerations
Using the hardware supplied, you can mount the transducer on your trolling motor in one of three ways.
• Perspective Mount (Installing the Transducer on the Perspective Mode Mount, page 4)
◦ You can mount the transducer on the trolling motor shaft using the perspective view mount and bracket.
◦ When using the perspective view bracket, the transducer can be used for perspective, downward, and
forward views.
• Barrel Mount (Installing the Transducer on a Trolling Motor Barrel, page 8)
◦ You can mount the transducer on either side of the trolling motor barrel.
◦ When mounted on the barrel, the transducer can be used for downward and forward views.
• Shaft Mount (Installing the Transducer on the Trolling Motor Shaft, page 10)
◦ You can mount the transducer on either side of the trolling motor shaft.
◦ When mounted on the shaft, the transducer can be used for downward and forward views.
◦ You cannot use perspective view when mounting the transducer directly to the trolling motor shaft, but it
allows for a lower-profile installation.
When planning the installation, you should observe these considerations.
• You must angle the transducer correctly for the selected view to work properly.
• Installing the transducer with the included knobs allows for tool-free transitions between sonar views.
• You can use the included low-profile hardware instead of the knobs for a more permanent transducer view
position.
• You should mount the transducer in a location where it will not be jarred when launching, hauling, or storing.
• You must install the sonar module in a location with adequate ventilation where it will not be exposed to
extreme temperatures.
• You should mount the sonar module in a location where the LEDs are visible, where the cables can be
connected, and where the device will not be submerged.
2