
Owner's Manual

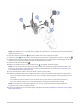
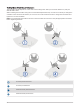
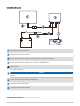
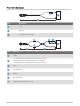
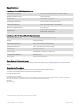
Table Of Contents
- Important Safety Information
- Tools Needed
- Mounting Considerations
- Installing the Transducer on the Perspective Mode Mount
- Installing the Transducer on a Trolling Motor Barrel
- Installing the Transducer on the Trolling Motor Shaft
- Installing the Transducer on a Pole
- Installing the Transducer Using Low Profile Mounting Hardware
- Mounting the GLS 10 Black Box Device
- Transducer Settings and Operation
- Specifications

Installing the Transducer on a Pole
You can use the included hardware to install the transducer on a pole (not included). Installing the transducer on
a pole is similar to installing the transducer on a trolling motor shaft. If needed, you can refer to the diagram
provided for installing the transducer on a trolling motor shaft when installing the transducer on a pole
(Installing the Transducer on the Trolling Motor Shaft, page 10).
NOTE: The included shaft bracket features an 8-degree angle to reduce the effects of the trolling motor barrel
interference with the transducer beam. When installing the transducer on a pole, you can purchase a flat bracket
with no angle if you prefer. See your Garmin dealer or go to buy.garmin.com for details.
Labels identifying the parts bags required for this procedure:
NOTICE
You must secure the transducer cable to the pole or other secure location during installation. Damage to the
transducer cable wire or the cable jacket can cause transducer failure.
1 Remove the back of the shaft-mount bracket and four screws from parts bag .
2 Remove the front half of the shaft mount bracket from parts bag .
3 If the pole is equal to or less than 25 mm (1 in.) in diameter, remove the rubber liner from parts bag .
4 If the pole is equal to or less than 25 mm (1 in.) in diameter, wrap the rubber liner around the pole in the
location you want to install the mount.
5 Place the shaft-mount bracket around the rubber liner on the pole.
6 Insert the screws into the shaft mount bracket, and secure them using the M5 hex wrench in parts bag .
7 Remove the knob and neoprene washer from parts bag .
8 Place the transducer against the shaft-mount bracket, and secure it using the neoprene washer and knob.
NOTE: You can secure the transducer to the mount using the included low-profile hardware instead of the
knob if you do not plan to switch transducer modes frequently during use (Installing the Transducer Using
Low Profile Mounting Hardware, page 14).
9 Secure the transducer cable to the pole or other secure location, and route the cable to the location of the
sonar module.
13