
Owner's Manual


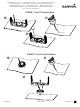
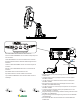


Table Of Contents
- Owner’s Manual
- Table of Contents
- Introduction
- Customizing the Chartplotter
- ActiveCaptain® App
- Sonar Fishfinder
- Traditional Sonar View
- Garmin ClearVü Sonar View
- SideVü Sonar View
- Split-Screen Frequency
- Flasher
- Split-Zoom View
- Selecting the Transducer Type
- Sonar Frequencies
- Creating a Waypoint on the Sonar Screen Using the Device Keys
- Pausing the Sonar
- Adjusting the Zoom
- Sonar Gain
- Adjusting the Range of the Depth Scale
- Sonar Setup
- Garmin Quickdraw Contours Mapping
- Navigation with the STRIKER Vivid
- Searching for a Destination by Name
- Creating a Waypoint on the Map
- Navigating to a Waypoint
- Creating and Navigating a Route Using the Map
- Stopping Navigation
- Waypoints
- Routes
- Tracks
- Showing Tracks
- Clearing the Active Track
- Saving the Active Track
- Viewing a List of Saved Tracks
- Editing a Saved Track
- Saving a Track as a Route
- Browsing for and Navigating a Recorded Track
- Deleting a Saved Track
- Deleting All Saved Tracks
- Retracing the Active Track
- Setting the Color of the Active Track
- Managing the Track Log Memory During Recording
- Configuring the Recording Interval of the Track Log
- Device Configuration
- Sharing and Managing User Data
- Appendix
- Index
- Quick Start Manual
- STRIKER™ Vivid 5/7/9 Fixed Bail Mount
- Important Safety & Product Information

Creating
and
Navigating
a
Route
Using
the
Map
The
starting
point
can
be
your
present
location
or
another
location
on
the
map.
1
Select
User
Data
>
Routes
>
New
>
Route
Using
Chart.
2
Pan
the
map
to
select
the
starting
location
of
the
route.
3
Select
✓
to
add
a
turn
to
the
route.
4
Repeat
to
add
all
of
the
turns
in
the
route.
5
Select
= >
Navigate
To.
6
Select
an
option.
Marking
and
Navigating
to
a
Man
Overboard
Location
From
any
screen,
select
£ >
Man
Overboard>
Yes.
The
fishfinder
sets
a
direct
course
back
to
the
location.
Mapping
a
Body
of
Water
Using
the
Garmin
Quickdraw™
Contours
Feature
Before
you
can
use
the
Garmin
Quickdraw
Contours
feature,
you
must
have
sonar
depth
and
your
GPS
position.
1
Select
Quickdraw
Map
> = >
Quickdraw
Contours
>
Start
Recording.
2
When
recording
is
complete,
select
= >
Quickdraw
Contours
>
Stop
Recording.
Troubleshooting
My
device
does
not
turn
on
•
Push
the
power
cable
all
the
way
into
the
back
of
the
device.
Even
if
the
cable
seems
to
be
connected,
you
should
push
firmly
so
that
it
is
fully
seated.
•
Make
sure
the
power
source
is
generating
power.
You
can
check
this
several
ways.
For
example,
you
can
check
whether
other
devices
powered
by
the
source
are
functioning.
Quick
Start
Manual
•
Check
the
fuse
in
the
power
cable.
The
fuse
should
be
located
in
a
holder
that
is
part
of
the
red
wi
re
of
the
power
cable.
Check
that
the
proper
size
fuse
is
installed.
Refer
to
the
label
on
the
cable
or
the
installation
instructions
for
the
exact
fuse
size
needed.
Check
the
fuse
to
make
sure
there
is
still
a
connection
inside
of
the
fuse
.
You
can
test
the
fuse
using
a
multimeter.
If
the
fuse
is
good
,
the
multimeter
reads
O
ohm.
•
Check
to
make
sure
the
device
is
receiving
at
least
10
Vdc,
but
12
Vdc
is
recommended.
To
check
the
voltage,
measure
the
female
power
and
ground
sockets
of
the
power
cable
for
DC
voltage.
If
the
vo
l
tage
is
less
than
10
Vdc
,
the
device
will
not
turn
on.
My
sonar
does
not
work
•
Push
the
transducer
cable
all
the
way
into
the
back
of
the
device.
Even
if
the
cable
seems
to
be
connected
,
you
should
push
firmly
so
that
it
is
fully
seated.
•
Press
<!>
,
and
ensure
sonar
is
enabled.
•
Select
the
correct
transducer
type
(page
4).
5