
Owner's Manual


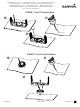
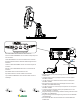


Table Of Contents
- Owner’s Manual
- Table of Contents
- Introduction
- Customizing the Chartplotter
- ActiveCaptain® App
- Sonar Fishfinder
- Traditional Sonar View
- Garmin ClearVü Sonar View
- SideVü Sonar View
- Split-Screen Frequency
- Flasher
- Split-Zoom View
- Selecting the Transducer Type
- Sonar Frequencies
- Creating a Waypoint on the Sonar Screen Using the Device Keys
- Pausing the Sonar
- Adjusting the Zoom
- Sonar Gain
- Adjusting the Range of the Depth Scale
- Sonar Setup
- Garmin Quickdraw Contours Mapping
- Navigation with the STRIKER Vivid
- Searching for a Destination by Name
- Creating a Waypoint on the Map
- Navigating to a Waypoint
- Creating and Navigating a Route Using the Map
- Stopping Navigation
- Waypoints
- Routes
- Tracks
- Showing Tracks
- Clearing the Active Track
- Saving the Active Track
- Viewing a List of Saved Tracks
- Editing a Saved Track
- Saving a Track as a Route
- Browsing for and Navigating a Recorded Track
- Deleting a Saved Track
- Deleting All Saved Tracks
- Retracing the Active Track
- Setting the Color of the Active Track
- Managing the Track Log Memory During Recording
- Configuring the Recording Interval of the Track Log
- Device Configuration
- Sharing and Managing User Data
- Appendix
- Index
- Quick Start Manual
- STRIKER™ Vivid 5/7/9 Fixed Bail Mount
- Important Safety & Product Information

(D
Depth
information
®
Suspended
targets
or
fish
@
Bottom
of
the
body
of
water
Selecting
the
Transducer
Type
If
you
are
connecting
a
transducer
that
was
not
included
with
the
device
,
you
may
need
to
set
the
transducer
type
to
make
the
sonar
function
properly.
Before
connecting
the
transducer
,
you
should
select
the
transducer
type.
The
transducer
name
should
be
listed
on
the
label
on
the
transducer
cable,
near
the
connector.
This
device
is
compatible
with
a
range
of
accessory
transducers,
i
ncluding
Garmin
ClearVu
™
transducers,
which
are
available
at
www
.
garmin
.
com
/transducers.
1
Select
Settings
>
My
Vessel
>
Transducer
Type
.
2
Select
an
option
:
•
If
you
have
a
200/77
kHz,
dual-beam
transducer
,
select
Dual
Beam
(200/77
kHz)
.
•
If
you
have
a
200/50
kHz,
dual-frequency
transducer
,
select
Dual
Frequency
(200/50
kHz).
•
If
you
have
another
type
of
transducer,
select
it
from
the
l
ist.
Sonar
Frequencies
NOTE:
The
frequencies
that
are
available
depend
on
the
transducer
being
used.
4
Adjusting
the
frequency
he
l
ps
adapt
the
sonar
for
your
particu
l
ar
goa
ls
and
the
present
depth
of
the
water.
Selecting
the
Transducer
Frequency
NOTE:
You
cannot
adjust
the
frequency
for
a
ll
sonar
views
and
transducers
.
You
can
select
wh
i
ch
frequencies
appear
on
the
sonar
screen
.
NOTICE
Always
be
aware
of
local
regulations
on
sonar
frequencies
.
Fo
r
example
,
to
protect
orca
whale
pods
,
you
might
be
prohibited
from
using
frequencies
between
50
to
80
khz
with
in½
mile
of
an
orca
whale
pod
.
It
is
your
responsibil
i
ty
to
use
the
device
in
compliance
with
all
applicable
laws
and
ordinances.
1
From
a
sonar
view
,
select
= >
Frequency
.
2
Select
a
frequency
su
i
ted
to
your
needs
and
water
depth.
Creating
a
Waypoint
on
the
Sonar
Screen
Using
the
Device
Keys
1
From
a
sonar
view
,
use
the
arrow
keys
to
select
a
locat
i
on
to
save.
2
Select
✓
.
3
If
necessary,
ed
it
the
waypoint
information.
Navigation
Marking
Your
Present
Location
as
a
Waypoint
From
any
screen
,
select
£ .
Navigating
to
a
Waypoint
1
From
the
Quickdraw
Map,
use
the
arrow
keys
to
select
the
waypoint.
The
waypoint
name
appears
on
the
screen.
2
Select
✓
.
3
Select
Navigate
To>
Go
To.
-
Quick
Start
Manual