
Owner's Manual


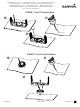
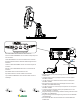


Table Of Contents
- Owner’s Manual
- Table of Contents
- Introduction
- Customizing the Chartplotter
- ActiveCaptain® App
- Sonar Fishfinder
- Traditional Sonar View
- Garmin ClearVü Sonar View
- SideVü Sonar View
- Split-Screen Frequency
- Flasher
- Split-Zoom View
- Selecting the Transducer Type
- Sonar Frequencies
- Creating a Waypoint on the Sonar Screen Using the Device Keys
- Pausing the Sonar
- Adjusting the Zoom
- Sonar Gain
- Adjusting the Range of the Depth Scale
- Sonar Setup
- Garmin Quickdraw Contours Mapping
- Navigation with the STRIKER Vivid
- Searching for a Destination by Name
- Creating a Waypoint on the Map
- Navigating to a Waypoint
- Creating and Navigating a Route Using the Map
- Stopping Navigation
- Waypoints
- Routes
- Tracks
- Showing Tracks
- Clearing the Active Track
- Saving the Active Track
- Viewing a List of Saved Tracks
- Editing a Saved Track
- Saving a Track as a Route
- Browsing for and Navigating a Recorded Track
- Deleting a Saved Track
- Deleting All Saved Tracks
- Retracing the Active Track
- Setting the Color of the Active Track
- Managing the Track Log Memory During Recording
- Configuring the Recording Interval of the Track Log
- Device Configuration
- Sharing and Managing User Data
- Appendix
- Index
- Quick Start Manual
- STRIKER™ Vivid 5/7/9 Fixed Bail Mount
- Important Safety & Product Information

6
From
your
mobile
device
settings,
open
the
Wi-Fi
9
connections
page
and
connect
to
the
Garmin
'
device,
using
the
name
and
password
you
entered
in
the
Garmin
device.
For
more
information
about
the
ActiveCaptain
app
and
features,
see
the
Owner's
Manual
at
www.garmin.com/manuals
or
watch
a
video
at
www.garmin.com
/
ActiveCaptain
Video.
Acquiring
GPS
Satellite
Signals
The
device
may
need
a
clear
view
of
the
sky
to
acquire
satellite
signals.
The
time
and
date
are
set
automatically
based
on
the
GPS
position.
1
Turn
on
the
device.
2
Wait
while
the
device
locates
satellites.
It
may
take
30
to
60
seconds
to
acquire
satellite
signals.
When
the
device
acquires
satellite
signals,
.aill
appears
at
the
top
of
the
Home
screen.
If
the
device
loses
satellite
signals,
oiilll
disappears
and
a
flashing
question
mark
appears
over
8
on
the
chart.
For
more
information
about
GPS,
go
to
www.garmin.com/aboutgps.
Adjusting
the
Backlight
1
Select
Settings
>
System
>
Display
>
Backlight.
2
Adjust
the
backlight.
TIP:
From
any
screen,
press
6
repeatedly
to
scroll
through
the
brightness
levels.
This
can
be
helpful
when
the
brightness
is
so
low
you
cannot
see
the
screen.
Adjusting
the
Color
Mode
1
Select
Settings
>
System
>
Display>
Color
Mode.
TIP:
Select
6 >
Color
Mode
from
any
screen
to
access
the
color
settings.
2
Select
an
option.
-------
-
Quick
Start
Manual
Customizing
the
Home
Screen
You
can
add
items
to
and
rearrange
items
on
the
Home
screen.
1
From
the
Home
screen,
select
Customize.
2
Select
an
option:
•
To
rearrange
an
item,
select
Rearrange,
select
the
item
to
move,
and
select
the
new
location.
•
To
add
an
item
to
the
Home
screen,
select
Add,
and
select
the
new
item.
•
To
remove
an
item
you
have
added
to
the
Home
screen,
select
Remove,
and
select
the
item.
Sonar
Fishfinder
For
more
information
about
which
transducer
is
best
for
your
needs,
go
to
www.garmin.com/transducers.
Different
sonar
views
can
help
you
view
the
fish
in
the
area.
The
sonar
views
available
vary
depending
on
the
type
of
transducer
and
sounder
module
connected
to
the
chartplotter.
For
example,
you
can
view
certain
Panoptix™
sonar
screens
only
if
you
have
a
compatible
Panoptix
transducer
connected.
There
are
four
basic
styles
of
sonar
views
available:
a
full-screen
view,
a
split-
screen
view
that
combines
two
or
more
views,
a
split-zoom
view,
and
a
split-
frequency
view
that
displays
two
different
frequencies.
You
can
customize
the
settings
for
each
view
in
the
screen.
For
example,
if
you
are
viewing
the
split-
frequency
view,
you
can
separately
adjust
the
gain
for
each
frequency.
Traditional
Sonar
View
There
are
several
full-screen
views
available,
depending
on
the
transducer
that
is
connected.
The
full-screen
Traditional
sonar
view
shows
a
large
image
of
the
sonar
readings
from
a
transducer.
The
range
scale
along
the
right
side
of
the
screen
shows
the
depth
of
detected
objects
as
the
screen
scrolls
from
the
right
to
the
left.
3