STRIKER VIVID ™ Owner’s Manual
© 2020 Garmin Ltd. or its subsidiaries All rights reserved. Under the copyright laws, this manual may not be copied, in whole or in part, without the written consent of Garmin. Garmin reserves the right to change or improve its products and to make changes in the content of this manual without obligation to notify any person or organization of such changes or improvements. Go to www.garmin.com for current updates and supplemental information concerning the use of this product.
Table of Contents Introduction.....................................................................1 Device Keys ................................................................................ 1 Home Screen .............................................................................. 1 Zooming on the STRIKER Vivid 4 .............................................. 1 Panning on the STRIKER Vivid 4 ............................................... 1 GPS Satellite Signal Acquisition .............................
Introduction WARNING See the Important Safety and Product Information guide in the product box for product warnings and other important information. Device Keys Item Icon Description Returns to the previous screen. Returns to the home screen when held. Scrolls, highlights options, and moves the cursor. Zooms in and out of a view. Closes a menu, when applicable. Opens a menu of options for the page, when applicable. Turns on and off the device when held.
Combination Pages • To resize the information areas shown on the screen, select Resize Combination. • To customize the data shown on the screen, select Overlay Numbers (Overlay Number Settings, page 7). Some pages combine two or more functions on one page. The number of options available for combination pages depends on the optional devices you have connected to your STRIKER Vivid device. You can edit the combination pages and create new combination pages.
2 From the ActiveCaptain page, select Wi-Fi Network > Wi-Fi 3 4 5 6 > On. Enter a name and password for this network. From the application store on your mobile device, install and open the ActiveCaptain app. Bring the mobile device within 24 m (80 ft.) of the STRIKER Vivid device. From your mobile device settings, open the Wi‑Fi connections page and connect to the Garmin device, using the name and password you entered in the Garmin device.
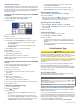
Depth at your present location Depth scale SideVü Sonar View SideVü scanning sonar technology shows you a picture of what lies to the sides of the boat. You can use this as a search tool to find structures and fish. Split-Zoom View On the split-zoom page, you can see a full-view graph of sonar readings on the right side of the screen, and a magnified portion of that graph on the left side of the screen. From a sonar screen, select > Zoom > Split Zoom.
definition and thermocline definition can be better when using a higher frequency. Lower frequencies use wider beam widths, which can let the fisherman see more targets, but could also generate more surface noise and reduce bottom signal continuity during rough sea conditions. Wider beam widths generate larger arches for fish target returns, making them ideal for locating fish. Wider beam widths also perform better in deep water, because the lower frequency has better deep water penetration.
Sonar Setup Showing and Adjusting the Depth Line You can show and adjust a horizontal line on a sonar screen. The depth of the line is indicated on the right side of the screen. NOTE: Showing a depth line on one screen displays the depth line on all of the screens. > Sonar Setup > Depth 1 From a sonar screen, select Line. 2 Select . 3 To adjust the Depth Line, select or . Setting the Scroll Speed You can set the rate at which the sonar image moves across the screen.
Surface noise is caused by interference between the to help transducer and water. You can hide surface noise reduce clutter. Wider beam widths (lower frequencies) can show more targets, but can generate more surface noise. TVG: Reduces surface noise. This control is best used for situations when you want to control and suppress clutter or noise near the water surface. It also allows for the display of targets near the surface that are otherwise hidden or masked by surface noise.
When you share a contour map, only the contour map is shared. Your waypoints are not shared. When you set up your ActiveCaptain app, you may have selected to share your contours with the community automatically. If not, follow these steps to enable sharing. From the ActiveCaptain app on your mobile device, select Sync with Plotter > Contribute to Community. The next time you connect the ActiveCaptain app to the STRIKER Vivid device, your contour maps are transferred to the community automatically.
> Navigate To. 5 Select 6 Select an option. Routes A route is a sequence of waypoints or locations that leads you to your final destination. Stopping Navigation From the Navigation chart or Fishing chart, select Navigation. > Stop Waypoints Waypoints are locations you record and store in the device. Waypoints can mark where you are, where you are going, or where you have been. Marking Your Present Location as a Waypoint From any screen, select .
Browsing for and Navigating Parallel to a Saved Route Before you can browse a list of routes and navigate to one of them, you must create and save at least one route. 1 Select User Data > Routes. 2 Select a route. 3 Select Navigate To. 4 Select Offset to navigate parallel to the route, offset from it by a specific distance. 5 Indicate how to navigate the route: • To navigate the route from the starting point used when the route was created, to the left of the original route, select Forward - Port.
fills the track log faster. The resolution interval is recommended for the most efficient use of memory. 1 Select User Data > Tracks > Active Track Options > Record Interval > Interval. Select an option: 2 • To record the track based on a distance between points, select Distance > Change, and enter the distance. • To record the track based on a time interval, select Time > Change, and enter the time interval.
Setting Alarms CAUTION The Beeper setting must be turned on to make alarms audible (Setting the Beeper, page 2). Failure to set audible alarms could lead to injury or property damage. Navigation Alarms Select Settings > Alarms > Navigation. Arrival: Sets an alarm to sound when you are within a specified distance or time from a turn or a destination. Anchor Drag: Sets an alarm to sound when you exceed a specified drift distance while anchored.
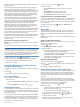
User Data Sharing Cable Wiring Diagram Troubleshooting My device will not turn on or keeps turning off First device User data cable Second device Item Wire Function Wire Color Data Blue Data Brown Ground Black Data Green Data White Clearing Saved Data You can remove saved user data from the device memory. 1 Select User Data > Manage Data > Clear User Data. 2 Select an option. NOTICE If you select All, all the data you have saved will be removed, except Garmin Quickdraw contours data.
Map datum is a math model which depicts a part of the surface of the earth. Latitude and longitude lines on a paper map are referenced to a specific map datum. 1 Find out which map datum and position format was used when the original waypoint was created. If the original waypoint was taken from a map, there should be a legend on the map that lists the map datum and position format used to create that map. Most often this is found near the map key. 2 Select Settings > Units.
Index A navigation alarms 12 navigation inset 7 notifications 3 ActiveCaptain 2 quickdraw 7 smart notifications 3 updating software 3 alarms 12 anchor drag 12 arrival 12 navigation 12 off course 12 sonar 12 anchor drag alarm 12 arrival alarm 12 O B R backlight 2 beeper 2 C charts 7 appearance 8 quickdraw 7 clock 12 alarm 12 color mode 2 combinations 2 customizing 2 courses 8 D data clearing 13 management 12 data fields 7, 8 deleting quickdraw 7 user data 13 depth shading 8 destinations, selecting 8
support.garmin.
GARMIN~ Quick Start Manual
Introduction Item Icon Description ® 6 Turns on and off the device when held. Performs one or more of these actions when quickly pressed: Adjusts the backlight • Adjusts the color mode Enables and disables sonar . See the Important Safety and Product Information guide in the product box for product warnings and other important information. Device Keys - + - .!> fA ( ,...,., 0 ~- '=;- Item CD Icon + ® ~ @ v © I 2 -- E.1 ....... ~"..; ► ✓ a ~ c.
9 6 From your mobile device settings, open the Wi-Fi connections page and Customizing the Home Screen connect to the Garmin' device, using the name and password you entered in the Garmin device. For more information about the ActiveCaptain app and features, see the Owner's Manual at www.garmin.com/manuals or watch a video at www.garmin.com /ActiveCaptain Video. You can add items to and rearrange items on the Home screen. 1 From the Home screen, select Customize.
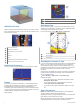
Adjusting the frequency helps adapt the sonar for your particular goals and the present depth of the water. Selecting the Transducer Frequency NOTE: You cannot adjust the frequency for all sonar views and transducers. You can select which frequencies appear on the sonar screen.
Creating and Navigating a Route Using the Map The starting point can be your present location or another location on the map. 1 Select User Data > Routes > New > Route Using Chart. 2 Pan the map to select the starting location of the route. 3 4 5 6 Select ✓ to add a turn to the route. Repeat to add all of the turns in the route. Select = > Navigate To. Select an option. Marking and Navigating to a Man Overboard Location From any screen, select £ > Man Overboard> Yes.
su ort. armin.com © 2020 Garmin Ltd. or its subsidiaries Garmin, the Garmin logo, and Ultrascroll are trademarks of Garmin Ltd. or its subsidiaries, registered in the USA and other countries. ActiveCaptain, Garmin ClearVu"', Garmin Quickdraw"', and STRIKER"' are trademarks of Garmin Ltd. or its subsidiaries. These trademarks may not be used without the express permission of Garmin. Wi-Fi is a registered mark of Wi-Fi Alliance Corporation.
• STRIKER Vivid 5: 30 cm (11.8 in.) • STRIKER Vivid 7: 40 cm (15.75 in.) • STRIKER Vivid 9: 45 cm (17.7 in.) • Compass Safe Distance • Distance de sécurité du compas • Distanza di sicurezza dalla bussola • • Sicherheitsabstand zum Kompass • Consumo eléctrico máximo • Distância segura da bússola • • Sikkerhedsafstand for kompas • Trygg avstand fra et kompass • Säkerhetsavstånd till kompass • Wi-Fi® 2.4 GHz @ 1.8 dBm maximum STRIKER™ Vivid 5/7/9 Fixed Bail Mount ➊ ➋ 3 mm (1/8 in.
Push cables FIRMLY. Not all models have three connectors. Poussez les câbles FERMEMENT. Tous les modèles ne disposent pas de trois connecteurs. Inserire SALDAMENTE i cavi. Non tutti i modelli hanno tre connettori. ➊ Drücken Sie die Kabel FEST ein. Nicht alle Modelle verfügen über drei Anschlüsse. Inserta los cables CON FIRMEZA. No todos los modelos incluyen tres conectores. Fuse: 3.0 A Empurre os cabos COM FIRMEZA. Nem todos os modelos têm três conectores. 12 Vdc Skub kablerne FAST.
GARMIN. IMPORTANT SAFETY AND PRODUCT INFORMATION Failure to heed the following warnings could result in an accident or collision resulting in death or serious injury. Marine Operation Warnings You are responsible for the safe and prudent operation of your vessel. This device is a tool that will enhance your capability to operate your vessel. This device does not relieve you from the responsibility of safely operating your vessel. Avoid navigational hazards and never leave the helm unattended.
warranty claims against products or services that are obtained and/or used in contravention of the laws of any country. Garmin navigation products are intended to be used only as a travel aid and must not be used for any purpose requiring precise measurement of direction, distance, location or topography. Garmin makes no warranty as to the accuracy or completeness of map data.
Garmin is here to help! Before contacting your retailer, please visit Garmin Product Support at www.garmin.com/support if you have questions about your device. Garmin ist fur Sie da ! Bevor Sie sich an lhren Handler wen den, besuchen Sie bei Fragen zu lhrem Gerat bitte die Website des Garmin-Supports unter www.garmin.com/support. Garmin est la pour vous aider ! Avant de prendre contact avec votre revendeur, veuillez consulter le service d'assistance produit de Garmin a l'adresse www.garmin.