
Owner's Manual
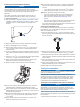


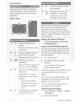
Table Of Contents
- Owner’s Manual
- Table of Contents
- Introduction
- Customizing the Chartplotter
- ActiveCaptain® App
- Sonar Fishfinder
- Traditional Sonar View
- Garmin ClearVü Sonar View
- SideVü Sonar View
- Split-Screen Frequency
- Flasher
- Split-Zoom View
- Selecting the Transducer Type
- Sonar Frequencies
- Creating a Waypoint on the Sonar Screen Using the Device Keys
- Pausing the Sonar
- Adjusting the Zoom
- Sonar Gain
- Adjusting the Range of the Depth Scale
- Sonar Setup
- Garmin Quickdraw Contours Mapping
- Navigation with the STRIKER Vivid
- Searching for a Destination by Name
- Creating a Waypoint on the Map
- Navigating to a Waypoint
- Creating and Navigating a Route Using the Map
- Stopping Navigation
- Waypoints
- Routes
- Tracks
- Showing Tracks
- Clearing the Active Track
- Saving the Active Track
- Viewing a List of Saved Tracks
- Editing a Saved Track
- Saving a Track as a Route
- Browsing for and Navigating a Recorded Track
- Deleting a Saved Track
- Deleting All Saved Tracks
- Retracing the Active Track
- Setting the Color of the Active Track
- Managing the Track Log Memory During Recording
- Configuring the Recording Interval of the Track Log
- Device Configuration
- Sharing and Managing User Data
- Appendix
- Index
- Garmin ClearVu Transducer Transom/Trolling Motor Mount Installation Instructions
- Striker 4 Installation Guide
- Striker Vivid 4/5 Quick Start Manual
- Transducer Transom Mount Template
- Important Safety & Product Information

I @ j
Bottom
of
the
body
of
water
Selecting
the
Transducer
Type
If
you
are
connecting
a
transducer
that
was
not
included
with
the
device,
you
may
need
to
set
the
transducer
type
to
make
the
sonar
function
properly.
Before
connecting
the
transducer,
you
should
select
the
transducer
type.
The
transducer
name
should
be
listed
on
the
label
on
the
transducer
cable,
near
the
connector.
This
device
is
compatible
with
a
range
of
accessory
transducers,
including
Garmin
ClearVu
™
transducers,
which
are
available
at
www.garmin.com/transducers.
1
Select
Settings
>
My
Vessel
>
Transducer
Type.
·
2
Select
an
option:
•
If
you
have
a
200/77
kHz,
dual-
beam
transducer,
select
Dual
Beam
(200/77
kHz).
•
If
you
have
a
200/50
kHz,
dual-
frequency
transducer,
select
Dual
Frequency
(200/50
kHz).
•
If
you
have
another
type
of
transducer,
select
it
from
the
list.
Sonar
Frequencies
NOTE:
The
frequencies
that
are
available
depend
on
the
transducer
being
used.
Adjusting
the
frequency
helps
adapt
the
sonar
for
your
particular
goals
and
the
present
depth
of
the
water.
Selecting
the
Transducer
Frequency
NOTE:
You
cannot
adjust
the
frequency
for
all
sonar
views
and
transducers.
You
can
select
which
frequencies
appear
on
the
sonar
screen.
NOTICE
Always
be
aware
of
local
regulations
on
sonar
frequencies.
For
example,
to
protect
area
whale
pods,
you
might
be
prohibited
4
from
using
frequencies
between
50
to
80
khz
with
in
½
mile
of
an
orca
whale
pod.
It
is
your
responsibility
to
use
the
device
in
compliance
with
all
applicable
laws
and
ordinances.
1
From
a
sonar
view,
select
= >
Frequency.
2
Select
a
frequency
suited
to
your
needs
and
water
depth.
Creating
a
Waypoint
on
the
Sonar
Screen
Using
the
Device
Keys
1
From
a
sonar
view,
use
the
arrow
keys
to
select
a
location
to
save.
2 Select v .
3
If
necessary,
edit
the
waypoint
information.
Navigation
Marking
Your
Present
Location
as
a
Waypoint
From
any
screen,
select!.
Navigating
to
a
Waypoint
1
From
the
Quickdraw
Map,
use
the
arrow
keys
to
select
the
waypoint.
The
waypoint
name
appears
on
the
screen.
2
Select
v .
3
Select
Navigate
To>
Go
To.
Creating
and
Navigating
a
Route
Using
the
Map
The
starting
point
can
be
your
present
location
or
another
location
on
the
map.
1
Select
User
Data
>
Routes
>
New
>
Route
Using
Chart.
2
Pan
the
map
to
select
the
starting
location
of
the
route.
3
Select
v
to
add
a
turn
to
the
route.
4
Repeat
to
add
all
of
the
turns
in
the
route.
5
Select
= >
Navigate
To.
-------
Quick
Start
Manual