
Owner's Manual
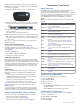


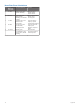

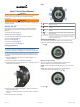
Table Of Contents
- Quick Start Manual
- Owners Manual
- Table of Contents
- Introduction
- Waypoints, Routes, and Tracks
- Navigation
- Geocaches
- Applications
- ANT+ Sensors
- Customizing Your Device
- Device Information
- Appendix
- Index

You should wear the heart rate monitor directly on your skin,
just below your breastplate. It should be snug enough to stay in
place during your activity.
1
Snap the heart rate monitor module
À
onto the strap.
2
Wet both electrodes
Á
on the back of the strap to create a
strong connection between your chest and the transmitter.
3
Wrap the strap around your chest, and connect the strap
hook
Â
to the loop.
The Garmin logo should be right-side up.
4
Bring the device within range (3 m) of the heart rate monitor.
TIP: If the heart rate data is erratic or does not appear, you
may have to tighten the strap on your chest or warm up for
5–10 minutes.
After you put on the heart rate monitor, it is on standby and
ready to send data.
Setting Your Heart Rate Zones
The device uses your fitness user profile (page 10)
information to determine your heart rate zones. You can
manually adjust the heart rate zones according to your fitness
goals (page 8).
1
Select the Orange key.
2
Select Setup > Fitness > HR Zones.
3
Follow the on-screen instructions.
About Heart Rate Zones
Many athletes use heart rate zones to measure and increase
their cardiovascular strength and improve their level of fitness. A
heart rate zone is a set range of heartbeats per minute. The five
commonly accepted heart rate zones are numbered from 1 to 5
according to increasing intensity. Generally, heart rate zones
are calculated based on percentages of your maximum heart
rate.
Fitness Goals
Knowing your heart rate zones can help you measure and
improve your fitness by understanding and applying these
principles.
• Your heart rate is a good measure of exercise intensity.
• Training in certain heart rate zones can help you improve
cardiovascular capacity and strength.
• Knowing your heart rate zones can prevent you from
overtraining and can decrease your risk of injury.
If you know your maximum heart rate, you can use the table
(page 12) to determine the best heart rate zone for your
fitness objectives.
If you do not know your maximum heart rate, use one of the
calculators available on the Internet. Some gyms and health
centers can provide a test that measures maximum heart rate.
Using an Optional Bike Cadence Sensor
You can use the
GSC 10 to send biking data to your device.
• Pair the sensor with your fēnix (page 7).
• Create a custom profile for biking (page 3).
• Update your fitness user profile information (page 10).
Customizing Your Device
Setup Overview
The Setup menu contains numerous ways to customize your
device. Garmin recommends that you take the time to
familiarize yourself with the settings for each feature. If you take
the time to customize your settings before your activity, you will
spend less time adjusting the watch during your activity. To
open the Setup menu, select the Orange key, and select
Setup.
NOTE: Any changes you make are saved to the active profile
(page 2).
Setup Item Available Settings and Information
System You can customize GPS settings, arrow keys, and the
device language (page 9).
Data Pages You can customize data pages and data fields
(page 8).
Sensors You can customize the compass (page 9) and
altimeter (page 9) settings.
ANT Sensor You can set up wireless accessories such as the heart
rate monitor or tempe (page 7).
Tones You can customize the tones and vibrations (page 9).
Display You can adjust the backlight and screen contrast
(page 9).
Reset You can clear the trip data, sensor plots (page 11),
waypoints, or track log, or you can reset all of your
settings (page 11).
Map You can customize the map orientation and how items
appear on the map (page 9).
Tracks You can customize the track recording settings
(page 9).
Time You can customize the appearance of the time page
(page 9).
Units You can change the units of measure for data such as
distance, elevation, and temperature (page 9).
Pos. Format You can change how your position data appears
(page 10).
Profiles You can change the active profile and edit your profiles
(page 2).
Fitness You can turn on Auto Lap, customize your fitness user
profile, and edit your heart rate zones (page 10).
Geocaches You can customize how your geocaches are listed and
activate chirp (page 10).
Menu You can customize the items that appear in the main
menu (page 8).
About You can view information about the device and software
(page 10).
Customizing the Main Menu
You can move or delete items in the main menu.
1
Select the Orange key.
2
Select Setup > Menu.
3
Select a menu item.
4
Select an option:
• Select Move Up or Move Down to change the location of
the item in the list.
• Select Remove to delete an item from the list.
Customizing the Data Pages
You can customize the data pages for each profile (page 2).
1
Select the Orange key.
2
Select Setup > Data Pages.
3
Select a category.
4
Select Add Page.
8 Customizing Your Device