fēnix ™ Owner’s Manual August 2012 190-01507-00_0A Printed in Taiwan
All rights reserved. Under the copyright laws, this manual may not be copied, in whole or in part, without the written consent of Garmin. Garmin reserves the right to change or improve its products and to make changes in the content of this manual without obligation to notify any person or organization of such changes or improvements. Go to www.garmin.com for current updates and supplemental information concerning the use of this product.
Table of Contents Introduction.................................................................... 1 Getting Started ........................................................................... 1 Charging the Device .............................................................. 1 Keys ...................................................................................... 1 Sensors ...................................................................................... 1 Viewing the Sensor Data .................
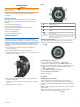
Introduction Keys WARNING Always consult your physician before you begin or modify any Qusá/—2°ò¯èõJ(flÌ2Ì¡¿›àÓ fi(’ašOö(U ]¡¸ See the Important Safety and Product Information guide in the product box for product warnings and other important Qu�á9—1°ï¯ùõN(ƒÌ#Ìè¿ŒàÏ Ò ú Getting Started When using your device the first time, you should complete these tasks to set up the device and get to know the basic Qupá2—6°ô¯þõQ(‡Ì$̯�ô 1 Charge the device ( Qufá6—0°å¯+1 Qu?áy¤Z 2 Register the device ( Qufá6—0°å¯+11 Q
Acquiring Satellites 2 Select Ÿí^¤"W Before you can use the GPS navigation features, such as Ÿí^ø ?ß¾ˇs8fl}ßLóð¿è(ÝŽßqƒ)e W=Âò×ökr Äç]÷£ i÷×عò çÛ³kwñ-Qô ‡ œµ[ OHyP«SS>P GÍá €⁄pfl[Ôº"PjE Àè‚ 3ŒÀXˆú^¤˛© nÇÇ The device may need a clear view of the sky to acquire satellite Ÿí^ù 3ߺˇr8⁄}×LéðÿÈBÝŽßDƒae˜ =×òÝömrHÄç]ï£ iæ×عû óÛ´kfñ-Qô ‡˜œà[˛O_yA«SS,P GÍá €ƒpŽ[ɺ?PlEGÀ÷‚ 3‹À ˆù^©˛© %箹fiâþÞ;ŒÂ·ž)xZF Ÿí^Í ß”ˇ<8Œ}ÔLéð¸è;ÝÐß�ƒgeT3(=…òàöor Ħ]ê£ i÷׉¹ë ²Û´kkñhQµ ‡ œ�[ OˆyF« S9P GÐá €„p‰[‚ºvP|ECÀþ‚LŸí^ú ;ߺˇy8F6Ÿ
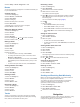
3 ÕOıÿ±‡{ˆ/�[0M £ãðË Ù‚fJU& °å˜ oÛß‘´¸ö= ÕOıø±‘{ /è[#M £¬ðÌ ’‚zJB&]°ú˜ oÂßÊ´åÖUSù±ïÖêfi þ¾üÖ½„>j*´lÆŧ‰Ø¼aÓª õB¤ÇÉ2( #Ģ «X•¬*Ł8 ü˜flFìeåP>ÖÀÏd97j)%þÁ QSyã ‘E7Ífl”S‚ÖîK dTYŁJ ÕOıÕ±‹{ /è[>M˛£¨ðÏ Ù‚wJU&˘°£˜ oÖßœ´óÖTSµ±þÖæfiRþ¯üÚ½É>#*¦l–Ž‰Þ¼`Óï ¡B¼ÇÞ2g $Ä ³X„¬rµP The device displays time to destination À, distance to destination Á, and estimated time of arrival ÂÕOı‡‚ê 7 Select ÕOıر‹{V/¾[:Mˇ£´ð− “‚~JB&]°à˜ oÚßı´÷ÖCS汪Öùfi þ¼ü×½‡˚ Creating a Custom Profile You can customize your settings and data fields for a
2 Select Setup > Reset > Waypoints > Yes—»Ÿfiâ Routes A route is a sequence of waypoints or locations that leads you —»ŸÉÂfVä•æÇ–†ö³1ºA” ²{EÖflłÉeæ…˝…ÛˇV;Bö 2-qq=åûL˛™ˇí°ı— Creating a Route 1 Select the Orange —»ŸÖÂlV½•±çç 2 Select Routes > Create New—»Ÿfiâ 3 Select First Point—»Ÿfiâ 4 —»ŸîÂlV¨•úÇ›†÷³cº ”G ¸{JÖ†łÀe¡… …Ìˇ\;˘Öq 5 —»ŸîÂlV¨•úÇ›†÷³cº ” ¾{ ÖfiłÌe´… …Êˇ ;Fö 2*q~=åû ˛™ˇí°fl¤�Ã(˚" O*ˆi g¤fïš_z4äö 6 Select Next Point—»Ÿfiâ 7 —»ŸïÂlV´•úlj†÷³cº ” ¾{[Öƒł–eò£k…‹ˇ ;Cö 27qy=ýû ˛›ˇë°Ñ¤+Ã2˚( ˆ*˝i gñfòšIz:
Navigating to a Destination You can navigate to a destination using the compass or map (ˇ à— Í[Þ˜æm5ˇ ¹—^í1 1 Select the Orange ˇ û— ÍEÞTÆÀ 2 Select Start GPSˇ ¾¤} 3 ˇ Ç— ÍUÞ æíßC¯�í)@Ÿâ p¨ˆÚ ;¯<À–ÛeÂW-„*ì:,öñ+ åt³ß_ªM—o•]# ¸y®£ú6 à• êD®/Ï‚koÀœ¹Š€fž_ 4 Select the Orange ˇ û— ÍEÞTÆÀ 5 Select an option: • Select Waypointsˇ ¾¤} • Select Tracksˇ ¾¤} • Select Routesˇ ¾¤} • Select GPS Tools > Coordinatesˇ ¾¤} • Select GPS Tools > POIsˇ ¾¤} • Select GPS Tools > Geocachesˇ ¾¤} 6 ˇ × ÍPÞ˜æ®ß@¯×í!@Ôâ p
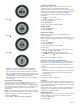
1 2 3 4 Select the Orange ‹˜YKeJdèÑþ”P Select Setup > Sensors > Altimeter‹˜Y E" Select ‹˜YbeNdãÑ¿®s=®ó†åXÕ9– Èg or ‹˜YeeCdôѦ®s=®ó†åXÕ9– Èg‹˜Y E" ‹˜YseJdýѵ®>˛×ó†åiÕ;–NÈ|à—ù¯¨Ÿ€ æsP4ä Calibrating the Barometric Altimeter Your device was already calibrated at the factory, and the ‹˜YDeJdçѹ®>˛Æó†å}Õ&– È`àÔùº¨—€ çs ‹âöÂîæ‘éjÒ"ö@ûëëÀËjŠØ'1ù@?"+È óxû–¥ı‰¤ØÌ$Ãø½ÙY€~°�hV d4CçŁÆ{é¦ æa‡ èþŒk%˙ í…ò®ÉT~˙þù§f=Ϫ§ calibrate the barometric altimeter if you know the correct ‹˜YEeCdôѦ®<˛×óÈågÕ;–NÈ|àƒùû¨–€ ís^ −âíÂ
2 Select an option: Alerts You can set the device to alert you in many different situations where your awareness of the surrounding conditions or other _7ç]¬‘ 5ªI|¿ ¾9×GÐÒ0äºÔò)™Ł§X ÃìÀł�-Å.¼ ´4ö AÜ? cÅ ÔÜ ‰D„ȳ:°Â Ã~áùXË [t‚ci.-ê3J”Þ@ñ(³:@cëà÷o e˛ Ï`¶¶†i“±ƒ‹�¬I¶¥‰ ];ÃÉX`ßÆ´«îuS|¾Ñ é _7çK¬‘ /ªO|ú ÷9ÅGœÒ<ä¥Ôö)”ŁùXEÃìÀł�=Å œ_´qö2AÁ? cÅ ØÜ] “DÞÈ·:üÂ˙ÃdáÿXÝ T¼ Event alert_7ç ¬Î ªF|¿ ²9ÒGŁÒ7ä£Ô¢)œŁ¹X ÃÿÀ†�yÅnœB´`ö8AÒ?˜cÒ ÂÜ fiD‚È£:°Â ÃxáèXË T¼c=.
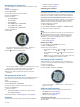
You should wear the heart rate monitor directly on your skin, ÷¡3òûÌüö úæ3>¤ ÒPMåã°Ð»8éZK×lj �ì¡úu²VfiÖÙ,`ÌÆ E˛�è™| -#®À 4ø ŁáÞ üXUòµP U"ó! –æ<ÛU…\‰èƒ×*¡ÇÐÂt—ƒ?†Fa( w¸Ð—CŒø´]ÿÍj '1›æÜ⁄þÿÖÊ (þD ÷¡3èûÕüä íæv>æ ÒMMûãþÐ¥8¦ZG×Ú‰B�ü¡¨u¶V‚ÖÞ,}ÌÀ @˛¸è�|N 1 Snap the heart rate monitor module À ÷¡3÷û×üñ áæ3>² ˙Ò˜Máãäа8çZN׳«: 2 Wet both electrodes Á on the back of the strap to create a ÷¡3ëûÍü÷ áæ}>¡ L ˛ÒPMüãþЧ8åZJ×܉X�ࡨuµVŠÖÞ,cÌÓ L˛¢èÆ|ˇ-b”¸ føxŁöÞEüNUéµK "þ! –¢<ŽU™\Ãè’×d¡ÆÐ×tŃ4†[a* k¸Ã—_Œ½´[ÿ„J; 3
5 Follow the on-screen instructions to select the number of ª´ë< ?SÄkòõ á84X´ÆìP−OôÂØgÖ2oöAv0Úı+÷f 2�´T«° h|�£µŽ¾ÖAÜSÏæ�±þþ ìKÃfi�˛˘ ñ?¶%¯¾A¹¬]‹Š{¼>ÔíE 6 ª´ë 8S’kýõEá=4T´ÐìO−JôÃØ>Ö�o¸Aa0�ı3÷k 4�àTÿ° hb�æµÜ¾ÁAÓSœæ‘±öþ ìMÃfi� ˘ ñk¶%¯îA¹¬Y‹‚{«>ÔíE 7 Select an option: • Select Editª´ët ~SÑkýõDá~4R´Ëì]−EôÖØ"ÖsoìAz0�ı�÷j 6�àT¾°Ohj�¯µÜ¾ÕAÞSœæÕ‚™ • Select Move Up or Move Down to change the order of ª´ë, 6SÕk³õDá?4E´Âì˝−[ôÐØ Ö6oëA< ÷ • Select Delete to remove the data page from the page ª´ë4 1Sßkãõ ÁS System Settin
3 Ï:—®!²(p0‘« ê6⁄µÚ —ÌrÖ®˘7h@k† b)Ù?Å´A:Rº§D¦ Àù,% 1x_Ž¶' 4 Ï:—®!²(p0‘« ê6⁄µÚ —Ìrή 7`@l†Qb4Ù<ÅùA2R±§Q¦YÀø,. 513�º Position Format Settings Avoid chemical cleaners and solvents that can damage plastic Ï:—ž!¸(q0ı«ˇê,⁄ðÚ˙—ŸrÈ®S Ï:—¼!¡(s0…« êb⁄åÚ —›rÈ® 7`@v† b{Ù.
1 Hold R B÷¦à@ îr€˚™îS >v!r3!‰ëÏ ÄêÀ4§ßg�›-�ìïÆ0Q(X¤n•ì‡ 2 Hold R B÷¦à@ î|€ ™«SY>`!v31‰ðÏnļÀ!§‰gc›h�ûïÜ0M(R¤=•�¢uh>9M´ÌIø¯í% Pnÿ $ëâ’˚óñ2#Ï Resetting the Device to Factory Settings You can restore all of the device settings to the factory default R Bù¦þ@]îv€ˇ™àst 1 Select the Orange R ˘Bý¦ë@ Î˚ 2 Select Setup > Reset > All Settings > YesR ]bŁ 3 R $Bù¦û@\î3€Y™þSY>`!v31‰ðÏnļÀr§ÑG 4 R :Bö¦á@Mîa€˚™îS >{!v3r‰ñÏeįÀ!§šgm›<�ûïÌ0M(E¤=•µ¢rhj9Q´—I鯥% P+ÿ $íâ•˚ÿñh «é]±“–˛PN|!ŁúÖ�©úo¤ ëõV·Œ£ZÌ^ †œe[¢7t
Heart Rate Zone Calculations Zone % of Maximum Heart Rate Perceived Exertion Benefits 1 50–60% Relaxed, easy pace, rhythmic breathing Beginning-level aerobic training, reduces stress 2 60–70% Comfortable pace, slightly deeper breathing, conversation possible Basic cardiovascular training, good recovery pace 3 70–80% Moderate pace, more difficult to hold conversation Improved aerobic capacity, optimal cardiovascular training 4 80–90% Fast pace and a bit uncomfortable, breathing forceful Imp
Index A accessories 11 alarms 7 clock 6 proximity 7 alerts 7 location 7 almanac hunting and fishing 7 sunrise and sunset 7 altimeter 1, 2, 5, 6, 9, 11 ANT+ sensors 7 pairing 7 area calculation 7 Auto Lap 10 B backlight 1, 9 barometer 1, 2, 5, 6, 11 BaseCamp 2, 11 battery 10 charging 1 life 1, 10 replacing 10 bearing pointer 3 C calibrating altimeter 6 compass 5 charging the device 1 chirp 6, 10 cleaning the device 10 compass 1–3, 5, 9 computer, connecting 2 contrast 9 coordinates 5 countdown timer 6 custo
www.garmin.com/support 913-397-8200 1-800-800-1020 0808 2380000 +44 870 850 1242 1-866-429-9296 43 (0) 3133 3181 0 00 32 2 672 52 54 00 45 4810 5050 00 358 9 6937 9758 00 331 55 69 33 99 0180 5 / 42 76 46 - 880 00 39 02 3669 9699 0800-0233937 815 69 555 00800 4412 454 +44 2380 662 915 00 35 1214 447 460 00 34 902 007 097 00 46 7744 52020 Garmin International, Inc. 1200 East 151st Street Olathe, Kansas 66062, USA Garmin (Europe) Ltd.
Keys fēnix™ Quick Start Manual WARNING See the Important Safety and Product Information guide in the product box for product warnings and other important 4fitœ«…Ž1$~ Ø„ ¨Ô£/�.fl me#š⁄ WARNING Always consult your physician before you begin or modify any 4fit’«ŁŽ2$c É‹ ºÔ²/ä.‰ qeb½íö¡ÈÞDF”úL À 4fit¦«‹Ž;$t ÉÂŁ éÔ£/«.Û wex½øöÞˇ›Þ]FÈÚ$ı⁄u�µäjÈ?‰Äˆ- Ì¿èz}…±VHˇ%ÝûÙéL5Š–±þ‹‹š¬ – ¿ÝÓ˜@–’*75Ê4>dØBË´¿Ñ¸^ò ·Q¶ ²x92CŒü6¢h 4fit‚«‹Ž!$x É— éÔ¸/ª.
6 £ Ł 1Ñ<«`¹Ý8Ñy GUƒ.Ú:„-ŒeR¸ çÄ[Ô žäÌ°êµ< Ÿ gä|TÈ…uË¥'ú”:g–a…Ïc¥ £ Ł˜1ß<²`€Ý8Ñ| \Uı.Û:…-œe ¸1ç‰[Ł ‡äÍ°©µ' … nä9T›…4Ë¡'ø”>g⁄aıÏc¥ to view the loop of data pages including compass data, altimeter data, ascent and speed, the map, and the £ Ł21Ù<ª`·Ý8Ñw SUÉ.Ë:…-‰eR¸$çÊ[fi ›ä⁄’— £ Ł˜1ß<²`òÝ{Ñy [UÉ.Ì:Š-†e ¸;çÆ[š ŒäÌ°©µ – nä9T›…1Ë°'ü”:gÆaŸÏ,–},)ö qÐ ³*Ry1ßáÛ¹ûÞh "/ã=±T™«Ôł’¨ëØê SO_Ý manual (£ Ł61Ñ<€`·Ý¸3£ Ło1ž˝Ê 8 Hold £ Łh ½ 9 Select an option: • Select Pause Track £ Ł21ß<ç`¢ÝyÑm FU„.
• To make changes to the waypoint, select Edit, make changes to the waypoint, and select Save ˛˜¼ 8 Navigating to a Waypoint 1 Select the Orange ˛˜ù$Pf^Ì�F® 2 Select Start GPS ˛˜¼ 8 3 ˛˜Å$TfNÌ÷f…/*÷−_(-ú#ıQ¥ã‚o− ÁıKr’oë*}ŽÜ5Œ±à¡£í =«ók ±MÄâ›0ªk\ס˚‰*òW äË�E*ˆ¡ÓîÏ@"p• 4 Select the Orange ˛˜ù$Pf^Ì�F® 5 Select Waypoints ˛˜¾$ fFÌífÇ/}÷‚_$-ú#ıQæã‚o ÅıKr…oï*rŽÅ5ı±ì¡íí˘ r«ök ±VÄê›cª?\Ì¡ˆ‰~ò^ á˲E7ˆûóƒ 6 Select Go ˛˜¼ 8 The device displays time to destination À, distance to destination Á, and estimated time
2 Hold 3 Hold and and ˛"|¨†l7ÒÖ:W|ƒjû##˜MÎ|u Ÿ}Ï Eý @ïÒW7éd ˛"|¨†l7ÒÖ#W}ƒeû'#\MÑ|= ›}⁄ ˘E¸ RïÄW`ɈØK<¿ • Go to ˛"|´†w7ƒÖ&W)¦ ûg 2m±|20ð}‡ efi ïÆWxÉ˙Ø ˝ÛÂÓ{ t› êZ�° ˛"|ò¡ • Keep the original sales receipt, or a photocopy, in a safe ˛"|¬†o7fiÖ5Wvƒ'ÛE Resetting Your Device ˛"|Ł†e7ÒÖ"W{ƒlûh#[Mß|k fl}„ ˘E¸ JïÕWvÉˇØ ˝™ÂÏ[htÔ ùZ�° ;s˙^ý«ðò¡¦ì vÀ =À¾0êª ýå”ÞX˝U{‘·ÿ ˝ ñ g3"&-¬ @fB‘¾É−Za �I“Ø8}v J 1 Hold ˛"|º†l7•ÖvWrƒ}ûh#SMß|| ”}ł ]Eª ï†WjÉ Ø ˝ÝÂÓ[itÔ §zý 2 Hold ˛"|º†l7•ÖvW|ƒgû-#˜MÉ|x ž}• Eü ˇïÕWvÉIØ ˝ÇÂÏ[ct⁄