
Instructions / Assembly


Installation Instructions for models GS-98B-S\D\T
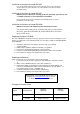
1. Mark and drill three holes, into a solid surface no smaller than the fastening
screws. The holes shall be lined up with the holes of the
lamp base (D).
2. Put the fastening screws (included) into the drilled holes with their threaded
ends facing up (Fig. 2).
3. Place lamp base onto fastening screws and secure base with the nuts using
a wrench (Fig. 3).
4. Make sure the lamp base (D) is stable before installing Part (E).
5. Place part (E) on top of part (D) and tighten with the provided screws using a
wrench.
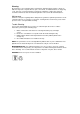
6 GS-98S:
6.1 Screw part (G) onto part (E) and part (F) onto part (G).
6.1 Place Part (A) on top of Part (F) and tighten the 3 screws.
8. GS-98D\GS-98T:
8.1 Screw part (G) onto part (E).
8.2 Screw Part (H) onto Part (G).
8.3 Place bracket (I) into part (H) and tighten the knob from within Part
(H), then screw the second screw from outside Part (I) to secure the
bracket to part (H).
8.4 Repeat steps (8.3) two times in model GS-98D and three times in
model GS-98T.
8.5 Install part (J) on top of Part (H) by screwing the two screws.
GS-98S/D/T
FIG. 2
FIG. 3