
User Manual


XScopes
User’s Manual
DS-XScopes-3.5 – December, 2014 Page | 11
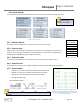
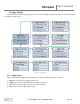
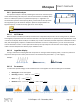
1.5 Absolute Maximum Ratings
Xprotolab & Xminilab
Portable Variants
Parameter
Minimum
Maximum
Minimum
Maximum
Unit
Supply Voltage (+5V)
-0.5
5.5
N/A (Battery Powered)
V
Analog Inputs
1
-30
30
-180
180
V
Digital Inputs
-0.5
3.8
-0.5
5.5
V
External Trigger
-3.5
6.8
-3.5
6.8
V
Operating Temperature
-40
70
-40
70
°C
Storage Temperature
-40
80
-40
80
°C
Table 3: Absolute Maximum Ratings
1. The maximum voltage on the analog inputs has only been tested to these limits. The device may tolerate higher voltages, but it is not recommended for safety.
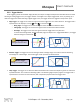
1.6 Factory Setup
The device can enter factory options if the MENU key is pressed during power up. The following options are available:
1) Offset calibration: The unit is calibrated before being shipped, but calibration is required again if the firmware
is updated. During calibration, two graphs are shown that represent the calibration on each channel.
2) Shut off timeout: Sets the time to shut down the device after the last key has been pressed. On the non-
portable devices, it will only shut off the display and put the microcontroller to sleep.
3) Restore defaults: Select this function to restore to the default the settings. There are many settings on the
device, if you are not familiar with them, this function is useful to set the device to a known state.
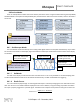
1.7 Quick Start Guide
- Take the device out of the packaging. There is a protective film on the display which can be removed.
- Power on the device. The non-portable devices can be powered with either the USB or with an external power
supply, by applying +5V on the corresponding pin. Double check your connections because the device WILL get
damaged if applying power on the wrong pin. The portable variants are powered with the MENU button.
- Connect the AWG pin to CH1. On the portable variants, you can flip the Curve switch instead.
- The tactile switches are named (from left to right) K1, K2, K3 and K4. The K4 is the Menu button.
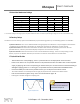
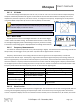
- Press and hold the K1 key (auto setup). The screen should look like figure 16.
- Pressing K2 or K3 will change the sampling rate.
Figure 16: Quick start
Additional examples
on how to use the device are
presented in chapter 8.