
Installation Guide

Common G-Floor® Trailer Installations
This installation guide is intended to aid in the installation of G-Floor Trailer Flooring. In
addition to this guide, always follow recommendations supplied on the adhesive or by the
adhesive manufacturers. We have provided the following which demonstrates common
installation instructions.
Preparation:
The substrate on which the flooring is going to be laid should be smooth, clean and dry. If it is
wooden, any seams should be sanded smoothly, evenly and should be level. This will prevent the
seam from being visible when the flooring is installed.
The roll of flooring should be acclimated in a temperature controlled area prior to being installed in
the trailer.
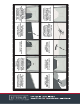
Installation:
Unroll material in trailer – Make sure it is laid in straight and trim off any excess.
Trim to fit the layout of the floor - Carefully remove any excess material to fit the angles of
the floor in the trailer so that it lays flat.
Lift material on one side lengthwise (from side to side, not front to back) and fold it in half
back on itself – Expose the substrate so adhesive can be applied.
Apply adhesive to the uncovered half of the trailer floor – Use the appropriate kind of
adhesive for the substrate with which you are working for best results. Trailer flooring should
not be free floating, as it will result in rippling or even creases in the material, as well as
expansion and contraction of the material due to changes in temperature.