
Installation & Assembly
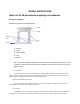

Make sure the legs are plum and level. (see drawing) At top of each leg is a metal strap that will be screwed to the
wall (screws furnished).
4)
Install Lintel
After applying adhesive to the back of the lintel set lintel on top of the legs. Make sure the lintel is level, if
not use shims that are provided. Make sure lintel sets tightly against the wall. They are a set of 2 metal straps that
need to be screw to the wall.
5)
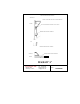
Install Mantel
Provided is a 2x4 that is 30” long. Measure the height of the mantel. Take this dimension and measure up
from the top of the lintel and make a mark on the wall. Take a level and set on mark and strike a line. The 2x4 will
set down from that line about ½”. To determine the exact dimension, measure the thickness of the material on the
back side of the mantel. After determing this dimension place the 2x4 on the wall. Before attaching to wall mark
the placement of the wall studs. Screw the 2x4 to the wall at the wall stud locations. Place mantel on the 2x4
making sure it is centered and level. In the pre punched holes attached mantel to 2x4 with screws. See Diagram A
If filler panels are needed install after surround install is complete. Dry fit and cut as required to fit
surround. Use adhesive to secure panels to wall. Caulk to surround and where the panels meet surfaces.
Included in your shipment:
Screws for attaching legs, lintel and mantel to wall.
Adhesive
Caulk
Instructions
Shop Drawings
Shims
2 x 4 x 30”