made in sweden FX DREAMLINE OWNER’S MANUAL
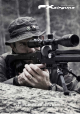
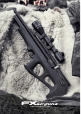
THE DREAMLINE With the arrival of the FX Dreamline, innovation that was previously only dreamed about, is now a reality. The FX Dreamline is the first fully modular airgun system in the world. The modular design allows the rifle to change to any of the Dreamline configurations. Today’s hunting bullpup can be converted for the weekend field target match. The classic sporter rifle can be switched out to house all your favorite AR furniture and accessories.
Warnings • • • • • • • • • • • • • • • Never attempt to disassemble this rifle while it is charged! Never fire the rifle when it is empty of air or when air cylinder is removed! Never point the rifle at anyone, or allow anyone to point a rifle at you! Treat every rifle as if it is loaded even if you know it is not loaded! Always carry the rifle so that the direction of the muzzle is under control, even if you stumble. Always be sure of your target and what lies behind it before firing your rifle.
Charging the rifle A quick connector is supplied with the rifle and is threaded with a 1/8” thread. Make sure that the thread is the same at the charging source before you attach it. 1 2 4 3 5 How to load the magazine To load the Side-Shot magazine, start by rotating the center lid-lock (1) until you are able to remove the lid (2). Twist the inner pellet tray (3) counterclockwise until you hit the stop.
Cocking and Loading With the rifle pressurized and magazine loaded, continue to prepare the rifle for use by pulling rearward on the cocking lever until it clicks in the rearward position. Then set the safety to its safe position. Carefully insert the magazine in the magazine slot, ensuring the pellets face the correct direction. Press firmly to ensure the magazine is completely installed. Closing the cocking lever will now load a pellet into the barrel and make the rifle cocked and loaded.
1 2 1 Adjusting the power Setting the power on the Dreamline can be done with three external adjustments. 1. Front power adjuster (1) - The airflow adjuster is located on the left front side of the breechblock. This gives you the ability to adjust the power from high to low. Low setting is for low power on all caliber. Caliber Setting is max power for selected caliber. Variations in appearance might occur. NOTICE – NEVER fire the airgun without air.
• When completely seated, you should be able to see a small portion of 2 thebarrel assembly inside the magazine slot (3). • Once in position, tighten the locking screws. • Misalignment will cause poor performance and potential harm to the airgun. NOTICE – Failure to tighten these locking screws can cause serious damage to the rifle if fired. Pelletprobe: • Start by pushing the sidelever to its rear position. • Set the safety to its safe position. • Then remove the pelletprobe locking screw (1).
3 2 1 4 5 5 Adjustments standard triggersystem: For liability reasons, we cannot give detailed instructions on trigger adjustments. The following diagram is a reference showing adjustment screws and what aspect of the trigger they adjust. The 2nd Stage Adjustment (2) is the break or release weight adjuster. The 1st Stage Length Adjustment (1) controls the travel or 1st Stage length. NOTICE – Adjusting your trigger can easily make the rifle unsafe.
made in sweden www.fxairguns.