
Installation Instructions
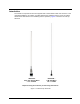
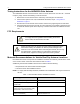
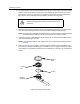
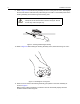
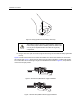
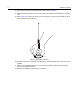
Table Of Contents
- Foreword
- Product Safety and RF Exposure Compliance
- Before using this product, read the operating instructions for safe usage contained in the Product Safety and RF Exposure booklet enclosed with your radio.
- ATTENTION!
- This radio is restricted to occupational use only to satisfy FCC RF energy exposure requirements. Before using this product, read the RF energy awareness information and operating instructions in the Product Safety and RF Exposure booklet enclosed wi...
- For a list of Motorola-approved antennas, batteries, and other accessories, visit the following website: http://www.motorolasolutions.com/governmentandenterprise
- Document Copyrights
- Disclaimer
- Trademarks
- VHF Vehicle Roof-Top Antennas HAD4021A HAD4022A
- Installation Manual
- Introduction
- Tuning Instructions for the HAD4022A Gain Antenna
- FCC Requirements
- Motorola Recommendations for Vehicle Roof-Top Antenna Locations
- Required Tools and Materials
- Installation Procedure
- Connector Fabrication (Mini-UHF)
- Tuning Chart for HAD4022A
- Product Safety and RF Exposure Compliance

6 Installation Procedure
9. Refer to Figure 3. Insert the bushing assembly into the mounting hole as shown, tilted slightly.
Be sure that all of the cable has been pulled through to the radio. The threaded portion of the
bushing assembly will not fall through the mounting hole.
Figure 3. Inserting the Bushing Assembly
10. Refer to Figure 4. While holding the bushing assembly down, thread the locking nut onto it.
.
Figure 4. Threading the Locking Nut
11. When the nut is well onto the bushing assembly, pull upward on the entire assembly as
shown in Figure 5.
Make sure the bushing assembly is centered in the hole and seated properly with both
shoulders inside the mounting hole.
In double-roof vehicles, which have no dome light, DO NOT
attempt to secure the base mount to both roof layers. Secure
it to the top, outer roof layer only.
C a u t i o n
MAEPF-27628-O
MAEPF-27629-O