
10PX Transmitter - Manual

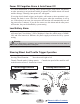
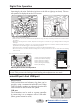
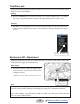
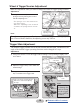
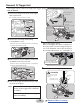
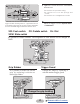
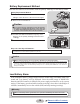
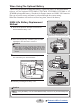
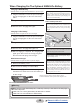
Table Of Contents

16
Return to table of contents
How to remove
1
Remove the fixing screw shown in the figure
with a hex wrench.
Be careful not to lose the screws.
Removal Of Trigger Unit
The trigger can be removed to replace the trigger spring.
M2×8
M2×8
M2×8
M2×8
4
Pull out the trigger unit while pulling it down
as shown in the figure.
M2×6
M3×12
Rear unit
M3×12
2
Remove the 2 steering unit mounting
screws (M3x12 screw).
Remove the 2 mounting screws completely
from the transmitter body.
M3×12
M3×12
3
Next, Remove the two M3x12 screws and
one M2x6 screw on the rear unit.
Remove the 3 mounting screws completely
from the transmitter body.
6
Carefully insert the trigger unit as shown.
Note:
Be careful not to damage the case or
wiring as the trigger unit is dicult
to remove.
Be careful not to pinch the wiring
when assembling.
Trigger groove and
transmitter case rail
Assembly
Insert the groove of the
trigger into the rail and
slide it in.
Trigger
Transmitter
case
Trigger unit
Rail for trigger unit
5
When replacing the spring.
Remove the trigger unit, there is a window at
the spring. First, loosen the trigger spring ten-
sion to the maximum, remove the spring from
the window with tweezers, etc., and replace it.
Loosen the trigger spring
tension to the maximum
1. While pulling down
the trigger unit
2. Pull out the trigger
unit slowly
Note: Trigger unit is difficult to remove
It would be conve-
nient to use two L
wrenches
Pull out the
trigger unit in
the direction of
the black arrow
while open
-
ing the case
slightly in the
direction of the
white arrow.