FUSION MS-RA60 ® OWNER’S MANUAL ENGLISH
© 2021 Garmin Ltd. or its subsidiaries All rights reserved. Under the copyright laws, this manual may not be copied, in whole or in part, without the written consent of Garmin. Garmin reserves the right to change or improve its products and to make changes in the content of this manual without obligation to notify any person or organization of such changes or improvements. Go to www.fusionentertainment.com for current updates and supplemental information concerning the use of this product.
Table of Contents Getting Started Stereo Controls Stereo Screen Connecting an Auxiliary Device Bluetooth Device Playback Connecting a Compatible Bluetooth Device Bluetooth Range Information Bluetooth Source Settings Selecting a Different Bluetooth Device Radio Setting the Tuner Region Changing the Radio Station Presets DAB Playback Setting the Tuner Region Scanning for DAB Stations DAB Presets 1 2 3 4 4 4 4 4 4 5 5 5 5 6 6 6 6 General Settings 7 Additional Stereo Control Options 8 Connecting to
Getting Started WARNING See the Important Safety and Product Information guide in the product box for product warnings and other important information.
Stereo Controls Dial Turn to adjust the volume. Press to switch between zones to control the volume. Turn to move through the menus or adjust a setting. Press to select the highlighted option. Press to open a menu. Press to return to the previous screen or menu. Press to change the source. Press repeatedly to scroll through the available sources. Press to turn on the stereo. Press to mute and un-mute the stereo. Press and hold to turn off the stereo.
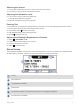
Adjusting the Volume 1 Turn the dial to adjust the volume for a zone or all zones on the stereo. 2 If necessary, press the dial to switch between zones. Adjusting the Subwoofer Level 1 From a source screen, press and hold the dial. The SUB LEVEL adjustment appears. 2 Adjust the subwoofer level by turning the dial. Entering Text You can enter text to change some settings values on this device, such as changing the name of the device. 1 Use the dial to choose a letter, and press the dial to select it.
Connecting an Auxiliary Device You can connect various auxiliary devices to the stereo. These devices have either RCA connectors, a line output, or a headphone output jack. 1 Locate the auxiliary connectors on the wiring harness. 2 If necessary, connect an RCA-to-3.5 mm adapter cable to the auxiliary device. 3 Connect the auxiliary device to the AUX IN 1 RCA connectors on the wiring harness. 4 Select the AUX source. Bluetooth Device Playback You can pair the stereo to up to eight Bluetooth media devices.
Radio To listen to AM or FM radio, you must have a suitable marine AM/FM antenna properly connected to the stereo and be within range of a broadcasting station. For instructions on connecting an AM/FM antenna, see the stereo installation instructions. To listen to DAB stations, you must have the appropriate equipment (DAB Playback, page 6). For instructions on connecting a DAB adapter and antenna, see the installation instructions provided with your adapter and antenna.
DAB Playback DAB broadcasts are not available in all regions. When the stereo is not set to a compatible region, the DAB source is not available. See the troubleshooting section if you cannot access the DAB source or if DAB stations are not playing properly. (The stereo does not receive DAB stations, page 9) Setting the Tuner Region You must select the region you are in to receive DAB stations properly. 1 Select > SETTINGS. 2 Select TUNER REGION. 3 Select the region you are in.
Saving a DAB Station as a Preset 1 With the DAB source selected, change the stereo to a DAB station. 2 Select > BROWSE > PRESETS > SAVE CURRENT. TIP: You can quickly save the selected DAB station as a preset by holding . Selecting a DAB Preset from a List Before you can select a DAB preset from a list, you must save at least one DAB station as a preset. 1 Select the DAB source. 2 Select > BROWSE > PRESETS > VIEW PRESETS. 3 Select a preset from the list.
Additional Stereo Control Options Connecting to a Garmin Watch ® For a list of a compatible Garmin watches, go to www.fusionentertainment.com. For more information about the watch, see the watch manual at www.garmin.com/manuals. 1 Following the instructions in the watch manual, install the Fusion-Link Lite™ app from the Connect IQ™ store onto the watch. 2 On the stereo, select the BT source. 3 Select > DISCOVERABLE. The stereo remains discoverable for two minutes. 4 Bring the watch within 3 m (10 ft.
Cleaning the Device 1 Dampen a soft, clean, lint-free cloth with fresh water. 2 Gently wipe the device. Troubleshooting The stereo does not respond to key presses • Hold until the stereo turns off, and turn it on again to reset the stereo. • Disconnect power to the stereo for two minutes to reset the stereo. My Bluetooth audio is interrupted by short breaks • Ensure the media player is not covered or obstructed. Bluetooth technology performs best with line-of-sight operation.
Specifications General Weight 316g (11.2 oz) Water resistance IEC 60529 IPX7 (front), IEC 60529 IPX5 (rear)1 Operating temperature range From 0 to 50°C (from 32 to 122°F) Storage temperature range From -20 to 70°C (from -4 to 158°F) Input voltage From 10.8 to 16 Vdc Current (max.) 15 A Current (muted) less than 190 mA ANT wireless range Up to 3 m (10 ft.) Compass-safe distance 15 cm (5.9 in.) Fuse 15 A mini-blade type Bluetooth wireless range Up to 10 m (30 ft.
Stereo Dimension Drawings Front Dimensions 157 mm (6 3/16in.) 68 mm (2 11/16in.) Side Dimensions 22 mm (7/8in.) 81.2 mm ( 33/16 in.) 50 mm (2 in.
Top Dimensions 130 mm (5 1/8 in.) 22 mm (7/8 in.) 10 mm (3/8 in.
Index A AM 5 Android devices 8 ANT devices 8 Apple devices 8 auxiliary input 4 B Bluetooth devices 4, 8 D DAB 5–7 device cleaning 9 keys 2 registration 8 F FM 5 K keys 2 L language 7 M menu key 2 P power key 2 presets 5–7 DAB 7 product registration 8 R radio AM 5 FM 5 registering the device 8 S source 2 speaker zones 3 subwoofer 3 T tone 7 V volume, adjusting 3 W watch 8 Index 13
FUSION SUPPORT New Zealand 09 369 2900 Australia 1300 736 012 Europe +44 (0) 370 850 1244 USA 623 580 9000 Pacific +64 9 369 2900 SUPPORT.GARMIN.
FUSION® MS-RA60 Quick Start Manual
FusioneMS-RA60 Quick Start Manual Getting Started I WARNING Press repeatedly to scroll through the available sources. 0 See the Important Safety and Product Information guide in the product box for product warnings and other important information. BT source: Press to skip to the previous track or the beginning of the current track. AM or FM source: • Press to tune to the previous station or preset (preset mode with two or more presets saved). • Press and hold for faster tuning (manual mode only).
• Press and hold to save this station as a preset. DAB source: press to scan for DAB stations. BT source: Press to skip to the next track. AM or FM source: • Press to tune to the next station or preset (preset mode with two or more presets saved). • Press and hold for faster tuning (manual mode only). DAB source: press to advance to the next DAB station in the ensemble. When you reach the end of the current ensemble, the stereo automatically changes to the first available station in the next ensemble.
® ® Current track number out of total number of tracks in the playlist (if available) Track duration (if available) Playing Media Connecting a Compatible Bluetooth Device You can play media from a compatible Bluetooth device using the Bluetooth wireless connection. 1 Select the Bluetooth source. 2 Select 5 > DISCOVERABLE to make the stereo visible to your compatible Bluetooth device. 3 Enable Bluetooth on your compatible Bluetooth device. 4 Bring the compatible Bluetooth device within 10 m (33 ft.
Select MANUAL to select a station manually. • Select PRESET to select a saved station preset. 3 Select M◄ or ►M to tune to the station. When in MANUAL tuning mode, you can hold M◄ or ►M to quickly advance through the stations. • Saving a Station as a Preset 1 With an applicable source selected, tune the stereo to a station. 2 Select 5 > PRESETS. 3 Select SAVE CURRENT. TIP: You can quickly save the selected station as a preset by holding ► n .
Link Lite app, select Settings > Pair new. 6 Control the audio playback using the Fusion-Link Lite app on the watch. After the devices are paired, they connect automatically when they are turned on, within range, and the app is open on the watch. Connecting to an ARX70 Remote Control 1 On the stereo, select the BT source. 2 Select 5 > DISCOVERABLE. 3 Bring the ARX70 remote control within 10 m (33 ft.) of the stereo. NOTE: Stay 10 m (33 ft.) away from other ANT devices while pairing.
• • Registering Your Fusion Device Help us better support you by completing our online registration today. Go to www.fusionentertainment.com. Keep the original sales receipt, or a photocopy, in a safe place. ~tlira !IH*~~ ~-~W~Jm~:n:;~ ~ m 1'1ft~ ~~ij*~ ~~=~mt fPitl ~li!t& fill 1* X 0 * 0 0 0 0 m•,~* X 0 0 0 0 0 ~-~1lf ~J'.00: ~~ tfi 1* i¥ :ti~ X 0 0 0 0 0 X 0 0 0 0 0 *~~~~ SJ/T11364 ~~jE~1ttlo o: {t~.ttt.MifflHlf~ii.
FUSION SUPPORT fusionentertainment.
® Fusion MS-RA60 Installation Instructions ® Important Safety Information WARNING Failure to follow these warnings and cautions could result in personal injury, damage to the vessel, or poor product performance. See the Important Safety and Product Information guide in the product box for product warnings and other important information. This device must be installed according to these instructions. Disconnect the vessel's power supply before beginning to install this product.
Mounting Considerations • You must mount the stereo on a flat surface that provides open airflow around the rear of the stereo for heat ventilation. • If you are installing the stereo in a location that may be exposed to water, you must mount it within 45 degrees of the horizontal plane. • If you are installing the stereo in a location that may be exposed to water, add a drip loop to the cable to allow water to drip off of the cable and avoid damage to the stereo.
Mounting the Stereo NOTICE Do not use the stereo as a template when drilling the mounting holes because this may damage the display and void the warranty. You must only use the included template to correctly drill the mounting holes. Be careful when cutting the hole to mount the stereo. There is only a small amount of clearance between the case and the mounting holes, and cutting the hole too large could compromise the stability of the stereo after it is mounted.
Port Identification Item Description FUSE Contains the 15 A fuse for the device. Not used. Connects the stereo to the auxiliary in and zone 1 line/subwoofer out wiring harness. Connects the stereo to a typical AM/FM antenna using a Motorola type antenna connector. If you are installing the stereo on a boat with a metal hull, you must use a ground-dependent antenna, and if you are installing the stereo on a boat with a non-metal hull, you must use a ground-independent antenna.
Wiring Harness Wire and Connector Identification Wire Function Wire Color/ Number Notes Power (+) Red Connects to the positive terminal of a 12 Vdc power source capable of supplying 15 A. Ground (-) Black Connects to the negative terminal of a 12 Vdc power source capable of supplying 15 A. This wire should be connected before connecting the red wire. All accessories connected to the stereo must share a common ground location.
Connecting to Power When connecting the stereo to power, you should connect it through a circuit breaker rated for 15 A. If it is necessary to extend the power and ground wires, use 14 AWG (2.08 mm2) wire. For extensions longer than 1 m (3 ft.), use 12 AWG (3.31 mm2) wire. 1 Route the red power wire to a circuit breaker rated for 15 A , and route the black ground wire to the battery. 2 If necessary, route a wire between the circuit breaker and the battery . 3 Route the wiring-harness plug to the stereo.
Complete System Wiring This diagram illustrates a system installation with an external amplifier and subwoofer connected to the stereo using a line out. You can connect an amplifier and subwoofer only to zone 1 on the stereo. NOTE: You can also connect speakers to the speaker wires for the internal stereo amplifier while using an external amplifier connected to the line out. Adjusting the volume affects speakers connected to the internal amplifier and speakers connected to the line out.
Stereo Information Specifications General Weight 316g (11.2 oz) Water resistance IEC 60529 IPX7 (front), IEC 60529 IPX5 (rear)1 Operating temperature range From 0 to 50°C (from 32 to 122°F) Storage temperature range From -20 to 70°C (from -4 to 158°F) Input voltage From 10.8 to 16 Vdc Current (max.) 15 A Current (muted) less than 190 mA ANT wireless range Up to 3 m (10 ft.) Compass-safe distance 15 cm (5.9 in.) Fuse 15 A mini-blade type ® Bluetooth wireless range Up to 10 m (30 ft.
Stereo Dimension Drawings Front Dimensions 157 mm (6 3/16in.) 68 mm (2 11/16in.) Side Dimensions 22 mm (7/8in.) 81.2 mm ( 33/16 in.) 50 mm (2 in.
Top Dimensions 130 mm (5 1/8 in.) 22 mm (7/8 in.) 10 mm (3/8 in.) Registering Your Fusion Device Help us better support you by completing our online registration today. • Go to www.fusionentertainment.com. • Keep the original sales receipt, or a photocopy, in a safe place. Software Updates For best results, you should update the software in all Fusion devices at the time of installation to ensure compatibility.
Printing a Mounting Template NOTICE It is not recommended that you print a mounting template on your own. Use the template that came in the product box. If you do print the template, you must follow these instructions for printing a mounting template precisely. To print large templates, you need large enough paper and printer.
142 mm (5 19/32 in.) Max. Ø 10 mm (13/32 in.) 43 mm (1 11/16 in.) RA60 Mounting Template 52 mm (2 1/16 in.) 135 mm (5 5/16 in.) March 2021 © 2021 Garmin Ltd.
IMPORTANT SAFETY AND PRODUCT INFORMATION June 2021 © 2021 Garmin Ltd.
Important Safety and Product Information WARNING Failure to heed the following warnings could result in an accident resulting in death or serious injury. Device Warnings • Do not immerse the device or batteries in water or other liquids. • Do not leave the device exposed to a heat source or in a high-temperature location, such as in the sun in an unattended vessel. To prevent the possibility of damage, remove the device from the vessel or store it out of direct sunlight.
Software License Agreement BY USING THE DEVICE, YOU AGREE TO BE BOUND BY THE TERMS AND CONDITIONS OF THE FOLLOWING SOFTWARE LICENSE AGREEMENT. PLEASE READ THIS AGREEMENT CAREFULLY. Garmin Ltd. and its subsidiaries (“Garmin”) grant you a limited license to use the software embedded in this device (the “Software”) in binary executable form in the normal operation of the product. Title, ownership rights, and intellectual property rights in and to the Software remain in Garmin and/or its third-party providers.
1The consumer shall return the product to any authorised Fusion dealer in authorised sales countries for repair or replacement processing. Fusion assumes no freight or shipping responsibility for returning goods to an authorised Fusion dealer, or return freight from an authorised dealer to the consumer submitting the warranty claim. 2The consumer shall be charged for any parts or labour charges not covered by this limited warranty.
Fusion warranty does not apply is subject to Fusion’s normal service policies and Fusion charges for labour and material may apply. • This is a manufacturers warranty provided to consumers of Fusion products. Variations to this warranty may only be made by Fusion and will be notified to the customer in writing or issued on the Fusion website. Fusion Dealers, agents and authorised dealers are not authorised to make changes or vary this Fusion warranty.
© 2021 Garmin Ltd. or its subsidiaries support.garmin.