MODEL # FOA-DK5682 Questions? GIVE US CALL: 1-888-980-5122 MON-FRI 8:30AM - 5:30PM (PST) Allen Wrench (Included) Phillips Screwdriver (Not Included) 2 - People Recommended EASY DIFFICULT The Assembly Rating is a 5-point system showing the level of effort needed to assemble a specific product.
Furniture of America FOA Intro Thank you for your purchase! We hope you enjoy this new addition to your home for many years to come. Our commitment to providing quality products does not simply end when you purchase our product. We fully stand behind our products from start to finish. Our customer service department is available Monday – Friday 8:30 AM – 5:30 PM Pacific and can help with assembly questions as well as, if necessary, replacing damaged or missing parts.
PRE ASSEMBLY INTRODUCTION We understand building ready-to-assemble furniture can be a challenging experience for some. To help avoid confusion, we have provided some helpful tips that may speed up the process. Teamwork ALWAYS have at least two people to help with transporting and assembling the product to avoid potential injury and/or damage. Suitable Location Assembling near the area of the intended location is highly recommended.
/ 13
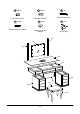
VANITY SET FOA-DK5682 #1 1pc #2 1pc #3 1pc Table top Left bottom cabinet #4 1pc #5 2pcs #6 1pc Mirror Mirror support rail Backplane #7 1pc #8 4pcs #9 1pc Stool Seat Stool Leg Glass Right bottom cabinet #A 12pcs #B 8pcs #C 8pcs Bolt Ø1/4" x 1-3/16" Bolt Ø1/4" x 1-3/8" Bolt Ø1/4" x 2" 5 / 13
#D 20pcs #E 20pcs Lock Washer Ø1/4" #F 1pc Allen Wrench 4mm Flat Washer Ø5/16" #I 1set #H 6pcs #G 12pcs Wood Dowel Ø8 x 20mm Glass suction cup Ø26mm Anti-tip Skit #5 #4 #5 #9 #1 #3 #7 #6 #2 #8 6 / 13
FOA-DK5682 is packed in 3 cases Disignation Carton Part Hardware Left bottom cabinet #2 Right bottom cabinet #3 Table top #1 Mirror support rail (2pcs) #5 #C x 8pcs Backplane #6 #E x 20pcs FOA-DK5682-1 FOA-DK5682-2 FOA-DK5682-3 #A x 12pcs #B x 8pcs #D x 20pcs #F x 1pc Stool Seat #7 Stool Leg(4pcs) #8 Glass #9 Mirror #4 7 / 13 #G x 12pcs #H x 6pcs #I x 1set
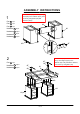
ASSEMBLY INSTRUCTIONS Insert dowels (#G) to back (#6). Align back (#6) to the cabinets (#2,3), then secure by using bolts (#A) with washers (#D,E). 1 Part #2 x1pc Part #3 x1pc Part #6 x1pc #6 #2 Hardware #A x4pcs Hardware #D x4pcs Hardware #E x4pcs Hardware #G x4pcs #G #3 #F #E #D 2 #F Part #1 x1pc Hardware #A x8pcs Hardware #G x8pcs #F #A #A Insert dowels (#G) to the cabinets (#2,3), then align top (#1) to the cabinets (#3). Fully extend the drawers, then secure by using bolts (#A).
ASSEMBLY INSTRUCTIONS Insert suction cups (#H) to the top, then carefully place glass (#9) onto the top. 3 Part #9 x1pc Hardware #H #9 x6pcs #H 4 Part #5 x2pcs Hardware #B x4pcs Hardware #D x4pcs Hardware #E x4pcs #5 #5 Align mirror supports (#5) to the back of unit, then secure by using bolts (#B) with washers (#D,E).
ASSEMBLY INSTRUCTIONS 5 Part #4 x1pc Hardware #B x4pcs Hardware #D x4pcs Hardware #E x4pcs Align mirror (#4) to the mirror supports (#5), then secure by using bolts (#B) with washers (#D,E). #4 #E #5 #D #B #F 6 Secure drawer handles to the front of the drawers.
ASSEMBLY INSTRUCTIONS 1. Put your fingers on this icon of power in order to open or close the LED light. 7 2. Use your fingers to press and keeping hold this button, the light will to be more and more brighter. Against, if you continue press and hold it for the second time, the light will to be become more and more glimmer.
ASSEMBLY INSTRUCTIONS 9 Part #7 x1pc Part #8 x4pcs Hardware #C x8pcs Hardware #D x8pcs Align legs (#8) to the seat (#7), then secure by using bolts (#C) with washers (#D,E).
/ 13