
Operation Manual
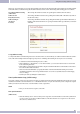


On the page »Forward Setting« you can select the forwarding mode, then enter the destination URL (phone number, phone number in URL
format or IPaddress) to which incomingcalls should be forwarded, as well as a name. Thefollowingcallforwarding optionsare available:
UnconditionalCall Forwarding
(All Forward):
All incoming calls will be forwarded to the specified phone number, URL or IP address.
CallForwardon
Busy(Busy Forward):
An incoming call will be forwarded to the specified phone number, URL or IP address only if the cal
-
led subscriber is busy.
Callforwarding on
(NoAnswer
Forward):
An incoming call will be forwarded to the specified phone number,phone number in URL format, or
IP address if the called subscriber does not pick up the handset within a specified time (as entered in
»Time Out.
Set Up Call Forwarding
You may enable all three call forwarding modes at the same time. In this case the TA will only use »Call Forward Unconditional« (All For-
ward). This call forwarding mode has the highest priority. The two remaining call forwarding modes may be active concurrently.
•
To enable the desired call forwarding mode, choose »On«.
•
Under »All Fwd No.:«, »Busy Fwd No.:« or »No Answer Fwd No.:« you can use the »Name« text box to enter a name
for the forwarding destination.
•
Under »URL« you enter either the phone number, the phone number in URL format or the IP address of the subscri
-
ber to whom calls should be forwarded.
•
Under »No Answer Fwd Time Out« you specify the number of calls after which Call Forwarding on No Answer
should kick in and redirect calls to the specified destination. You can choose any number between 2 and 8 ringing
tones (»2~8 Ring«).
•
Confirm your entries by clicking the »Submit« button.
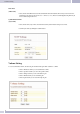
Time Synchronization Setup (SNTP Settings)
It is useful to configure a timer server in your network so that your Telephone remains synchronized within the network. This server can be
installed at an external location in the Internet as a so-called Public Time Server or in your own network. If you have configured a computer
within your network as the Time Server, enter the IP address of that computer here.
SNTP
•
Here, you can activate time acceptance. Select »On«.
Time Synchronization
(Time Server)
•
Under the »Primary Server« and »Secondary Server« setup items, enter the IP addresses of the »time synchronizati
-
on sources«. Here, you can enter two different addresses. This allows the time to be accepted via a second server in
the event of loss of the first server.
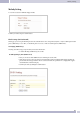
Telephone Settings (Phone Setting)
36