
Operation Manual


Configuration using the telephone
21
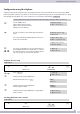
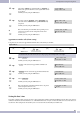
Begin as follows:
a
M<>O<>O<>O
»Menu« but
-
ton
3.Phone setting 4.Date/Time sett 1.Date & Time
To enter the time, move the arrow (cursor) to the proper position and input the correct digits.
If your SNTP server is still configured you will be requested to de-activate it.
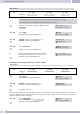
M
When you see this message strike the key »Menu« and select
»2.SNTP setting«.
SNTP must be
disabled first !
<>
Select »1.SNTP«.
Confirm your entry using the »OK« button>«.
1.SNTP
2.Primary SNTP
<>
O
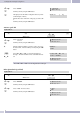
»2.Disabled«. This de-activates SNTP server access.
Confirm your entry using the »OK« button.
1*Enabled
2.Disabled
<>
O
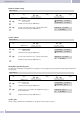
Select »1.Date & Time««.
Confirm your entry using the »OK« button>«.
1.Date & Time
2.SNTP setting
t
O
Here, enter the date and time in the format YY.MM.DD.
hh:mm (in the example shown here 24.12.2006, 19.00).
Confirm your entry using the »OK« button.
Date & Time:
2006-12-24 19:00
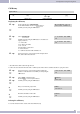
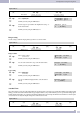
Activating / De-activating the SNTP server (SNTP settings)
Begin as follows:
a
M<>O<>O<>O
»Menu« but
-
ton
3.Phone setting 4.Date/Time set 2.SNTP setting
O
Select »1.SNTP«.
Confirm your entry using the »OK« button>«.
1.SNTP
2.Primary SNTP
<>
O
»1.Enabled«. This activates SNTP server access.
Confirm your entry using the »OK« button.
1*Enabled
2.Disabled
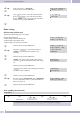
M
Press»Menu« onceagain.
Under the »Primary SNTP« and »Secondary SNTP« setup items, enter the IP addresses of the »time synchronization sources«. Here, you
canenter two different addresses. This allows thetime to be accepted via a second server inthe event ofloss ofthe firstserver. Any timeser
-
ver that has already been entered is displayed.
<>
O
Select »2.Primary SNTP«.
Or, select a further SNTP server »3.Secondary SNTP«.
Confirm your entry using the »OK« button>«.
1.SNTP
2.Primary SNTP