
User Guide

902 MHz Wireless Relays Application Manual B1867
page 3
Optional Modes
• Relay state after power-up can be set to ON, OFF or LAST STATE
• Relay state after power-up is LAST STATE by default.
Relay State
Setting Relay State to OFF at Power-up:
1. While device is not powered, press and hold the LRN button.
2. Power-up the device.
3. Wait approximately 3 seconds until the LED blinks 3 times.
4. Release the LRN button.
Relay will always be OFF at power-up.
Setting Relay State to ON at Power-up:
1. While device is not powered, press and hold the CLR button.
2. Power-up the device.
3. Wait approximately 3 seconds until the LED blinks 2 times.
4. Release the CLR button.
Relay will always be ON at power-up.
Setting Relay State to LAST STATE at Power-up: (Default Mode) **
1. While device is not powered, press and hold the LRN and CLR buttons.
2. Power-up the device.
3. Wait approximately 3 seconds until the LED blinks 1 time.
4. Release the LRN and CLR buttons.
Relay will return to LAST STATE at power-up.
**NOTE: LAST STATE does not work with RIBW24B-EN3 when powered from 24 Vdc.
• Activating Repeater Mode allows relay to repeat signals from other EnOcean devices within range. The relay “hears” the signal and echoes it but will not respond to it unless it
has been linked to the transmitting device.
• Relay will allow a signal to be repeated up to two times.
Enabling Repeater Mode
1. Apply power to RIB.
2. Press, hold, and release the LRN button in approx. ½ second. LED should be blink-
ing. Do not hold LRN for longer than 2 seconds.
3. Press and hold the CLR button for 3 seconds until LED blinks twice indicating
Repeater Mode is enabled.
Disabling Repeater Mode
1. Apply power to RIB.
2. Press, hold, and release the LRN button in approx. ½ second. LED should be blinking.
Do not hold LRN for longer than 2 seconds.
3. Press and hold the CLR button for 3 seconds until LED blinks three times indicating
Repeater Mode is disabled.
Repeater Mode
Alarm Mode
• Activating Alarm Mode requires all learned contact switches, such as WDWS-EN3 or RIBWxxxB-EN3, to transmit a CLOSED telegram before relay will activate. Relay will
deactivate if any contact switch transmits an OPEN telegram.
Enabling Alarm Mode
1. Apply power to RIB.
2. Press, hold, and release the LRN button in approx. ½ second. LED should be
blinking. Do not hold LRN for longer than 2 seconds.
3. Press and hold LRN button on RIB for 3 seconds until LED pattern changes to
FLASH, FLASH, OFF (2 flashes).
4. Press and hold the CLR button for 3 seconds until LED blinks twice indicating
Alarm Mode is enabled.
Disabling Alarm Mode
1. Apply power to RIB.
2. Press, hold, and release the LRN button in approx. ½ second. LED should be blinking.
Do not hold LRN for longer than 2 seconds.
3. Press and hold LRN button on RIB for 3 seconds until LED pattern changes to FLASH,
FLASH, OFF (2 flashes).
4. Press and hold the CLR button for 3 seconds until LED blinks three times indicating
Alarm Mode is disabled.
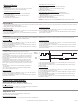
Delay Mode
• Typically used with Hotel Room Energy Control (see page 5).
• Activating Delay Mode allows the relay to ignore temporary changes
in switch states.
• The Delay Mode causes a delay of 10 seconds before relay will turn
ON and a delay of 90 seconds before it will turn OFF. It also prevents
the relay from activating following a deactivation for 90 seconds (see
Figure 4, below).
• The OFF delay allows the load to continue to run while the switch
or transmitter is temporarily open. This is helpful when monitoring
window and door contacts that may be briefly opened and then closed.
If the contact remains open for longer than 90 seconds the relay will
deactivate.
• The ON delay prevents the relay from immediately responding to a
closed contact.
• The 90 second OFF to ON delay is intended specifically for HVAC
units so that they will not short cycle.
Enabling Delay Mode
1. Apply power to RIB.
2. Press, hold, and release the LRN button in approx. ½ second. LED should be
blinking. Do not hold LRN for longer than 2 seconds.
3. Press and hold LRN button on RIB for 3 seconds until LED pattern changes to
FLASH, FLASH, OFF (2 flashes).
Disabling Delay Mode
1. Apply power to RIB.
2. Press, hold, and release the LRN button in approx. ½ second. LED should be blinking.
Do not hold LRN for longer than 2 seconds.
3. Press and hold LRN button on RIB for 3 seconds until LED pattern changes to FLASH,
FLASH, OFF (2 flashes).
4. Press and hold LRN button on RIB for 3 seconds until LED pattern changes again, to
FLASH, FLASH, FLASH, OFF (3 flashes).
5. Press and hold the CLR button for 3 seconds until LED blinks three times indicating
Delay Mode is disabled.
<10s
O
On
O
On
>10s10s
90s 90s 90s
Wireless
Command
Relay
State
Clearing ID’s from Memory
Global Clear (Reset to default settings)
Clears all linked devices, disables optional modes, and turns relay OFF.
Performing Global Clear
1. Press and hold CLR button on RIB for 3 seconds until LED begins slowly blinking.
a. Clear Mode will time out and exit in 30 seconds.
• Allows the user to Un-link a single transmitter from RIB receiver.
• Maintains all optional mode settings.
Performing Single Device Clear
1. Repeating the Link procedure for a currently Linked device will Un-link that device.
4. Press and hold LRN button on RIB for 3 seconds until LED pattern changes again, to
FLASH, FLASH, FLASH, OFF (3 flashes).
5. Press and hold the CLR button for 3 seconds until LED blinks twice indicating Delay
Mode is enabled.
Single Device Clear