
User Guide

902 MHz Wireless Relays Application Manual B1867
page 2
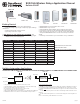
Bi-directional Mode: Two RIBWxxxB- or one RIBWxxB-EN3 and a PHC Gateway Controller
• Both devices must be able to receive and transmit.
• Dry contact closure will transmit a relay ON command; dry
contact open will transmit a relay OFF command.
• RIBWxxB-EN3 Re-transmits dry contact input state every 70-140
seconds.
• Optional modes: Repeater, Alarm (see pages 4)
• When linking a RIB with Version 1.5 firmware (on product label
below RIB logo) to a RIB with an earlier version, the Ver. 1.5 must
be RIB-1 in this procedure.
Bi-directional Link Procedure
1. Apply power to both RIB’s.
2. Get RIB-1 in Learn mode by pressing, holding, and releasing the LRN button for
approx. ½ second. LED should start blinking. DO not hold LRN button for longer than
2 seconds.
3. On RIB-2, hold LRN button until LED blinks once (approx. 3 seconds) to transmit
Device Power
Device Power
Dry Contact
Dry Contact
RIBWxxxB-EN3
RIB-1
Relay Output Relay Output
RIBWxxxB-EN3
RIB-2
LRN CLR LRN CLR
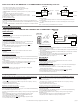
Lighting Applications
Simple Lighting Control: RIBWxxxB-EN3 or RIBWxxC-EN3 and WWS2-EN3 or WKC-EN3
Load
60Hz A/C Power
Yel
Org
Blk
Wht or Red
RIBWxxxB-EN3
or RIBWxxC-EN3
WWS2-EN3
(Rocker Switch)
or
WKC-EN3
(Keycard Switch)
LRN CLR
B. Momentary Mode
• Relay activates while switch is pressed and deactivates when switch
is released.
• Optional modes: Repeater (see page 4)
Momentary Mode Link Procedure
1. Apply power to RIB.
2. Press, hold, and release the LRN button in approx. ½ second. LED should be blinking.
Do not hold LRN for longer than 2 seconds.
3. Press and hold LRN button on RIB for 3 seconds until LED pattern changes to FLASH,
FLASH,
OFF (2 flashes).
4. Press and release the button on the switch you are learning three times quickly.
5. LED on RIB will stay ON for 4 seconds indicating telegram reception.
6. To learn another switch, repeat steps 2-5.
C. Toggle Mode
• Each press and release of the switch causes the relay to change state.
• Optional modes: Repeater (see page 4)
A. Rocker Mode
• Relay activates when Rocker ON is pressed; relay deactivates when
Rocker OFF is pressed.
• Optional modes: Repeater (see page 4)
Rocker Mode Link Procedure
1. Apply power to RIB.
2. Press, hold, and release the LRN button in approx. ½ second. LED should
be blinking. Do not hold LRN for longer than 2 seconds.
3. Press and release the button on the switch you are learning three times
quickly.
4. LED on RIB will stay ON for 4 seconds indicating telegram reception.
5. To learn another switch, repeat steps 2-4.
WWS2-EN3 Modes
Toggle Mode Link Procedure
1. Apply power to RIB.
2. Press, hold, and release the LRN button in approx. ½ second. LED should be blinking. Do not
hold LRN for longer than 2 seconds.
3. Press and hold LRN button on RIB for 3 seconds until LED pattern changes to FLASH, FLASH,
OFF (2 flashes).
4. Press and hold LRN button on RIB for 3 seconds until LED pattern changes again, to FLASH,
FLASH, FLASH, OFF (3 flashes).
5. Press and release the button on the switch you are learning three times quickly.
6. LED on RIB will stay ON for 4 seconds indicating telegram reception.
7. To learn another switch, repeat steps 2-6.
WKC-EN3 Mode
Momentary Mode
• Relay activates when card is inserted and deactivates when card is removed.
• Optional modes: Repeater (see page 4)
Momentary Mode Link Procedure
1. Apply power to RIB.
2. Press, hold, and release the LRN button in approx. ½ second. LED should be blinking. Do
not hold LRN for longer than 2 seconds.
3. Press and hold LRN button on RIB for 3 seconds until LED pattern changes to
FLASH, FLASH, OFF (2 flashes).
4. Insert and remove the card on the switch you are learning three times quickly.
5. LED on RIB will stay ON for 4 seconds indicating telegram reception.
6. To learn another switch, repeat steps 2-5.
Occupancy Detection
A. Manual ON–Auto OFF: RIB receiving from both an Occupancy / Vacancy Sen-
sor (WVSWM-EN3 or WVSCM-EN3) and a Wall Switch (WWS2-EN3)
• Relay activates when Rocker ON is pressed. Relay deactivates when Rocker OFF
is pressed or 30 minutes after last detection of occupancy.
• It may take up to 2 minutes for the RIB to respond to the Occupancy / Vacancy
Sensor immediately following Link.
• Optional modes: Repeater (see page 4)
Manual ON – Auto OFF Learn Procedure
1. Be sure the Occupancy / Vacancy Sensor is charged
2. Apply power to RIB.
3. Press, hold, and release the LRN button in approx. ½ second. LED should be blinking.
Do not hold LRN for longer than 2 seconds.
4. Trigger a Teach telegram from the Occupancy / Vacancy Sensor by pressing the Menu
button once.
5. LED on RIB will stay ON for 4 seconds acknowledging telegram reception.
6. Press and hold LRN button on RIB for ½ second. LED will blink slowly.
7. Press and release rocker switch three times quickly.
8. LED on RIB will stay ON for 4 seconds acknowledging telegram reception.
9. To learn another switch, repeat steps 6-8.
a Teach telegram.
a. LED on RIB-1 will stay ON for 4 seconds to acknowledge and then transmit a
Teach telegram.
b. LED on RIB-2 will stay ON for 4 seconds to acknowledge the Teach telegram
from RIB-1.
Note: To clear memory, hold CLR button for 3 seconds.
B. Auto On: RIB and an Occupancy / Vacancy Sensor (WVSWM-EN3 or WVSCM-
EN3)
• Relay activates when occupancy is detected and deactivates 30 minutes after last
detection of occupancy.
• It may take up to 2 minutes for the RIB to respond to the Occupancy / Vacancy
Sensor immediately following Link.
• Optional modes: Repeater (see page 4)
Occupancy / Vacancy Sensor Only Learn Procedure
1. Charge the Occupancy / Vacancy Sensor per instructions.
2. Apply power to RIB.
3. Press, hold, and release the LRN button in approx. ½ second. LED should be blinking.
Do not hold LRN for longer than 2 seconds.
4. Trigger a Teach telegram from the Occupancy / Vacancy Sensor by pressing the
Menu button once.
5. LED on RIB will stay ON for 4 seconds acknowledging telegram reception.
6. Repeat steps 3-5 for additional Occupancy / Vacancy Sensors.