Mr.
Musikhaus Thomann Thomann GmbH Hans-Thomann-Straße 1 96138 Burgebrach Germany Telephone: +49 (0) 9546 9223-0 E-mail: info@thomann.de Internet: www.thomann.de 26.11.
Table of contents Table of contents 1 General information.............................................................................................................. 1.1 Further information........................................................................................................ 1.2 Notational conventions................................................................................................. 1.3 Symbols and signal words..............................................................
General information 1 General information This user manual contains important information on the safe operation of the device. Read and follow all safety notes and all instructions. Save this manual for future refer‐ ence. Make sure that it is available to all persons using this device. If you sell the device to another user, be sure that they also receive this manual. Our products and user manuals are subject to a process of continuous development.
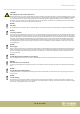
General information 1.3 Symbols and signal words In this section you will find an overview of the meaning of symbols and signal words that are used in this manual. Signal word Meaning DANGER! This combination of symbol and signal word indicates an immediate dangerous situation that will result in death or serious injury if it is not avoided. WARNING! This combination of symbol and signal word indicates a possible dangerous situation that can result in death or serious injury if it is not avoided.
Safety instructions 2 Safety instructions Intended use This device is intended for use as a freely moving multifunctional spotlight. The device is designed for professional use and is not suitable for use in households. Use the device only as described in this user manual. Any other use or use under other operating conditions is considered to be improper and may result in personal injury or property damage. No liability will be assumed for damages resulting from improper use.
Safety instructions CAUTION! Risk of injury due to movements of the device The head of the device can move quickly (pan, tilt) and can produce very bright light. This is also valid immediately after you turn on the device, when the device operates in automatic mode or under remote control and when you turn off a DMX controller that is connected to the device. Persons staying near the device could be injured or frightened.
Features 3 Features The device is particularly suitable for professional lighting tasks, for example at events, on rock stages, in theatres and musicals, in nightclubs as well as for mobile DJ's and entertainers.
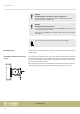
Installation 4 Installation Unpack and check carefully there is no transportation damage before using the unit. Keep the equipment packaging. To fully protect the product against vibration, dust and moisture during transportation or storage use the original packaging or your own packaging material suitable for transport or storage, respectively. Lift the device only at the base. When lifted at the rotatable mounting, the device may be damaged. You can install the device standing or hanging.
Installation NOTICE! Possible damage caused by movements of the device Always ensure that enough space is free around the device for the movements of the head (pan, tilt). NOTICE! Possible data transmission errors For error-free operation make use of dedicated DMX cables and do not use ordinary microphone cables. Never connect the DMX input or output to audio devices such as mixers or amplifiers. Please note that this device must not be connected to a dimmer.
Starting up 5 Starting up Create all connections while the device is off. Use the shortest possible high-quality cables for all connections. Take care when running the cables to prevent tripping hazards. Connections in DMX mode Connect the DMX input of the device to the DMX output of a DMX controller or another DMX device. Connect the output of the first DMX device to the input of the second one, and so on to form a daisy chain.
Connections and operating elements 6 Connections and operating elements ö # PUSH $% & '( ) * +, - ./ 1 Light aperture 2 Tripod mount 3 [Power In] Lockable input socket (Power Twist) for mains power supply 4 [DMX In] DMX input, designed as XLR panel plug, 3-pin 5 Fuse holder 6 Display 7 [MODE] Calls up the settings menu, skips one menu level back and closes an opened submenu without saving any changes 8 [UP] Increases the displayed value by one and selects menu items.
Connections and operating elements 13 [Power Out] Lockable output socket (Power Twist) for powering a connected device 14 [DMX Out] DMX output, designed as XLR panel socket, 3-pin Mr.
Operating 7 Operating 7.1 Starting the device CAUTION! Risk of injury due to movements of the device The head of the device can move quickly (pan, tilt) and can produce very bright light. This is also valid immediately after you turn on the device, when the device operates in automatic mode or under remote control and when you turn off a DMX controller that is connected to the device. Persons staying near the device could be injured or frightened.
Operating Main menu Menu level 2 Menu level 3 Menu level 4 ‘DMX menu’ ‘DMX Addr’ Setting the DMX address Meaning ‘001…512’ ‘Channels Select’ ‘DMX fail’ ‘ShowMode Master’ ‘ShowMode Menu’ Selecting a DMX mode ‘15CH ’ 15-channel DMX mode ‘16CH ’ 16-channel DMX mode ‘26CH’ 26-channel DMX mode ‘46CH’ 46-channel DMX mode Device behaviour on DMX signal failure ‘Stop ’ Stop and take starting position ‘Hold ’ Retaining last settings ‘Auto ’ Performing an automatic run ‘Sound ’ Performing
Operating Main menu Menu level 2 Menu level 3 Menu level 4 ‘Key Lock’ Key lock 30 seconds after last keystroke ‘ON’ Meaning Switching on When the key lock is activated, press successively [MODE], [DOWN], [UP] and [ENTER] to unlock the keys.
Operating Main menu Menu level 2 ‘Record Scene’ Menu level 3 Meaning ‘Test’ Test run prism ‘Reset’ New calibration prism ‘Reverse’ Reverse of the prism Recording scenes ‘ShowMode’ ‘RDM’ Menu level 4 ‘Yes ’ Recording a running scene. ‘No ’ Not recording a running scene.
Operating 7.
Operating Channel 15 Value Function 145…159 Colour effect 10 160…174 Colour effect 11 175…189 Colour effect 12 190…204 Colour effect 13 205…219 Colour effect 14 220…255 No function 0…255 Increasing running speed colour effect Mr.
Operating 7.
Operating Channel 16 Value Function 130…144 Colour effect 9 145…159 Colour effect 10 160…174 Colour effect 11 175…189 Colour effect 12 190…204 Colour effect 13 205…219 Colour effect 14 220…255 No function 0…255 Increasing running speed colour effect Mr.
Operating 7.
Operating Channel Value 25 Colour effect 26 Function 0…9 No function 10…24 Colour effect 1 25…39 Colour effect 2 40…54 Colour effect 3 55…69 Colour effect 4 70…84 Colour effect 5 85…99 Colour effect 6 100…114 Colour effect 7 115…129 Colour effect 8 130…144 Colour effect 9 145…159 Colour effect 10 160…174 Colour effect 11 175…189 Colour effect 12 190…204 Colour effect 13 205…219 Colour effect 14 220…255 No function 0…255 Increasing running speed colour effect Mr.
Operating 7.
Operating Channel Value Function 30 0…255 Intensity green head 3 31 0…255 Intensity blue head 3 32 0…255 Intensity white head 3 33 0…255 Rotation (pan) head 4 (0° up to the maximum value of the pan range of 540°) 34 0…255 Fine adjustment rotation (pan) head 4 35 0…255 Inclination (tilt) head 4 (0° up to the maximum value of the tilt range of 230°) 36 0…255 Fine adjustment inclination (tilt) head 4 37 0…255 Increasing speed head 4 38 0…255 Prism intensity head 4 39 0…255 Inte
Operating Channel 46 Value Function 160…174 Colour effect 11 175…189 Colour effect 12 190…204 Colour effect 13 205…219 Colour effect 14 220…255 No function 0…255 Increasing running speed colour effect moving head 26
Remote control 8 Remote control # To use the remote control, point its infrared diode at the infrared sensor on the unit and press the desired buttons. The maximum operating distance is about 9 m. The device will only respond to the remote control signals if it is not controlled via DMX. & To activate remote control operation, press [STAND BY] on the remote control and then [FULL ON].
Remote control 9 [SOUND ON] Activates the sound-control. 10 [SHOW] Calls up one of the preprogrammed automatic shows. Then press one of the number buttons [1] - [9] for the desired show. To cancel a show, press [STAND BY]. 11 [SOUND OFF] Deactivates the sound-control.
Technical specifications Technical specifications 310 mm 9 PUSH 1015 mm Light source 4 × 30 W RGBW LED Optical properties Beam angle Control DMX 4° Buttons and display on the unit Infrared remote control Rotation angle (pan), max. 540° Inclination angle (tilt), max.
Technical specifications Further information Illuminant type LED Colour mixture RGBW Gobo wheel No Prism yes Motorized focus No Motorized zoom No moving head 30
Plug and connection assignments 10 Plug and connection assignments Introduction This chapter will help you select the right cables and plugs to connect your valuable equipment so that a perfect light experience is guaranteed.
Troubleshooting 11 Troubleshooting NOTICE! Possible data transmission errors For error-free operation make use of dedicated DMX cables and do not use ordinary microphone cables. Never connect the DMX input or output to audio devices such as mixers or amplifiers. In the following we list a few common problems that may occur during operation.
Cleaning 12 Cleaning Optical lenses Clean the optical lenses, that are accessible from the outside, regularly in order to optimize the light output. The frequency of cleaning depends on the operating envi‐ ronment: wet, smoky or particularly dirty surroundings can cause more accumulation of dirt on the optics of the device. n Clean with a soft cloth using our lamp and lens cleaner (item no. 280122). n Always dry the parts carefully.
Protecting the environment 13 Protecting the environment Disposal of the packaging material For the packaging, environmentally friendly materials have been chosen that can be supplied to normal recycling. Ensure that plastic bags, packaging, etc. are properly disposed of. Do not just dispose of these materials with your normal household waste, but make sure that they are collected for recycling. Please follow the notes and markings on the packaging.
Musikhaus Thomann · Hans-Thomann-Straße 1 · 96138 Burgebrach · Germany · www.thomann.