
Owner manual


Point
- The list displays 10 L-Platforms at one time. Click the icon to display the next 10 L-Platforms, or click the icon to
display the previous 10 L-Platforms.
- L-Platforms owned by a different tenant are displayed in red in the L-Platform list.
2. To display the most recent information, click the icon.
Point
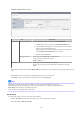
Checking movement process status
When the Status of process button is clicked, the Status of process window is displayed as a separate window and the status of L-
Platform movement processes performed can be checked.
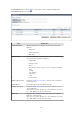
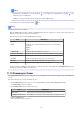
The following shows the items in the Status of process window:
Item
Explanation
Operation Displays the fixed value "Move" to indicate the operation performed
Status Displays the process status. The displayed status is one of the following:
· Completed
· Running
· Failed
L-Platform ID Displays the ID of the L-Platform to be moved
Departure tenant name Displays the name of the tenant from which the L-Platform is being moved
Destination tenant name Displays the name of the tenant to which the L-Platform is being moved
Start date Displays the time and date when the process was requested
End date Displays the time and date when the process was completed
Error message If the process failed, displays the cause of the failure
During movement of an L-Platform, "Reconfiguring" is displayed as the status of the L-Platform in the L-Platform List window of
the tenant from which the L-Platform is being moved.
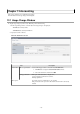
11.13 Changing an Owner
The Change Owner window can be used to change the owner of an L-Platform. The owner can be changed for up to 100 L-Platforms at
one time.
Perform the following steps to change an L-Platform owner:
1. In the L-Platform List window, select one or more target L-Platforms, and then click the Change owner button.
The Change Owner window is displayed.
2. In the Change Owner window, select the new owner.
Item
Explanation
New owner Select the new owner from amongst the tenant users.
Changing L-Platform List The L-Platforms for which the owner is being changed are displayed in a list.
3. Click the Confirm button.
The confirmation window is displayed.
- 133 -