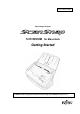
P3PC-1402-03EN Color Image Scanner fi-5110EOXM for Macintosh Getting Started Please read this guide before connecting the scanner to your PC.
Contents Introduction ........................................................................................................................................................... 1 1. Preparation ........................................................................................................................................................ 5 1.1. Checking the Contents of the Package.........................................................................................................................
Introduction Thank you for purchasing the ScanSnap fi-5110EOXM Color Image Scanner product. ScanSnap fi-5110EOXM is a color image scanner and office applications. It is a complete Office Solution designed to improve your productivity and to solve scanning problems in your office. ScanSnap product has the following features.
Regulatory Information FCC declaration This equipment has been tested and found to comply with the limits for a Class B digital device, pursuant to Part 15 of the FCC Rules. These limits are designed to provide reasonable protection against harmful interference in a residential installation. This equipment generates, uses, and can radiate radio frequency energy and, if not installed and used in accordance with the instruction manual, may cause harmful interference to radio communications.
About the use of mercury Hg About the Warning Label This product carries the following label warning. Lamp(s) inside this product contain mercury and must be recycled or disposed of according to local, state, or federal laws. The scanner lamp contains mercury. To avoid unexpected injury, read the following carefully. Doing the following actions may result in serious personal injuries: The surrounding area where this warning label is affixed can become very hot.
Safety Precautions FOLLOW THESE INSTRUCTIONS AND BE SURE TO HEED ALL WARNINGS AND CAUTIONS DESCRIBED BELOW. WARNING Do not touch the power plug with wet hands. Doing so might cause electric shock. CAUTION The following describes important cautions. Install the scanner on a desk so that none of its parts protrude outside of the desktop. Also, make sure that the scanner is installed on a flat, level surface Do not install the scanner on unstable surfaces.
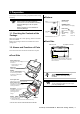
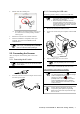
1. Preparation This chapter describes necessary preparations before using ScanSnap. ATTENTION Buttons Do not connect the scanner to your PC before installing “ScanSnap Manager”. If the scanner is connected before installing ScanSnap Manager, it will not operate correctly. Refer to Chapter 2 for the installation of ScanSnap Manager. [SCAN] button Starts scanning. [POWER] button Turns on/off the power supply. Power lamp Indicates the scanner status.
2. Connecting ScanSnap This chapter describes how to connect ScanSnap to your compuer. 3. Select the [Applications] folder at Finder. 4. Select the icon pointed by the arrow and drag the [Adobe Acrobat 7.0 Standard] folder to the [Applications] folder in which the software is installed. 5. After finishing copying, eject CD-ROM, open [Adobe Acrobat 7.0 Standard] folder in the [Applications] folder, double-click Acrobat Standard icon and follow the indicated instructions. 2.1.
2. 2.2.2. Connecting the USB cable Double-click the ScanSnap icon. Follow the procedure below to connect the USB cable. ATTENTION The operation with a commercially available USB cable is not guaranteed. ● When connecting to a USB hub, be sure to connect the scanner to the hub nearest to your computer (first stage). If you connect it to a USB hub from the second stage onwards, ScanSnap may not operate correctly.
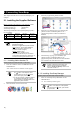
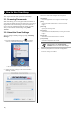
3. How to Use ScanSnap This chapter describes basic operation of ScanSnap. There are six tabs used to configure the scan options: 3.1. Scanning Documents [Application] Select the application for viewing the scanned images. With “ScanSnap” you can turn paper office documents on your desk into digital files and save them just by pressing a single button. The scanned image can be viewed on the screen using the supplied applications (Adobe Acrobat). Also you can edit the scanned image using Adobe Acrobat.
3.3. Scanning Office Documents 1. Select “Adobe Acrobat” at [Application:] under the [Application] tab of “Scan and Save Settings”. 2. Load the documents onto the scanner. Set the paper face-down on the Paper chute cover. Scanning direction Set the backside of the paper to the front. [SCAN] button 3. Press the [SCAN] button. Ö Scanning starts. Ö When the scanning is completed, Adobe Acrobat starts and displays the scanned images.
4. Troubleshooting This chapter describes common problems during the usage of ScanSnap and how to remedy them. 4.1. Troubleshooting Checklist Before you ask for repair service, please check the following items. If you cannot solve the problem even after checking the following items, contact the store where you purchased the scanner, or contact an authorized FUJITSU scanner service provider. Symptom The scanner cannot be turned on.
Symptom Scanning speed is very slow. Multi-feed frequently occurs. "Multi-feed" is a phenomenon when two or more sheets of paper are fed simultaneously into the scanner. Paper is not fed (stops midway). Check This Item Does your PC satisfy the recommended system requirements? Are you using a USB 2.0 port? If you are using a Hub is it USB 2.0 compliant? Note: When using an USB1.1 interface, the data transfer rate may be slower due to large data sizes.
4.2. Clearing Paper Jams 1. 2. 3. Open the ADF while pulling the Cover open lever. Remove the jammed document. Close the ADF cover. Click! ADF cover Cover open lever Ö You 12 | should hear the ADF cover click into position when it returns to its original position.
5. Daily Care This chapter describes how to clean the ScanSnap scanner. WARNING Fire/Electric Shock Before cleaning the scanner, disconnect the AC adapter from the power outlet. 5.1. Cleaning Materials Cleaning Materials Cleaner F1 Parts No. CA99501-0013 Remarks 1 bottle (100ml) *1) To purchase the cleaning material, contact the FUJITSU scanner dealer where you purchased the scanner. 5.3. Cleaning Inside of the scanner Clean inside of the scanner with a cloth moistened with cleaner F1.
2. Clean the following locations with a cloth moistened with the Cleaner F1. Pad ASSY rollers adversely affects the pickup performance. Eject rollers (x2) Clean the rollers lightly taking care not to roughen the surface of the rollers. Take particular care when cleaning the exit rollers, as black debris on the rollers adversely affects the pickup performance.
6. Replacing Consumables This chapter describes how to replace consumables. For details about consumables and where to purchase them, visit the following Website or contact the store where you purchased your scanner. [Website] http://scansnap.fujitsu.com/ WARNING Fire/Electric Shock Before you replace the consumables of this scanner, disconnect the AC adapter from the outlet to turn off the scanner. 6.1. Part Numbers and Replacement Cycle of Consumables 6.2.
6.3. Replacing the Pick Roller ATTENTION 5. Make sure that the Pad ASSY is completely attached. Otherwise, document jams or other feeding errors may occur. Replace the Pick roller following the procedure below. Close the ADF cover 1. Remove the document on the Paper chute cover. 2. Open the ADF cover while pulling the Cover open lever. Paper chute cover ADF cover ADF cover Cover open lever ÖYou should hear the ADF cover click into position when it returns to its original position. 6. 3.
5. Remove the Pick roller with its shaft. Hold the left part of the shaft, and raise it to remove the shaft from the scanner while pulling the shaft to the left. 8. Install the Pick roller with its shaft into the scanner. and set the shaft to the slot while lowering it. Bushing Shaft Pick roller shaft 9. If the around the pick roller is dirty by paper -powder, it may cause a scanning error. Please remove the dirt using a dry cloth with dollop of Cleaner F1.
11. Close the ADF cover. ADF cover ÖYou should hear the ADF cover click when it returns to its original position. 12. Turn on the scanner. Ö ScanSnap Manager icon changes from to . 13. Click and hold the "ScanSnap Manager" icon the Dock menu, and select [Check consumable supplies] from the menu. on 14. In the “Check consumable status” window, click the [Reset] button of the consumable you have replaced. Ö A confirmation pop-up screen appears.