
User's Manual


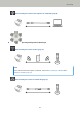

Table Of Contents
- FUJITSU Image Scanner fi-7300NX Operator's Guide
- Contents
- Introduction
- Scanner Overview
- Scanner Setup
- When Connecting the Scanner via Wi-Fi
- Connecting to a Wireless Access Point by Selecting One from the List of Wireless Access Points
- Connecting to a Wireless Access Point by Pressing the WPS Button
- Connecting to a Wireless Access Point by Entering the PIN for WPS
- When Establishing a Connection by Entering the Information for the Wireless Access Point
- When Connecting to a Network Which Requires a Certificate
- When Connecting the Scanner via a Wired LAN
- When Connecting the Scanner to the Computer via a USB Cable
- Checking the Network Connection for the Scanner
- Installing Software
- When Connecting the Scanner via Wi-Fi
- Basic Operations
- How to Perform a Basic Scan
- How to Load Documents
- Loading Documents
- Documents for Scanning
- Paper Size
- Paper Type
- Paper Weight (Thickness)
- Documents That May Not Be Scanned Successfully
- Documents That Must Not Be Scanned
- Precautions
- Loading Capacity
- Area Not to Be Perforated
- Conditions Required to Accurately Detect Overlapped Documents (Multifeed)
- Conditions for Mixed Batch Scanning
- Conditions for Automatic Page Size Detection
- Conditions for Using the Carrier Sheet
- Various Ways to Scan
- Scanning Documents with Different Widths
- Scanning Documents Folded in Half
- Scanning Documents such as Envelopes or Multi-Layered Transfer Paper
- Scanning Photographs and Clippings
- Scanning Long Page Documents
- Feeding Documents Manually
- Configuring Not to Detect Certain Overlap Patterns
- Disabling the Paper Protection Function
- Counting the Number of Documents
- Daily Care
- Replacing the Consumables
- Troubleshooting
- When a Paper Jam Occurs
- Errors
- Paper Feeding Error
- Cover Open Error
- Internal and Optical Errors
- Overrun Error
- Chip Error
- Motor Circuit Error
- Sensor Error
- Communication Related Errors
- Other Errors
- Connection Test Result
- Troubleshooting
- The Scanner Cannot Be Powered ON
- The Touch Screen or the [Power] Button Light or Both Switch Off
- The Touch Screen Does Not Function
- A Malfunction Occurs in the Touch Screen/The Display on the Touch Screen Is in an Incorrect Position
- The Display on the Touch Screen Is Distorted
- Cannot Connect the Scanner and a Computer via Wi-Fi
- A Wireless Access Point Is Not Displayed in the Access Point List
- Wi-Fi Setting for WPS Fails
- Failed to Establish a Wi-Fi Connection by Configuring the Settings Manually
- The Connection Between the Scanner and Computer Frequently Cuts Off
- Cannot Connect the Scanner and a Computer via a Wired LAN
- Cannot Connect the Scanner and a Computer via a USB Cable
- Cannot Connect the Scanner to a Destination by Specifying an IP Address
- Cannot Connect the Scanner to a Destination by Specifying a Host Name
- Scanning Does Not Start
- Scanning Takes a Long Time
- Image Quality Is Poor
- Quality of Scanned Text or Lines Is Unsatisfactory
- Images Are Distorted or Not Clear
- Vertical Streaks Appear on the Images
- Error Code "U4:40" Is Displayed on the Touch Screen While Scanning
- Overlapped Documents Are Frequently Fed into the Scanner
- Situation in Which the Document Is not Fed into the ADF Occurs Frequently
- Paper Protection Is Set Off Frequently
- Paper Jams/Pick Errors Occur Frequently
- Images Turn Out Elongated
- A Shadow Appears at the Top or the Bottom of the Image
- There Are Black Traces on the Document
- The Carrier Sheet Is Not Fed Smoothly/Paper Jams Occur
- Part of the Image Appears Missing in the Case Where the Carrier Sheet Is Used
- Before You Contact the Scanner Service Provider
- Checking the Product Label
- Scanner Settings (Touch Screen)
- Scanner Settings (Software Operation Panel)
- Starting Up the Software Operation Panel
- Password Setting for the Software Operation Panel
- Setting Items
- Settings Related to Sheet Counters
- Settings Related to Scanning
- Adjusting the Position to Start the Scan [Offset Setting/Vertical magnification Adjustment]
- Removing Shadows/Streaks that Appear around Edges of Images [Page Edge Filler (ADF)]
- Configuring the Scan Setting to Drop Out Specified Colors When Scanning [Dropout color]
- Shortening the Scanning Intervals [Pre-Pick]
- Specifying the Number of Retries for Paper Feeding [Number of Paper Feeding Retries]
- Feeding [Pick Speed]
- Cropping the Image Boundary [AutoCrop Boundary]
- Protecting the Documents from Being Damaged [Paper Protection]
- Specifying the Sensitivity Level for Paper Protection [Paper Protection Sensitivity]
- Scanning at High Altitude [High Altitude Mode]
- Specifying the Image Quality for Scanning [Image Quality Mode]
- Settings Related to the Detection for Overlapped Documents (Multifeed)
- Settings Related to Waiting Time
- Settings Related to Power On/Off and Start up of the Scanner
- Settings Related to Scanner Maintenance
- Appendix
- Contact for Inquiries

When Connecting the Scanner via Wi-Fi
About the procedure from unpackaging the scanner to turning the power on, refer to Getting Started.
1 Turn on the scanner.
For details, refer to How to Turn the Power ON (page 56).
2 In the screen which asks whether or not to connect via Wi-Fi, press the [Yes] button.
3 Select a configuration method, and press the [Next] button.
Configure the setting for a wireless access point in one of the following ways:
● Select an Access Point
Select a wireless access point from a list of wireless access points to establish a connection.
For details, refer to Connecting to a Wireless Access Point by Selecting One from the List of Wireless Access
Points (page 38).
● Use WPS
Establish a connection by using WPS of the wireless access point.
- To establish a connection by pressing the WPS button
For details, refer to Connecting to a Wireless Access Point by Pressing the WPS Button (page 39).
- To establish a connection by entering the PIN for WPS
For details, refer to Connecting to a Wireless Access Point by Entering the PIN for WPS (page 40).
● Configure manually
Establish a connection by entering the information for the wireless access point.
For details, refer to When Establishing a Connection by Entering the Information for the Wireless Access
Point (page 41).
HINT
● If the network environment requires a certificate, the certificate needs to be registered with the scanner.
● Set up the scanner by referring to When Connecting to a Network Which Requires a Certificate (page
42).
4 Specify the following items:
● IP Address
Set an IP address for the scanner.
When you set an IP address manually, configure [Subnet Mask] and [Default Gateway].
● DNS Server
Set this item to use a DNS server.
Specify IP addresses for [Primary DNS] and [Secondary DNS].
● Proxy Server
Set this item to use a proxy server.
Specify [Host Name/IP address] and [Port Number]. If an authentication is necessary, specify [Username]
and [Password].
Scanner Setup
35