Preface This installation guide explains how to install the "ETERNUSmgr for Linux" storage system management software on an ETERNUS DX400 series, ETERNUS DX8000 series, ETERNUS2000, ETERNUS4000, ETERNUS8000, ETERNUS3000, or ETERNUS6000 (hereafter referred to as an "ETERNUS Disk storage system" or "device"). Follow the instructions in this guide to install "ETERNUSmgr for Linux". Fourth Edition October 2009 Content and Structure This guide consists of the following two chapters and an appendix.
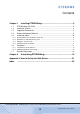
Contents Chapter 1 1.1 1.2 1.3 1.4 1.5 1.5.1 1.5.2 1.5.3 1.5.4 1.6 1.6.1 1.6.2 1.7 Installing ETERNUSmgr...........................................................5 ETERNUSmgr CD-ROM .................................................................................... 5 Installation Outline .............................................................................................. 8 Supported Environment .....................................................................................
Chapter 1 Installing ETERNUSmgr This chapter describes how to install ETERNUSmgr. 1.1 ETERNUSmgr CD-ROM The files distributed on the ETERNUSmgr CD-ROM are listed below. • • • • • • • • • • • • • • • • • • • • • ./README_ja.TXT ./README_en.TXT ./bin/win/ ./bin/sol/ETERNUSV20L30.PKG ./bin/hp/ETERNUSV20L30.HP ./bin/aix/ETERNUSV20L30.AIX ./bin/linux/FJSVgrmgr-V20L30-1.i386.rpm ./doc/install/win/ ./doc/install/sol/ ./doc/install/hp/ ./doc/install/aix/ ./doc/install/linux/ ./doc/share/ ./doc/DX8000/ .
Chapter 1 Installing ETERNUSmgr > 1.1 ETERNUSmgr CD-ROM ./bin/sol/ETERNUSV20L30.PKG This is the main ETERNUSmgr program for Solaris. It is the installation package for the "pkgadd" format. ./bin/hp/ETERNUSV20L30.HP This is the main ETERNUSmgr program for HP-UX. This file is a compressed archive of the various files needed to run ETERNUSmgr. Unpack this file and use the "stxinst" installer to install these files. ./bin/aix/ETERNUSV20L3\30.AIX This is the main ETERNUSmgr program for AIX.
Chapter 1 Installing ETERNUSmgr > 1.1 ETERNUSmgr CD-ROM ./doc/E2000/ This directory contains the "ETERNUS2000 ETERNUSmgr User Guide -Settings/ Maintenance- for models 100 and 200" pdf files. These pdf files show how to set up an ETERNUS2000 model 100 or 200 configuration, and describe how to modify settings and perform maintenance. .
Chapter 1 Installing ETERNUSmgr > 1.2 Installation Outline 1.2 Installation Outline The following are two stages in ETERNUSmgr installation. (1) Installation by rpm command (2) ETERNUSmgr environment setup Refer to "1.6 Procedure" (page 11) for the installation procedures. Check the following before installation.
Chapter 1 Installing ETERNUSmgr > 1.4 Required Hardware/Software • Supported Models Refer to the specifications of each ETERNUS Disk storage system. 1.4 Required Hardware/Software The following hardware/software is required in order to use "ETERNUSmgr". • An Industry standard server with a Web server and Sendmail server installed - IA-64 is not supported. - Operation of ETERNUSmgr using Linux versions/distributions not described in "• Supported Operating Systems" in "1.
Chapter 1 Installing ETERNUSmgr > 1.5 Installation Notes - For ETERNUS DX400 series, ETERNUS DX8000 series, ETERNUS4000 models 300, 400, 500, and 600, and ETERNUS8000, use: Software type Software name Remarks • Microsoft® Internet Explorer 6.0 + Service Web Browser Pack2 ® • Microsoft Internet Explorer 7.0 • Netscape 6.0 or later (Windows® Any of these web browser may be used. environment) - For ETERNUS6000, use: Software type Web Browser Software name • Microsoft® Internet Explorer 6.
Chapter 1 Installing ETERNUSmgr > 1.6 Procedure 1.5.2 Web Directory and Web Directory Files Files in the Web directory created in the installation directory are ETERNUSmgr screen files (top menu files). Copy the edited top menu ("menu.htm") and other related files to an appropriate directory on the Web server containing the menu.
Chapter 1 Installing ETERNUSmgr > 1.6 Procedure 1.6.1 Installation by rpm Command Execute "./bin/linux/FJSVgrmgr-VxxLxx-1.i386rpm" (which is an install package included with the CD-ROM), by abiding by the following format. Installation must be conducted by the superuser. If the installation directory is not specified, ETERNUSmgr will be installed in "/opt/FJSVgrmgr/" as default. Refer to the entering "rpm" command in step 2 in the following, for installation directory specification procedures.
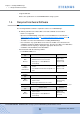
Chapter 1 Installing ETERNUSmgr > 1.6 Procedure Procedure 1 Select the type of target device. The character string for the selected device is assigned to the "TARGET_TYPE" parameter in the setup file ("STXPOLL_1.INI"), while a device type flag (1=ETERNUS3000/GR710/GR720/GR730, 2=ETERNUS6000/GR740/GR820/GR840, 4=ETERNUS DX400 series/ETERNUS DX8000 series/ETERNUS2000/ETERNUS4000/ ETERNUS8000) is assigned to the "TARGET_FLAG" parameter. For an ETERNUS DX410/DX440, select "1" (=ETERNUS DX400 series).
Chapter 1 Installing ETERNUSmgr > 1.6 Procedure Note the following if you do not use the ETERNUSmgr e-mail notification function. The "ADMIN_MAIL" parameter may be omitted in ETERNUSmgr in order to disable the e-mail notification function. Note that the e-mail notification function cannot be disabled by omitting the e-mail address at installation, and the setup file must therefore be edited to disable "ADMIN_MAIL".
Chapter 1 Installing ETERNUSmgr > 1.6 Procedure • Target Flag # Polling Server Flag TARGET_FLAG = Device type flag specified in Step 1 (1 = ETERNUS3000, GR710, GR720, GR730, 2 = ETERNUS6000, GR740, GR820, GR840, 4 = ETERNUS2000, ETERNUS4000, ETERNUS8000, ETERNUS DX400 series, ETERNUS DX8000 series) If "1=ETERNUS DX400 series" was selected in Step 1, then "TARGET_TYPE=ETERNUS DX400". If "2=ETERNUS DX8000 series" was selected in Step 1, then "TARGET_TYPE=ETERNUS DX8000".
Chapter 1 Installing ETERNUSmgr > 1.6 Procedure _STXPOLL.INI, STXPOLL_1.INI STXPOLL_1.INI is a setup file of ETERNUSmgr. It is created by executing the environment setup script. If necessary, a text editor such as Notepad, etc. can be used to edit these settings. _STXPOLL.INI file is a template file. Refer to the "ETERNUSmgr User Guide -Introduction-" when editing these setup files. Edit only parameters described in the guide.
Chapter 1 Installing ETERNUSmgr > 1.6 Procedure www/menu.htm This file contains ETERNUSmgr Top Menu. To use this file, copy it to a directory under the Web server where the top menu is stored. During installation, there is no need to copy this file to the specified directory under the top menu if the default directory is used. In this case, make a backup of this file ("menu.htm") and save it under a different name. www/fujitsu.gif, www/eternus.gif These are the images used by the ETERNUSmgr screens.
Chapter 1 Installing ETERNUSmgr > 1.7 Daemon Registration 1.7 Daemon Registration This section describes how to register ETERNUSmgr daemon. The location and procedure to register the daemon may vary depending on the server settings (registration locations vary with the run level). Consult with the server administrator to register the daemon. 1 Login as superuser. 2 Copy the execution control script to /etc/init.d/ directory. # cp /opt/FJSVgrmgr/stxpoll /etc/init.
Chapter 2 Uninstalling ETERNUSmgr This chapter describes how to uninstall ETERNUSmgr. Always terminate ETERNUSmgr before uninstalling. For details of terminating ETERNUSmgr, refer to "Chapter 3 Startup and Shutdown" in the "ETERNUSmgr User Guide -Introduction-." Use the "rpm" command to uninstall. Format: rpm -e FJSVgrmgr Procedure 1 Log in as the superuser. 2 Follow the above format and enter the "rpm" command. # rpm -e FJSVgrmgr 3 This completes the uninstall.
Chapter 2 Uninstalling ETERNUSmgr > directory. If installed again while previous ETERNUSmgr files exist, the installation may not be completed, or may not operate correctly. This is particularly relevant when the previous setup file ("STX~.INI") remains and is later detected by ETERNUSmgr during operation.
Appendix A How to Set Up the Web Server In addition to installing ETERNUSmgr, your Web server may need to be appropriately set up to enable faults to be monitored and the device status displayed using a Web browser. This appendix introduces an example of how to install ETERNUSmgr and how to set up apache, a typical Web server. The following describes an example of "apache 1.3.20" as the Web server.
Appendix A How to Set Up the Web Server > 3 Correct the path set in "DocumentRoot" to the directory of the ETERNUSmgr Top Menu. (Change underlined section below.) (example of "httpd.conf") # # DocumentRoot: The directory out of which you will serve your # documents. By default, all requests are taken from this directory, but # symbolic links and aliases may be used to point to other locations. # DocumentRoot "/opt/FJSVgrmgr/www" 4 Add the directory option setting (setting to display the directory list).
Appendix A How to Set Up the Web Server > [Web server setup procedure] Procedure 1 2 Open the apache setup file "httpd.conf" in an editor (e.g. vi). Search for the line described as "Alias" in "httpd.conf." (example of "httpd.conf") # # Note that if you include a trailing / on fakename then the server will # require it to be present in the URL. So "/icons" isn't aliased in this # example, only "/icons/"..
Appendix A How to Set Up the Web Server > ■ Example 3 Setting up the ETERNUSmgr Top Menu in the previously used Web server public directory when installing ETERNUSmgr. [Assumptions] • apache is already installed under the following directory configuration Root path for apache HTML document Full path of apache setup file : "/home/httpd/html" : "/etc/httpd/conf/httpd.
Index A stxchk ................................................................. 15 stxpoll ................................................................. 16 stxpolld ............................................................... 15 stxpollset.sh........................................................ 16 _STXPOLL.INI .................................................... 16 STXPOLL_1.INI.................................................. 16 Supported Environment ........................................
ETERNUS Disk storage systems ETERNUSmgr Install Guide for Linux P2U3-0022-04ENZ0 Date of issuance: October 2009 Issuance responsibility: FUJITSU LIMITED • The contents of this manual are liable to being updated without notice. • While the contents of this manual are the product of all due care and diligence, no responsibility can be accepted for operational problems arising from any errors or missing information, or other use of the information contained in this manual.