Fujitsu Mobile Color Scanner User’s Manual Fujitsu endeavours to ensure that the information in this document is correct, but accepts no liability for any error or omission in the same. Any procedures described in this document for operating Fujitsu products should be read and understood by the operator before such products are used. To ensure that Fujitsu products function without risk to safety and health, such procedures should be strictly observed by the operator.
Safe Operation About this User’s Manual This user’s manual contains important information on the safe use of the Mobile Color Scanner. Before attempting to use the scanner, read this guide thoroughly, paying particular attention to the “Notes on Safety.” Be sure to keep this guide handy in a safe and convenient location for quick reference during use.
Preface Thank you for purchasing the Fujitsu Mobile Color Scanner. The scanner can scan high-resolution color images. Follow the instructions written in this user’s manual so that you will use the scanner properly.
[Acts requiring caution] • Under government guidelines, business companies are warned against reproducing anything beyond their minimum required number of private securities (such as stock certificates, bills, and checks), commutation tickets, coupon tickets, and others. • Also prohibited is the unauthorized reproduction of passports issued by the government, licenses and ID cards issued by public institutions and private organizations, and passes, meal coupons, and other tickets.
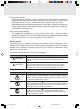
Notes on Safety Precautions to Follow when Installing or Moving the Scanner CAUTION Do not place the device in locations exposed to high temperatures, humidity, or dust, or with poor ventilation. Otherwise, it could lead to electric shock or fire. Do not install the scanner near a heating source such as a stove or heater, or near flammable materials such as volatile substances or a curtain. Otherwise, it could lead to fire.
Precautions to Follow when Using the Scanner WARNING Do not place on or near the device vessels containing water, such as “vases, flowerpots, and cups” or metallic objects such as clips and pins. Otherwise, it could lead to electric shock or fire. Do not splash water on the device or moisten it with water. Otherwise, it could lead to electric shock or fire.
Handling Precautions This scanner is precision electronic equipment. Follow the precautions below when handing the scanner. • Do not put any object on the scanner. Otherwise, the scanner could be scratched or could fail. • Do not insert any foreign objects into the scanner. Do not spray a liquid such as water or disassemble the scanner and insert any foreign objects into the scanner. • Do not use the scanner under any abnormal condition.
Contents Safe Operation ................................................................................................ ii Preface ........................................................................................................... iii Notes on Safety .............................................................................................. v Handling Precautions .................................................................................. vii Contents ......................................
Uninstalling Software .................................................................................. 36 Reinstallation .................................................................................................................... 36 Uninstalling the Scanner Driver ........................................................................................ 36 Uninstalling Software Supplied with the Scanner ............................................................. 37 Troubleshooting ...............
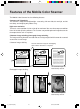
Features of the Mobile Color Scanner The Mobile Color Scanner has the following features: Compact and lightweight The scanner is compact and lightweight - measuring 142 mm wide, 30 mm high, and 30 mm deep, and weighing only about 100 g. High scan resolution The basic scan resolution is 600 x 600 dpi at maximum. You can select output resolution from 100 to 600 dpi using software. The scanner can provide optimum image data to suit the output device such as a printer.
Correction of orientation The automatic skew correction function automatically corrects the result of scanning an original on the skew, sideways, or upside down to place the result in position. If an original is scanned on the skew If an original is scanned sideways Scan result The scan result has been placed in position. If an original is scanned upside down.
Scanning facilitated by linking the scan button to FUJITSU launch After you install the scanner driver, FUJITSU launch automatically appears on the taskbar at the lower right of the screen each time you start the computer. When you press the scanner button in this status, the screen for scanning appears, allowing you to start scanning an original right away. Start the computer. Install the scanner driver,then restart the computer. Connect the cable. FUJITSU launch is resident on the taskbar.
Checking the Packing Contents Packing Box Scan button Pressing this button starts scanning. Pressing this button once again stops scanning. Mobile Color Scanner Ready lamp When this lamp is on, scanning is enabled. Cable Core for electromagnetic interference USB connector Setup CD with Scanner Driver Carrying case Accessory pack User ’s Manual (this manual) Calibration sheet % ( Original holder If any part is defective, contact the store where you purchased the scanner.
Names and Functions of Parts on the Top of the Scanner Scan button Pressing this button starts scanning. Pressing this button once again stops scanning. Ready lamp When this lamp is on, scanning is enabled. Mobile scanner Cable USB connector Names and Functions of Parts on the Bottom of the Scanner Scan window An image is scanned through this window. Always keep this window clean. Auxiliary rollers Main rollers When the main rollers move, animage is scanned.
Work Flow 1 Check the packing contents. Open the packing box and check the contents. ( Calibration sheet 2 Insert the driver setup CD into CD-ROM drive. Turn the power to the computer on and insert the setup disk in the disk drive. 3 Proceed in accordance with the messages displayed on the screen and restart the computer. 4 Connect the scanner to the computer. Connect the scanner to the computer. 5 Perform calibration.
Installing the Scanner Driver When you insert the setup disk into the CD-ROM drive, the following screen automatically appears. This start screen for installation is called the “main menu” of the installation utility. Readme Displays easy-tounderstand explanations and notes on installation when executing installation using the main menu. EXIT Terminates the main menu. This area displays an explanation of the item at the cursor under “INSTALL SOFTWARE.
Preparations The following details each item introduced in “Work Flow.” Proceed with preparation by following the procedural sequence below. Turn on the computer. Notes If you have connected the scanner, disconnect the scanner, then install the scanner driver and connect the scanner by following the procedure below. Insert the Scanner Driver CD into CD-ROM drive.
Click on Scanner Driver. Click Next. Click Next.
Wait until the files have been copied. Click on EXIT. Click Start > Shut Down Windows.
Click Restart > OK. After the computer restarts, connect the scanner to the computer. Notes Connect the scanner for the first time at this step. Guide If you have inadvertently connected the scanner to the computer before installing the scanner driver, check the connection, referring to “Checking the Connection”.
Caution In a Windows 2000 environment, when you connect the scanner to the computer, the following screen appears: Click Yes. Press the scan button. The following screen appears: Guide If the above screen does not appear, check the connection, referring to “Checking the Connection”.
Place the scanner on the white area of the calibration sheet, then click OK. Notes Be sure not to move the scanner while the following screen is being displayed. When the above screen appears, slowly move the scanner from the white area to the black area. Guide Move the scanner while ensuring that it does not become separated from the sheet.
When this screen appears, click OK. Guide If the calibration termination screen does not appear after you move the scanner to the bottom, move the scanner to the top again. Continue scanning the sheet until the termination screen appears. Scanning is complete.
Caution If this error message is displayed, click OK, slowly move the scanner from the black area to the white area of the calibration sheet again. When the scanner reaches the end of the sheet, continue scanning by moving the scanner in the opposite direction on the sheet. The following screen appears: You can now use the scanner.
Using the Mobile Color Scanner Have ready the original of the material you want to scan. For details of the scanning range of this scanner, see “Original Sizes the Scanner Can Scan”. Place the scanner on the original. Press the scan button.
When the light around the scan button becomes green, slowly move the scanner to scan the original material. Move the scanner while ensuring that it does not become separated from the sheet. Press the scan button again at the position you want to stop scanning. The scanned image is automatically saved on the screen of your computer under the following icon: To change the data save destination, see “Coordinating Processing with FUJITSU Launch”.
Setting Operation Performed when Pressing the Scan Button You can use FUJITSU launch to set the operation performed when the scan button of this scanner is pressed. FUJITSU launch is a resident icon on the taskbar after installation of the scanner driver.
Coordinating Processing with FUJITSU Launch Specify how processing is performed when clicking the Transfer button on the driver screen or which software program is to be started after an image is scanned. (See “Screens Displayed during the Use of the Scanner”.) Select Save to... from the FUJITSU launch menu and click a desired option. Save to file is selected as the initial setting. Save to...
Detailed setting This option is used to set the folder used when you select Save to file for Save to... and the application to be started when you select Launch application for it. Click Detailed setting in the menu. The following dialog box appears: On Windows 98/Me For Application, you can select from up to 16 applications that were set. On Windows 2000 The Application field is left blank. Click the Browse button. A dialog box appears.
Screens Displayed during Use of the Scanner The following outlines the names and functions of the items on the scanner driver screen. For details, see Online Help of the scanner driver. Main Tab This screen is displayed on the left when the scanner driver starts. Guide You can bring up the screen by pressing the scanner button. Doc.Type Selects the type of original to be scanned. Bright Resolution Adjusts the brightness of halftones. Specifies the number of pixels (dots) per inch.
Image Adjustment tab Original screen Sample screen Displays the image scanned using the settings previously saved. Displays the image on which the settings on the Image Adjustment page are reflected. Undo button Returns the settings on the Image Adjustment page to those previously saved. Apply button Automatic check box Gamma Reflects image processing for the Sample image in the preview window. When turned on, automatically sets each adjustment item.
Preview Screen The preview screen, which is displayed on the right of the screen regardless of whether the Main or Image Adjustment tab is selected, displays the scanned image in the preview window. Scan button End button Scans an original using the set values. Terminates the driver screen without scanning. Transfer button Transfers the adjusted image to the application. Preview window Displays the scanned image. Zoom in icon Select Area icon Selects an area to be transferred to the application.
Scanning an Original This scanner can scan an original with a smooth surface such as a photograph or printed matter. Check the conditions and sizes of originals the scanner can scan before scanning an original. To scan a large original, see “Scanning a Large Original”. Conditions for Originals the Scanner Can Scan This scanner may not successfully scan certain types of original. Note the following: Notes • Use an original with a smooth surface.
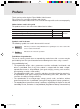
Original Sizes the Scanner Can Scan The following table lists the original sizes this scanner can scan. Width (mm) (*1) Length (mm) A6 105 148 Two A6-size sheets in portrait orientation 105 297 A4 in portrait orientation 210 297 Size Business card 91 55 Postcard 100 148 Photograph Free Custom 88 127 Up to 105 Up to 364 (*2) 13~105 13~364 (*2) Guide *1 *2 The width (mm) in the above table indicates the value including margins.
1 Make sure that the power to the computer is on and set this scanner on an original. Make sure that the original area to be scanned is within the scanning range of the scanner and the beginning of the original is at the scanning start position. The following figure shows the scanning range.
2 Start scanning the original. Follow the procedure below to scan the original. Perform steps 2) and 3) only when you use the scanner with the software for the first time. Guide For information on how to start the scanner from software, see the manual for the software you are using. 1) Start software supporting TWAIN. 2) Click Select TWAIN Source... or another item in the File menu. 3) Select FUJITSU Mobile Color Scanner from the Source list in the displayed dialog and click the Select button.
3 Move the scanner as follows. • When Auto is checked under Direction on the driver screen The scanner automatically recognizes orientation of scanned characters and converts them into right orientation. You can scan the original without considering the scanning direction.
4 Terminate scanning. When the scanner scans the specified size of the original, it automatically terminates scanning. When the Adjust Image check box is off, scanning is now complete. The scanned image is displayed on the software. When the Adjust Image check box is on, a reduced image is displayed in the preview window. Go to step 5. To stop scanning in progress Press the scan button of this scanner. Data that has been scanned is saved.
5 Click the Image Adjustment tab. On the Image Adjustment page, adjust the image, and rotate, horizontally flip, and cut the image on the preview screen if required. 6 Click the Transfer button on the driver screen to transfer the image to the software. Guide During scanning or calibration of this scanner, do not place the computer in the suspend, not operating, or standby state.
Scanning a Large Original The following explains how to scan a large original the scanner cannot scan at one time. This scanner stitches the images of an original mainly consisting of text (called a document below) using the character image stitching function, and photographic and picture images using the photograph image stitching function.
• If you scan a document on the skew, black dots and others may be displayed on a stitching boundary. In this case, remove them using image processing software. • If you scan a document containing a drawing or photograph, the drawing or photograph in the stitching result may be misaligned. Scan a document so that a drawing or photograph is scanned at one time. • Only images scanned from the top to bottom (document orientation) can be stitched.
Images which can be stitched Image 1 Images which cannot be stitched Image 1 ABCDEFGHIJKLMNOPQRSTUVWX Image 2 ABCDEFGHIJKLMNOPQRSTUVWX Image 2 ABCDEFGHIJKLMNOPQRSTUVWX NOPQRSTUVWX For photograph image stitching Scan a photograph or picture image original so that an area of at least 20 mm must be scanned twice. Guide Scan an original from the top to the bottom. Scan the left side of the original for the first pass, and then scan the right side for the second pass.
Scanning a Large Original For a large original, select Character Image for Stitching Mode and scan the original several times. For a photograph or picture image original, select Photograph Image. The following explains how to make settings on the driver screen. For details of the driver screen, see “Screens Displayed during Use of the Scanner”. 1 Set the desired stitching mode on the driver screen.
3 Specify a value for Scan Times. For character image stitching Specify 2 to 6 for Scan Times as the number of times the original is to be scanned. For photograph image stitching 2 is fixed for Scan Times. 4 Start scanning. Press the scan button of this scanner or click the Scan button on the driver screen to start scanning. When scanning is complete, the reduced image that was scanned is displayed in the preview window.
6 Terminate stitching. When the specified number of images have been scanned and stitched, scanning terminates, the driver screen is closed, and the image of the stitching result is displayed on the software. If you want to terminate scanning before the specified number of images have been scanned, click the Stop Stitching button. The images that have been scanned and stitched are displayed on the software.
Maintenance To keep the scanner in good condition, clean the scanner about once a month. Warning Burns Electric shock • Before cleaning the scanner, always disconnect the pen scanner from the computer. • Cleaning the scanner without disconnecting it from the computer may result in burns or electric shock. Notes Note the following points when cleaning the scanner: • Use only water or neutral detergent.
Cleaning the Optical Unit A dirty optical unit may cause images to be distorted. Wipe the optical unit with a soft dry cloth. Notes Use a soft dry cloth to clean the optical unit. Do not use water or neutral detergent. Cleaning the Rollers To remove paper dust from the rollers, move the scanner on a commercially available adhesive sheet for cleaning printers. Disconnecting the Scanner from the Computer Disconnect this scanner from the USB connector of the computer.
Uninstalling Software The following explains how to uninstall the scanner driver and software supplied with the scanner. To uninstall software in a Windows 2000 environment, you must log on as Administrator. Reinstallation Before reinstalling the scanner driver, first delete the existing files. Uninstalling the Scanner Driver Before reinstalling or upgrading the scanner driver for the purpose of using it properly, first uninstall the currently installed scanner driver.
4 Restart the computer. After completion of uninstallation, restart the computer. The scanner driver is now uninstalled. Uninstalling Software Supplied with the Scanner 1 Select Settings from the Start menu and click Control Panel. The Control Panel dialog appears. 2 Double-click Add/Remove Programs. The Add/Remove Programs Properties dialog appears. 3 On Windows 98/Me, select a software program to be uninstalled from the list on the Install/Uninstall page and click the Add/Remove button.
Troubleshooting Read the following if an error message is displayed or you cannot operate the scanner as expected while using the scanner. Checking the Connection After connecting this scanner to the computer, check whether the scanner driver has been installed successfully, following the procedure below: 1 Select Settings from the Start menu and click Control Panel. 2 Double-click System in the Control Panel.
3 On Windows 98/Me: Click the Device Manager tab in the System Properties dialog. On Windows 2000: Click the Device Manager button on the Hardware tab in the System Properties dialog. Verify that FUJITSU Mobile Color Scanner has been created under Imaging Devices in the displayed Device Manager page. This completes the checking procedure.
If FUJITSU Mobile Color Scanner has not been created and USB Device is displayed under Other Devices or USB Device under Imaging Devices is marked with an exclamation mark (!) on Windows 98/Me/2000, the scanner driver has not been installed successfully. Reinstall the scanner driver by following the procedure below: • When you have not installed the scanner driver On Windows 98/Me, select USB Device under Other Devices by clicking the left mouse button and click the Remove button to uninstall it.
Error Messages If an error message is displayed during the use of this scanner, scan the original again and check whether the error recurs before assuming that the scanner is faulty. If the error recurs, take appropriate action in accordance with the explanations given below. If the error still occurs after you take action following the procedure described above, contact a Fujitsu service representative in charge of Fujitsu personal computers and peripheral products.
Error message Explanation and action to be taken The specified scanner is being used. – Check whether this scanner is being used by another software program. – Check whether the scanner driver has been started twice. – Terminate all software programs, then start them and perform scanning. An input-output error occurred in the scanner. A failure occurred during a scan operation using this scanner. The failure may have occurred in the image scanner. Turn off the power to all devices once.
Error message Explanation and action to be taken Because the scanner was stopped, scan operation was aborted. This message is displayed when at least 2 minutes have elapsed after start of scanning. Scan an original within 1 minute at a time. You cannot select “Automatic” in “Direction” if “Halftone” is selected in “Image Type.” Select “Manual” in “Direction,” or select a setting other than “Halftone” in “Image Type.
Submessages Error message Explanation and action to be taken – Undefined error Submessages following error messages “General fault related to response to MSG_XXXXXX (internal)” and “General fault related to response to DAT_XXXXXX (internal)” These submessages indicate the details of individual program errors occurring during message/data processing. – Processing cannot be continued because memory is insufficient. – The data source could not be found.
Before Assuming that the Scanner is Faulty If you cannot operate the scanner as expected or an error occurs, check the following items before assuming that the scanner is faulty. Problems are divided into the following two types in accordance with their nature here: • Problems related to operation • Problems after scanning Problems related to operation The scanner does not operate when you press the scan button.
1 Select Settings from the Start menu and click Control Panel. 2 Double-click System in the Control Panel dialog. 3 On Windows 98/Me, click the Device Manager tab in the System Properties dialog. On Windows 2000, click the Device Manager button on the Hardware page in the System Properties dialog. 4 Check that USB Device is displayed under Other Devices on the Device Manager page.
5 Select USB Device and click the Remove button. 6 Connect the scanner to the computer. Although the setup disk is inserted, the main menu does not appear. Start Explorer and double-click Instmenu.exe on the setup disk.
Problems after scanning The scanned image contains streaks. • The optical unit of the scanner may be dirty or there may be foreign matter on the unit. Clean the optical unit. (Refer to “Maintenance” and “Cleaning the Optical Unit”.) • Perform calibration again. This problem may be solved. (See “Preparations” in the User’s Manual and “calibration” in the Glossary.) The scanned image is blurred or distorted or colors run. • The original may not have been scanned straight.
Aliasing in the image is noticeable. • If the scanning resolution is low, aliasing may become noticeable depending on the image. Specify a higher resolution and scan the original again. • Although an original is scanned at high resolution, aliasing may become noticeable when the image is scaled up. Make an enlarged copy of the original itself and scan the copy. The margins of the original are not white. • Areas which look white differ in the degree of whiteness in fact.
Specifications Hardware Specifications Scanning method Hand-held Resolution 600 x 600 dpi Scanning device Contact image-sensor Scanning speed 3.
Operating Environment Scanner Driver Operating Environment Compatible operating systems Windows 98/Me, Windows 2000 Professional CPU Recommended: Pentium/266 MHz or higher Memory (*1) At least 64 MB (Windows 98/Me) Recommended: At least 128 MB (scanning at 600 dpi on Windows 2000) Hard disk At least 5 MB of available space Connection port USB Port *1: Stitching images of a large original requires at least 64 MB of memory.
Before Making Inquiries If you want to consult Fujitsu about the scanner or have any inquiries thereon, check the following items and contact a Fujitsu service representative. The information in the list below will allow us to respond to you more quickly.
Glossary Terms that may be unfamiliar to beginners are described below. Calibration Operation for determining the reference values for black and white areas, so that the computer can accurately identify each information item in an image scanned by the scanner. For the Mobile Color Scanner, use the calibration sheet supplied with it for calibration. Be sure to perform calibration before using this scanner for the first time.