
AOU36RLX Installation Manual


En-4
CAUTION
When the outdoor temperature is 32°F (0°C) or less, do not use the accessory drain
pipe. If the drain pipe are used, the drain water in the pipe may freeze in extreme cold
weather. (Reverse cycle model only)
In the area with heavy snowfall, if the intake and outlet of outdoor unit is blocked with snow,
it might become difcult to get warm and it is likely to cause of the breakdown. Please
construct a canopy and a pedestal or place the unit on a high stand (local congured).
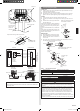
5. INSTALLATION
5.1.
Valve cover remove
Valve cover removal.
• Remove the one mounting screw.
• Remove the valve cover by sliding upward.
Valve cover
Hook (4 places)
5.2. HOW TO CONNECT THE WIRE TO THE TERMINALS
(1) Use ring terminals with insulating sleeves as shown in the gure below to connect to
the wire.
(2) Securely crimp the ring terminals to the wires using an appropriate tool so that the
wires do not come loose.
(3) Use the specied wires, connect them securely, and fasten them so that there is no
stress placed on the terminals.
(4) Use an appropriate screwdriver to tighten the terminal screws. Do not use a screw-
driver that is too small, otherwise, the screw heads may be damaged and prevent the
screws from being properly tightened.
(5) Do not tighten the terminal screws too much, otherwise, the screws may break.
(6) See the table below for the terminal screw tightening torques.
Tightening torque
M3.5 screw 0.8 to 1.0 N • m
M4 screw 1.2 to 1.8 N • m
M5 screw 2.0 to 3.0 N • m
Strip
10 mm
Ring terminal
Sleeve
Wire
Wire
Screw with special washer
Terminal board
Terminal block
Screw with special washer
Ring terminal
Ring terminal
CAUTION
Match the terminal block numbers and connection cable colors with those of the outdoor
unit or branch box. Incorrect wiring may cause a re.
Connect the connection cables rmly to the terminal block. Imperfect installation may
cause a re.
When xing the connection cable with the cable clamp, always fasten the cable at the
plastic jacket portion, but not at the insulator portion. If the insulator is chafed, electric
leakage may occur.
Do not use an earth screw for an external connector. Only use for interconnection
between two units.
Be careful not to generate a spark as follows for using a ammable refrigerant.
• Do not remove the fuse while power is on.
• Do not disconnect plug from the wall outlet and the wiring while the power is on.
• It is recommended to position the outlet connection in a high position. Place the
cords so that they do not get tangled.
5.3.
Outdoor unit wiring
CAUTION
When connecting the power supply cable, make sure that the phase of the power
supply matches with the phase of the terminal board. If the phases do not match, the
compressor will rotate in reverse and will not be able to compress.
(1) Service cover removal
• Remove the two mounting screws.
• Remove the service cover by pushing downwards.
(2) Fasten the power supply cable and the connection cable to the conduit holder
using the lock nut.
(open the knock out holes if necessary)
(3) Connect the power supply cable and the connection cable to terminal.
(4) Fasten the power supply cable and connection cable with cable clamp.
Lock
nut
Inter-unit line
Power supply
Hook
(3 places)
Direction of
the service
panel removal
Service cover
9374995356_IM.indb 4 11/20/2014 10:31:31 AM