
ABU36RSLX Installation Manual

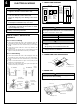


FRESH-AIR INTAKE
(1) Open up the knockout hole for the fresh-air intake, as shown in the
figure. (If using half-concealed installation, open up the top knockout
hole instead.)
10
For half concealed
installation
Indoor unit
CAUTION
1 When removing the cabinet (iron plate), be careful not
to damage the indoor unit internal parts and surroun-
ding area (outer case).
2 When processing the cabinet (iron plate), be careful
not to injure yourself with burrs, etc.
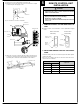
(2) Fasten the round flange (optional) to the fresh-air intake, as shown in
the figure. (If using half-concealed installation, attach to the top.)
[After completing “2 INDOOR UNIT INSTALLATION”...]
(3) Connect the duct to the round flange.
(4) Seal with a band and vinyl tape, etc. so that air does not leak from the
connection.
Round duct (option parts)
Duct
11
WIRED REMOTE CONTROL
UNIT SETTING (OPTIONAL)
BEFORE INSTALL WIRED REMOTE CONTROL UNIT
••
••
• The wired remote control unit is an option. It isn't included in main body
of air-conditioner.
••
••
• When you use wired remote control unit, some functions may not be
used.
••
••
• please use the recommended wired remote control unit.
(Before installing, Please read the FEATURES AND FUNCTIONS sec-
tion of OPERATING MANUAL to confirm the concerned contents.)
CAUTION
1 Before installing, be sure to disconnect all power sup-
ply.
2 Don't touch the heat exchanger.
3 During installing or removing operation, be sure not to
have wire catched by parts or draw it hard. Or it may
result troubles to the air-conditioner.
4 Avoid place in direct sunlight.
5 Select place that will not be affected by the heat from a
stove, etc.
6 Insure the length of wire is not over the recommended
maximum length.
7 Before setting up the wired remote control unit, please
confirm whether air-conditioner can receive the sig-
nal.
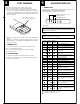
Remove the two screws on the bottom and then remove control box A.
Control box
Control box A
Screw
CAUTION
1 When the optional wired remote control is used, please
refer to the wired remote control manual supplied with
the wired remote control.
2 When the unit is set for the optional wired remote con-
trol, the wireless remote control cannot be used.
3 When the unit is set for the optional wired remote con-
trol, MANUAL/AUTO switch on the indoor unit cannot
be used.
4 When the unit is set for the optional wired remote con-
trol, the Display Timer lamp (Green) on the indoor unit
will no longer light.