
Operating Manual

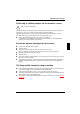

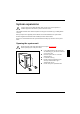
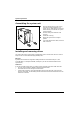
Table Of Contents
- Title
- Contents
- Introduction
- Important notes
- Preparation for use and operation
- Troubleshooting and tips
- Installing new software
- Power-on indicator remains dark after you have switched on your device
- The screen stays blank
- Flickering or drifting stripes on the monitor screen
- No mouse pointer displayed on the screen
- The floppy disk cannot be read or written
- Time and/or date is not correct
- Error messages on the screen
- Restoring the hard disk contents
- Tips
- System expansions
- Technical data
- Index

System expansions
30
A26361-K515-Z100-1-7619
Assembling the system unit
2
3
3
1
a
²
Place the housing on the system unit (1)
from above so that the distance (a) is
approx. 10 mm. While doing so, make sure
that the housing is hooked into the system
unit at the bottom.
²
Push the casing in the direction of the
arrow (2).
²
Fasten the screws (3).
²
Return the system unit to its original
position.
²
If you have disconnected cables, reconnect
them at the rear.
Installing and removing drives
The system unit houses a total of three accessible drives (two 5 1/4-inch drives and one 3 1/2-inch
drive) and one non-accessible half-height (Slimline) drive.
IDE drives
By default four IDE drives are supported. Ideally hard disks are connected to IDE port 1, and
accessible drives, for example CD-ROMs, to IDE port 2 (see also the Technical Manual for the
system board).
SCSI drives
If you want to install an SCSI drive, you require an SCSI controller and an SCSI cable. Note that:
•
not every SCSI controller is suitable for operating SCSI hard disks
•
each SCSI device must be assigned its own SCSI-ID
•
a device with activated or connected terminating resistors must always be connected at the
end of an SCSI cable. The terminating resistors of all other SCSI devices attached must not be
activated or connected.