
User Manual
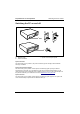
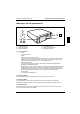
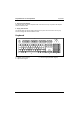
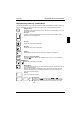
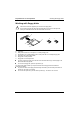
Table Of Contents
- Title
- Contents
- Introduction
- Important notes
- Transporting the PC
- Cleaning the PC
- Preparation for use and operation
- Unpacking and checking the delivery
- Preparing the PC for use
- Setting up the PC
- Connecting devices
- Connecting the PC to the line voltage
- Unlocking/locking the system unit
- Switching the PC on and off
- Indicators on the system unit
- Keyboard
- Working with floppy disks
- Settings in BIOS Setup
- Property and data protection
- Troubleshooting and tips
- System expansions
- Technical data
- Index

Preparation for use and operation Connecting the PC to the line voltage
14
A26361-K520-Z100-4-7619
Connecting the PC to the line voltage
100 V - 125 V 200 V - 240 V
1 1
1 = Notch for inserting the screwdriver
Check the rated voltage.
!
The value marked with an arrow must agree with the local line voltage:
115 = 100 V to 125 V 230 = 200 V to 240 V
If the rated voltage does not agree with the local line voltage, lift out the plug-in unit with a
screwdriver (1), turn it and replace it.
2
1
Plug the system unit's power cable into the system unit (1) and then into the grounded power
outlet (2).