
KVM Switch User Guide 2-1611


5 Appendices
5.1 FLASH Upgrades
The KVM s2-1611 FLASH upgrade feature allows you to upgrade your unit with
the latest rmware available. To perform this update you will need a TFTP server.
If you don’t already have a TFTP server, there are several you can download from
the internet.
If you upgrade the appliance rmware, please verify the individual rmware of
the KVM s2-Adapters. The upgrade of the adapters requires a separate upgrade
procedure which is found in Chapter 4.
Next, you will need to copy the FLASH upgrade le (. le extension) from the CD.
Save the FLASH upgrade le to the appropriate directory on the TFTP server. Once
this is complete, the following steps will upload the new FLASH le.
When upgrading your switch rmware, ensure that the keyboard coun-
try codes with your system correspond with the rmware loaded in your
switch. Contact Fujitsu SiemensTechnical Support for more informa-
tion. Technical Support contact information is available at the end of this
manual.
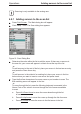
5.1.1. Uploading a new FLASH le
Connect a terminal or PC running terminal emulation software (such as
HyperTerminal) to the conguration port on the back panel of the KVM s2-1611
using a straight-through null modem cable. The terminal should be set to 9600
baud, 8 bits, 1 stop bit, no parity and no ow control.
Connect the LAN port on the KVM s2-1611 to an Ethernet hub that is also
connected to the PC being used as the TFTP server.
Launch both the server software and the terminal emulation software.
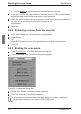
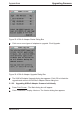
Verify that the KVM s2-1611 is turned on. After approximately 40 seconds, the
KVM s2-1611 will send out a message, Fujitsu Siemens KVM series2-1611
Ready__Press any key to continue. Press any key to access the main menu.
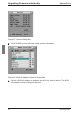
The KVM s2-1611 main menu appears.
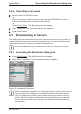
Get the IP address of the TFTP server: If using the SolarWinds TFTP server, it
appears in the lower right-hand corner of the server’s pane. Otherwise, extract
it from the OS tools (may be OS-dependent):
a. Right-click on Network Neighborhood.
b. Select Properties.
c. Select the Protocols tab.
d. Select TCP/IP protocol.
e. Select Properties and note the IP address.
590-332-501E 39