
KVM Switch User Guide 2-1611


KVM series2-1611
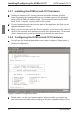
you enter your selection, you will be returned to the Network Conguration
menu.
Select option 2 and specify if you are using a static or BootP IP address. Use
a static IP address for ease of conguration. If you are using a BootP address,
please congure your BootP server to provide an IP address to the appliance,
skip step 4 and continue to the next procedure.
Select options 3-5 from the Terminal Applications menu, in turn, to nish
conguring your appliance for IP address, Netmask and Default Gateway.
Once this is completed, type a Ø (zero) to return to the main menu.
3.3.3 Adjusting the mouse acceleration
Before a server can be connected to the KVM s2-1611, an adjustment to mouse
acceleration must be made. Use the default Microsoft® Windows® PS/2 mouse
driver for all attached Microsoft Windows systems attached to the appliance.
3.3.3.1 Adjusting the mouse using Microsoft Windows NT®
(using default drivers)
From the desktop, select Start - Settings - Control Panel - Mouse.
Click on the Motion tab.
Set the pointer speed to Slow. You will need to set this for any Windows NT
user account that will be accessing the Windows NT system through
the appliance.
3.3.3.2 Adjusting the mouse using Microsoft Windows 2000/Windows XP
From the desktop, select Start - Settings - Control Panel - Mouse.
Click on the Motion tab.
Set the Acceleration setting to None and the speed setting to the default of
50%.
3.3.3.3 Adjusting the mouse using Solaris
Open the Workspace menu on your desktop.
Select Applications - Application Manager - Desktop_Controls.
Open the Mouse Style Manager and set the Acceleration to 1.0.
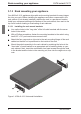
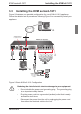
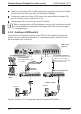
3.3.4 Connecting a KVM s2-Adapter to each server
Locate the KVM s2-Adapters for your KVM s2-1611 unit.
Attach the appropriately color-coded cable ends to the keyboard, monitor and
mouse ports on the rst server you will be connecting to the unit.
Adjusting the mouse acceleration
590-332-501E 11