
User's Manual


5
Tablet Dock User’s Guide
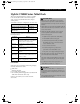
DOCKING YOUR SYSTEM
Microsoft
®
Windows
®
uses “plug- and-play” technology
to automatically load the files necessary to operate your
Tablet Dock and any attached devices.
1. Plug the system’s AC adapter into a wall outlet, then
into the Tablet Dock’s DC Input jack.
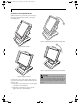
2. Set the ST4000 system on the Tablet Dock, with the
system oriented in the same direction as the dock.
(See Figure 3 for location). The connector in the back
of the system should be aligned with the interface
connector on the Tablet Dock.
Figure 3. Docking the system
3. Carefully push the system towards the docking port
until you hear a click. The click indicates that the side
latches are in place. Note that the system is not yet
locked into place until the following step is
performed.
4. Firmly pull the lock handle down as far as it will go.
This engages the back latches and side latches, and
locks the system in place.
5. Your Tablet Dock is now ready for use. You may now
attach devices to it.
UNDOCKING YOUR SYSTEM
Use these instructions when you want to remove your
system from the Tablet Dock.
1. If you are running a CD or DVD in the Tablet Dock
drive, be sure to stop the drive before undocking the
ST4000.
2. Press the lock release button on the top of the right
slide (above the lock handle). While holding it down,
pull the lock handle upwards to unlatch the back
latches from the system.
3. Pull the system upwards, away from the platform.
The system is now undocked.
POINT
The following instructions assume the Tablet Dock is
positioned in portrait mode, with the Lock Handle on
the right of the dock.
POINT
The front portion of the base should not be used as a
handle.It is designed to support the system when it is
installed in the Tablet Dock.
POINT
The system can be removed from the Tablet Dock
whether the system is operating or not.
Tablet Dock.fm Page 5 Wednesday, September 11, 2002 10:06 AM