
User's Guide
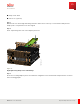
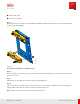

Table Of Contents
- User Guide
- Contents
- Preface
- 1 About this Guide
- 2 Overview
- 3 RU Hardware Feature
- 3.1 System Configuration
- 3.2 RU Specifications
- 3.3 Environment Specifications
- 3.4 RU Downlink/Uplink Default Parameters
- 3.5 Antenna Configuration
- 3.6 Carrier Configuration
- 3.7 Block Diagram
- 3.8 External Interface
- 3.9 TX Control Function
- 3.10 Performance Requirement
- 3.11 Mechanical Design and Other Options
- 4 Ordering Information
- 5 Installation
- 6 Operations
- 7 Maintenance and Trouble Clearing
- 8 Removal
- A References
- B ZTP Overview
- C Optical Connector Cleaning
- D Glossary
- Index

5.6
RU Installation
In this section:
5.6.1 Installation Prerequisites
5.6.2 Attach L-Brackets and Eye Bolts
5.6.3 Attach RU Mounting Adapter Plate
5.6.4 Attach RU to Pole
5.6.5 Attach RU to Wall
The following procedures describe how to install the RU.
Note: All hardware is stainless steel that will not corrode.
5.6.1
Installation Prerequisites
Installation requires the following basic tools and accessories:
■ Power cable
■ Optical cable
■ RF cables
■ RET cable
■ SFP
Tools Required:
■ Torque wrench
■ Torx
®
screwdriver
■ Screw drivers
■ Wire strippers
Note: This list of tools and accessories is the minimum required to install the RU. Depending on the situation,
more may be required. Any additional tools required for each installation procedure need to be identified and
prepared before starting installation.
Installation
RU Installation
82
Release 1.0 · Issue 1, March 2021
Fujitsu and Fujitsu Customer Use Only