
Owner's Manual


FPANG1: LP TO NG CONVERSION KIT INSTRUCTION MANUAL
Models PRO-C & PRO-S
FPANG1 includes the following components:
1 - 10 foot 3/8” ID gas hose with quick connect
1 - 1.80mm natural gas orifice for Outer Burner
1 - 1.24mm natural gas orifice for Inner Burner
Connection: Operating pressure: 7.0” W.C.
Check with your local gas utility company or with local codes for instructions on installing gas
supply lines. Be sure to check on type and size of run, and how deep to bury the line. If the gas
line is too small, the grill will not function properly. Any joint sealant used must be an approved
type and be resistive to the actions of natural gases. (This type of connection should be
performed by a certified or licensed technician only.)
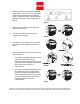
Assembly Instructions:
A. Assemble as shown above (FIG. 01). Remove
the front door. Use a pipe wrench to hold the
grill inlet pipe to avoid shifting any internal gas
lines of the grill. Remove the pre-attached LP
gas hose pipe from the inlet fitting of the grill.
Attach the 3/8" ID gas hose on.
B. Assemble as shown above (FIG. 02) Use
screwdriver to remove screws holding burner to
grill body by unscrewing counter-clockwise to
remove the burner kit.
C. Use a wrench to unscrew the LP gas orifice by
turning counter-clockwise and replace with
natural gas orifice. Use the 1.80mm orifice
(Silver) for the Outer Burner ring and the
1.24mm orifice (Brass) for the Inner Burner
ring. Note: The natural gas orifice has a larger
hole in the center to keep the flow of natural
gas consistent.
D. After the replacement, properly locate and re
attach the burner kit with respect to the orifices.
Adjust the igniter tip located near the burner
edge. (FIG. 03)
(Brass) ORIFICE 1.24MM
FOR INNER BURNER
(Brass) ORIFICE 1.80MM
FOR OUTER BURNER
(Brass) ORIFICE 1.80MM
FOR OUTER BURNER
(Brass) ORIFICE 1.24MM
FOR INNER BURNER
FIG 01.
FIG 02.
FIG 03.
Fuego Living LLC
147 Standard St
El Segundo CA 90245
888-88-FUEGO
info@fuegoliving.com