HIGH PERFORMANCE RACING DRONE USER MANUAL
INDEX 1.0 General Information 2.0 Product Contents 3.0 Safety Precautions 4.0 Safety Regulations 5.0 Remote Controller 5.1 Inserting the batteries 5.2 Remote Controller commands 5.3 Binding the remote controller with the Skyflash 5.4 Flying controls 5.5 Trim/Regulating 5.5.1 Manual trim 5.5.2 Automatic trim/reset 5.6 Speed selector 5.7 App controller mode 6.0 FTX Skyflash pilot information 6.1 Maintaining your FTX drone 6.2 Electronic protection system 6.3 Battery charging 6.3.1 Battery Safety 6.
SAFETY REGULATIONS 4.0 1- Keep all small parts out of the reach of children to prevent accidents. 2- The Skyflash is a powerful machine. You must move the left joystick slowly (the accelerator joystick) to ensure that it does not climb rapidly and cause a collision. 3- When you have finished flying, please remove the Li-Po battery from the Skyflash. Before you do, switch of the transmitter.
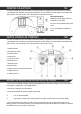
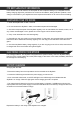
INSERTING THE BATTERIES 5.1 To insert the batteries in the transmitter, remove the battery compartment cover and insert 4 “AA” size 1.5v batteries (not included) / paying special attention to their polarity to ensure that the transmitter operates correctly. You may need to use a screwdriver to open the rear cover. Recommendations: Batteries must be fitted under the supervision of an adult. Do not mix new batteries with used ones. Do not mix batteries of different kinds. REMOTE CONTROLLER COMMANDS 5.
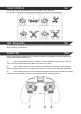
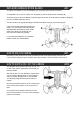
FLIGHT CONTROLS 5.4 The left stick controls the ascent/descent and the rotation in both directions. The right stick controls the forward/backward and left/right movement in both directions. TRIM / REGULATING 5.5 To ensure that your Skyflash can fly straight and level, you need to trim the aircraft. This can be done either manually or automatically. MANUAL TRIM 5.5.
AUTOMATIC TRIM / RESET. 5.5.2 The X-Drone is equipped with an auto-trim system whereby its default settings can be restored, allowing the aircraft to fly in an accurate and level manner. When must we use this function? - If the aircraft has taken an impact and as a result its Gyroscope/Electronic stabilizer is off-kilter. - If you have transported the aircraft from one place to another. - If your X-DRONE does not maintain its fixed position when hovering.
FTX SKYFLASH PILOT INFORMATION 6.0 In this section of the user manual, we will explain all of the aspects relating to your Skyflash such as battery charging, flight time, precautions for correct use of batteries, safety protection systems, how to change a rotor blade on your Skyflash and more important information for its correct use and handling. MAINTAINING YOUR FTX DRONE 6.1 1. Clean the Skyflash with a clean, soft cloth. 2.
BATTERY SAFETY 6.3.1 The FTX Skyflash is equipped with a rechargeable Li-Po battery. Do not use or leave the battery near a fire or source of heat. Do not hit, throw or drop the battery on any hard surface. Do not immerse the battery in water; keep it in a dry, cool place at all times. When charged, the battery must be checked regularly. Do not overcharge the battery. Do not connect the battery to power outlet with a different voltage. Do not damage or pierce the battery with any sharp object.
ACROBATIC FLIGHT: FLIP & ROLL (360º) 6.5 Once you have experience at flying of the FTX Skyflash you can continue to make progress and begin performing amazing Flips & Rolls. To perform a Flip & Roll in any of the speeds you can press the right control stick and then move it in any of the four directions to perform a Flip & Roll in this direction. Your Skyflash has a fourth speed with which it is not necessary to press stunts to perform a Flip & Roll manoeuvre.
REPLACING DAMAGED ROTOR BLADES 6.8 To replace rotor blades on your FTX Skyflash you must follow the following instructions: Your Skyflash has 4 rotors, 2 of which turn clockwise (A) and the other two anti-clockwise (B). These two types of rotors use blades of opposite types since each of the two pairs of blades is designed to work in a different direction of turn. The kit includes in its original packaging 4 replacement blades, two type (A) and two type (B).
CAMERA SD/HD 6.9.2 To take a picture momentarily press the button (3) camera button, a momentary led lighting system flashing indicate you that photography was successful. To start recording a video, press and hold the camera button (3) for 3 seconds, led lighting system will start to blink continuously during the recording of the video. To finish the recording back to hold the camera control button (3), doing this the lighting system will stop flashing.
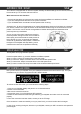
LIST OF COMPONENTS 7.0 FTX0505 Body FTX0506B (blue) FTX0506R (red) Canopy FTX0507 Protection Guards FTX0508 Battery FTX0509 Transmitter FTX0510 Blades FTX0511 PCB Main Board FTX0512 Motors FTX0513 LED Lights FTX0514 Charger FTX0515 Camera You can download our control apps by using the QR codes below. iOS Android Android (China) FTX is an exclusive brand of CML Distribution, Saxon House, Saxon Business Park, Hanbury Road, Bromsgrove, Worcestershire, B60 4AD, England info@ftx-rc.com · www.