
Operation Manual

PAG.
5
rev 1.1
ENGLISH
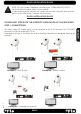
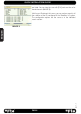
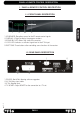
LNB Power
: Here you can set the power output to the LNB. If
your receiver is connected to the LNB directly then you need
to set the LNB Power to “On”. If your receiver is connected
to a multi switch (SMATV signal distribution system) then it
may be that you don’t need to provide the power to the LNB
(IMAGE 2). But since this is depending on the kind of installed
distribution system we recommend you to contact your installer
or to refer to the user manual of this system to get the correct
information.
Press [ ] to switch between “On” /”Off”.
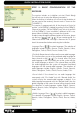
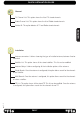
Satellite List
When you enter the “Satellite List” menu you can see a window
like the one beside (IMAGE 3):
1. Move through the satellite list using [ ] and mark/
unmark the satellites that you want pressing [OK]
2. Press [Red] button to enter edit satellite menu. You can edit
the satellite’s name and its longitude. Once you have edited the
satellite, select “Save” option and confi rm with [Yellow] button.
If you prefer to exit without saving the changes press [Blue]
button.
3. Press [Green] button to open the “Add satellite” window.
You can edit the satellite’s name and its longitude. Once you
have edited the satellite, select “Save” option and confi rm with
[Yellow] button. If you prefer to exit without saving the changes
press [Blue] button.
4. After pressing [Blue] button you will be asked “Are you sure
to delete?”. Select “Yes” to delete the marked satellite. Select
“No” to cancel the operation.
Press [Exit] to save the changes and go to the previous window
to continue confi guring the antenna.
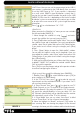
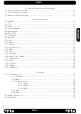
Single search
: You can edit the following items (IMAGE4):
1. Satellite: Press [ ] to switch Satellites or press [OK] to
enter satellite list to select directly.
2. In the “FTA Only” item, press [ to select to scan only
free channels or even scrambled channels. If you select “Yes” it
will scan free channels only.
3. In “Scan Channel” item, press [ ] to select to scan TV
+ Radio Channels, or just TV channels or just Radio channels.
4. Network Search: If you select this option as “Off”, the receiver
will search the selected Satellite. In case you select “On”, the
NIT (Network Identifi cation) will be identifi ed and the receiver
will automatically search all the TP of this network.
5. In “Scan Mode” item you can select “Auto Scan” to blind
scan or “Preset Scan” to scan all preset transponders.
6. Move the highlight to “Search” and press [OK] button to
start scanning. Bars are showing the progress of the channel
scanning in the lower part of the window and the found channels
QUICK INSTALLATION GUIDE
IMAGE 3
IMAGE 4