MAX S400 HD PLUS
QUICK INSTALLATION GUIDE The lightning flash with arrowhead symbol, within an equilateral triangle, is intended to alert the user to “dangerous voltage” and to prevent from a risk of electric shock. WARNING: To reduce the risk of electric shock, don’t open the cabinet. Refer servicing to qualified personnel only. The exclamation point within an equilateral triangle is intended to alert the user to important operating and maintenance (servicing).
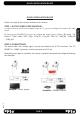
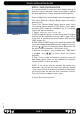
QUICK INSTALLATION GUIDE QUICK INSTALLATION GUIDE Follow next steps for the correct installation of this receiver. STEP 1: OUTPUT VIDEO CONFIGURATION By pressing the [V-FORMAT] key you can configure the output format. Options: (By source / By Native TV / 480i / 480p / 576i / 576p / 720p_50 / 720p_60/ 1080i_50 / 1080i_60 / 1080p_50 / 1080p_60). STEP 2: CONNECTIONS The coaxial cable, with satellite signal, must be connected to the “IF IN” connector.
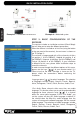
Example 3 – Combined with terrestrial Example 4 – Motorized system STEP 3: BASIC CONFIGURATION OF THE RECEIVER IMAGE 1 The receiver includes an installation assistant (Quick Setup) that will help you to setup the different parameters.
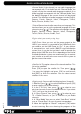
QUICK INSTALLATION GUIDE Second Audio: If the channel has no audio language that corresponds with “First Audio” but with “Second Audio” the system will play the second audio language as default. If no audio language corresponds with the “Second Audio” then the default language of the current channel will be played instead. The selections of audio languages include: English, German, French, Spanish, Italian, Portuguese, Turkish, Polish, Russian, Arabic, Farsi.
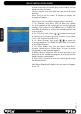
QUICK INSTALLATION GUIDE IMAGE 3 Multi search: You can edit the following items (Image 3): 1. On “Satellite” item press [OK] to open the satellite list. At the bottom of the screen you can see the selected satellites. The system will use DiSEqC1.0/1.1, DiSEqC1.2 and USALS functions to search the marked satellites and scan channels. 2. On “FTA Only” item, press [ ] to select scanning of all channels or just scanning of free channels. If you select “Yes” it will scan free channels only. 3.
QUICK INSTALLATION GUIDE STEP 4: TIME CONFIGURATION It is recommended to setup the clock before starting to enjoy the receiver, because correct time maybe is required by some applications. Please complete following options: NOTE: If the current channel provides the correct time information, you will see the current time after you entered “Time” menu. If the channel doesn’t provide time information, you have to input the date and time information manually. The most channels support the time signal. rev 1.
QUICK INSTALLATION GUIDE Edit Channel TV Channel List: This option shows the list of TV stored channels. Radio Channel List: This option shows the list of Radio stored channels. System Setup Language: This option allows choosing the language of the menus. TV System: This option allows choosing the video Standard and other parameters of the screen. Display setting Local Time Setting: Time setting menu. Timer Setting: Timer setting menu.
QUICK INSTALLATION GUIDE Installation Antenna connection Satellite List: This option shows all the stored satellites. This list can be modified. Single Search: Once the antenna is configured, this option allows search for the channels of one satellite. Multi Search: Once the antenna is configured, this option allows search for the channels of various satellites. TP List: This option shows all the stored TP. This list can be modified.
PAG. 10 rev 1.1 ENGLISH INDEX 1. Panel & Remote Control Description 1.1. Front panel description…….......................................…………………………12 1.2. Rear panel description…...............................................…………………………..12 1.3. Remote Control Description…...............................................…………………………..13 2. Basic Operations 2.1. Standby ……………………..............................................…………………………………...14 2.2. PR + / PR -…...............................................
PAG. 11 ENGLISH rev 1.1 INDEX 4.6. TP List……………..........................………………………..………………...24 5. System Setup 5.1. Language………………….............………………………...…………………...25 5.2. TV System……………..............…………………………..…………………...25 5.3. Display setting………....................………………………...………………26 5.4. Local Time Setting ………....................………………………...………………26 5.5. Timer Setting....................................................................................27 5.6. Parental Lock……………………..................
PANEL & REMOTE CONTROL DESCRIPTION This user’s guide is adapted to the version v.1.13B4-NR dated 21/11/2011. For future software updates, you can download the user’s guide from the following website: http://www.ftemaximal.com 1. PANEL & REMOTE CONTROL DESCRIPTION ENGLISH 1.1. FRONT PANEL DESCRIPTION 1 2 34 5 1. IR-SENSOR: Reception sensor for the IR remote control signals. 2. DISPLAY: 4 Digits to display the program numbers. 3. STAND BY LED: Shows the state of the receiver. 4.
PANEL & REMOTE CONTROL DESCRIPTION 1.3. REMOTE CONTROL DESCRIPTION 28 29 1 2 3 4 7 6 8 9 10 12 11 13 14 15 17 16 19 20 21 18 22 23 24 25 26 27 25. (SLOW): Backward / Forward slow buttons for recording and TimeShift. * 26. (Play): Start button for recording and TimeShift. * (Stop): Stop button for recording and TimeShift. * 27. 28. SAT: Satellite List 29. FAV: Opens favourite channel list. rev 1.1 * This function will only be available in models with PVR ready functionability PAG.
BASIC OPERATIONS 2. HOTKEY 2.1 STANDBY 1.Press [Power] button to switch from TV mode to Standby mode. 2.In Standby mode press [Power] button again to switch back to TV mode. The last active channel will be showed. 3.To switch off the STB complete press the main power button. 2.2 PR+/PRENGLISH In TV mode press [Channel Up/Channel Down] to change channel. 2.3 VOL+/VOLIn TV mode, press [Volume Up/Volume Down] to adjust volume. 2.
BASIC OPERATIONS OSD 4 3.Press number key [OK] can display the current channel detail information. The window is like below. 4.We should press green button if we wish to program a timing of the selected event. The timing window will be opened automatically and this way we will be able to confirm the programming of the event. We should press Exit if we wish to come back to channel list (OSD 4). 5.
BASIC OPERATIONS 2.We should press [Yellow] button if we wish to program a timing of the selected event. The timing window will be opened automatically and this way we will be able to confirm the programming of the event. We should press Exit if we wish to come back to channel list. (OSD 7) 2.16 TELETEXT ENGLISH OSD 8 1.Press [TXT] button in TV mode to open the teletext page. This service is depending on the support of the channel provider. 2.
BASIC OPERATIONS 4. In order to leave the Time Shift option, press the key [stop] to equal the difference between the reproduction time with the real one. 2.20. FIND 1. Press [FIND] key can open the “Find” window. 2. After input each character, the program list on the left will search the channel according your input, and list the matched channel. 3. Press [Blue] key can close “Find” window. In Tv mode, press [RES] key in order to configure the output format of your receiver. 2.22.
CHANNEL 3. EDIT CHANNEL Press [Menu] in the TV mode to enter the main menu (OSD 12). ENGLISH OSD 12 ] to select the Edit Channel item. 1. Press [ 2. Press [OK] to enter the selected item. ] to select the wanted menu item. 3. Press [ 4. Press [OK] to enter the selected item among. - TV Channel List - Radio Channel List - Delete All 3.1. TV CHANNEL LIST OSD 13 If you enter the Channel List menu a window like the one besides will open (OSD 13). 1.
CHANNEL 3.1.3. EDIT CHANNEL 1. Press [Blue] button to open the “Edit” window. 2. You can Delete, Sort, and Edit the channel (OSD 16). 3. Press [Exit] to leave the Channel Editing. The system will ask you to confirm the saving of the changes you made. 3.1.3.1. SORT OSD 16 OSD 17 3.1.3.2 DELETE In Channel Edit menu press [Blue] button to mark a channel for deleting. Marked channels (OSD 18) will be deleted after you confirm to save the changes when you leave this menu. 3.1.3.
CHANNEL 3.2. RADIO CHANNEL LIST Basically the operation of “Radio Channel List” is same as “TV Channel List”, except that in the small channel window a static background will be displayed (OSD 22). 3.3. DELETE ALL ENGLISH OSD 20 A safety question will show up where you have to confirm first. Select “Yes” to delete all channels or “No” to cancel and confirm with [OK] (OSD 23). Pressing [Exit] will exit the function directly without saving.
INSTALLATION 4. INSTALLATION OSD 24 4.1. ANTENNA CONNECTION OSD 25 When you enter the “Antenna connection” menu you can see a window like the one beside (OSD 25). LNB: Press the arrows [ ] on the remote to select the “Motorized Antenna” option in case you have an installation with an engine. If you do not have an engine, choose “Fixed Antenna”. 4.2. SATELLITE LIST rev 1.1 OSD 26 When you enter the “Satellite List” menu you can see a window like the one beside (OSD 26): ] and mark/ 1.
INSTALLATION 4.3. ANTENNA SETUP Depending on how the “Antenna Connexion” section is configured, it will allow configuring different parameters: OSD 29 OSD 30 • (Motorized Antenna) (OSD 29): ] in order to change among “Universal” - LNB type: Use [ , “Unicable” or a specific frequency of the local oscillator. Note: If you have an Unicable installation that allows you to distribute a satellite signal through a unique cable up to 8 receivers as maximum, in this menu option you can configure the receiver.
INSTALLATION 4.4. SINGLE SEARCH 4.5. MULTI SEARCH OSD 32 rev 1.1 OSD 33 OSD 34 Entering in this menu, you can make a search in all the satellites of the list configured in the “Satellites list” option. The configuration options are the same as in the individual search section. After selecting Antenna Setup another window will be opened (OSD 32). You can edit the following items: 1. Satellite: Press [OK] to enter satellite list. 2.
INSTALLATION 4.6. TP LIST ENGLISH OSD 35 OSD 36 OSD 37 When you open the “TP List” menu you will see a window like the one beside (OSD 34). ] to change the marked satellite. Press [ 1. Press [ ] to change the marked TP. 2. Press [Red] button to open the “Edit TP” menu (OSD 36). Here you can edit the Transponder’s data like frequency, polarity and Symbol Rate. In this window, the search of the channels of the TP can be done selecting the “Search” option and pressing [OK]. 3.
SYSTEM SETUP 5. SYSTEM SETUP OSD 39 5.1. OSD LANGUAGE OSD 40 rev 1.1 OSD 41 When you enter to “Language” menu, you will see the screen like below (OSD 40): 1.OSD Language: press [ ] key to select languages, the selections of languages include: English, French, German, Italian, Spanish, Portuguese, Polish, Russian, Turkish, Arabic and Farsi. 2. First Audio: Some channels offer more than one audio language. This function allows you to set the preferred audio language for those channels using [ ].
SYSTEM SETUP ENGLISH select from By source / By Native TV / 480i / 480p / 576i / 576p / 720p_50 / 720p_60/ 1080i_50 / 1080i_60 / 1080p_50 / 1080p_60 in YUV mode and 480i / 576i in RGB mode. Press [ ] to select the desired mode. 2. Aspect Mode is used for switching the screen aspect ratio mode. Now we provide below options: 4:3 PS / 4:3 LB / 16:9 / AUTO. You can press [ ] key to select each mode circularly. 3. In video output you can choose, by the means of [ ] keys, the video output mode: RGB / YUV.
SYSTEM SETUP 5. “Date” and “Time” items are valid only when the setting of “GMT Usage” is “Off”. You can press [ ] keys to moving highlight and use number keys to input directly. 6. Press [Exit] key to return back from ”TV System” menu. 5.5. TIMER SETTING OSD 45 * This function will only be available in models with PVR ready functionability 5.6. PARENTAL LOCK rev 1.1 OSD 46 You can set a password for anyone who wishes to operate in the “Installation” menu.
SYSTEM SETUP ENGLISH 1. Menu Lock determining that when user wish to enter “Installation” menu, whether have to input Password or not. If the setting of “Menu Lock” is “Yes” which means user have to key in password, set “No” means unlock. 2. Channel Lock determining that when user wish to play the lock channels, whether have to input the password or not. If the setting is “Yes”, play the channels with lock mark will show up a dialogue on the screen and ask for the password.
SYSTEM SETUP 5.9. OTHER When you select “Other” you will see a screen like OSD 49: 5.9.1. LNB POWER OSD 49 5.9.2. CHANNEL PLAY TYPE In this option you will be able to choose which type of channels the receiver shown every time it starts. Press [ ] in order to select among All, Free or Scrambled. 5.9.3. CHANNEL CHANGE From this option you will be able to select the effect that will be shown in the screen every time you change the channel.
TOOLS 6.TOOLS ENGLISH OSD 50 Press [Menu] in the TV mode to enter the main menu. 1. Press [ ] to select the Tools item. 2. Press [OK] to enter the selected item. In the Tools menu (OSD 50): 3. Press [ ] to select the wanted menu item. 4. Press [OK] to enter the selected item among. - Information - Load Factory Default - Software Upgrade by USB 6.1 INFORMATION 1. When you enter to “Information” menu, you will see a screen like above (OSD 51).
TOOLS 4. Once the file has been loaded, it requires the conformity to end the upgrading process, writing into the receiver the upgrading. Select “Yes” and press [OK] to upgrade the receiver. In case during the reading of the file, it is corrupted or it would be a not appropriated for this model of receiver, an alert messagewould appear “Error reading the USB disk”. 5. After pressing [OK] the receiver will write into the Flash memory, and it will reboot to end the upgrading process. rev 1.1 PAG.
GAMES 7.GAMES When you enter “Game” menu (OSD 54), you will see two games including Othello and Sudoku. 7.1 OTHELLO OSD 55 OSD 56 7.2 SUDOKU 1. Moving highlight to “Setup” and press [Left/Right] keys to select the game level (degree of difficulty) (OSD 56). 2. Moving highlight to “Start” and press [OK] key to start the game. 3. Select the option “Replay” and press [OK] in order to start again the same game. 4. Select the option “Solve” and press [OK] in order to see the solution of the game. 5.
REC 8. REC & MEDIA OSD 57 8.1. MEDIA PLAYER In this menu option you can accede and manage the contents of the HDD previously copied from your computer. You also can create playlists of music or pictures (OSD 58). You can move through the different type of files (Image, video, recordings * and music) by pressing the key [0] of your remote. Press [Menu] button to Exit.
REC ENGLISH OSD 59 In order to open the Play list, you have to go the Music or Image menu. Press [Red button] in order to open the Play list. In order to open the play list, please press [OK] and select which file you wish to open (OSD 59). 1. Press [Red button] in any file from a list in order to move it to the position you wish. 2. Press [Green button] on any file from one list to delete the file. 3. Press [Yellow button] on any file from one list to delete all the files contained. 4.
REC 2. Select the route where you wish to copy the file and press the key [Green] in order to do so. 3. Press the key [Exit] to exit. 8.1.3.3. DELETE FILES OSD 63 1. In order to delete one or more files, press the key [Yellow] over the file you wish to delete (if you want to delete several files, select them one by one). 2. A mark will appear after the name of the file 3. The marked files will be deleted after you get out from this menu 1.
REC 8.1.6. VIDEO PLAYER 1.Press the button [OK] over a video file (OSD 67). 2. The file will be played on the screen. 3. Press the key [Exit] to exit. 8.1.7. HOW TO REPRODUCE A RECORDING * OSD 67 If you want to reproduce a recording, you only have to select it and press the key [OK]. 8.1.7.1. HOW TO RENAME A RECORDING * ENGLISH 1. Press the key [Red] to rename a recording. 2. A window will appear where you can change the name of the record (OSD 68). Press OK [Yellow] to go out and modify the name. 3.
REC NOTE: There is no turning back for this process. After the selection of one of these options, the data will be deleted. 2. Press the key [Blue] to assign space in the disk according to the action you wish to do (OSD 73). Options: - REC & TMS: It assigns half of the free space in the disk to making timeshift and the other half for making recordings. - REC: It assigns the whole free space for recordings. - TMS: It assigns the whole free space for timeshift.
TECHNICAL SPECIFICATIONS Video Decoding MPEG-2 SD&HD, MPEG4 AVC SD&HD/H.264 Bit rate Máx. 20 Mbps Output PAL Aspect ratio 4:3 PS, 4:3 LB, 16:9, Auto Active pixel (Scart) 480i / 576i Active pixel (HDMI) By source / By Native TV / 480i / 480p / 576i / 576p / 720p_ 50 / 720p_60/ 1080i_50 / 1080i_60 / 1080p_50 / 1080p_60 Output connectors HDMI / Scart Decoding MPEG-2/MPEG-1 layer I, II, III / AAC / Dolby Digital Mode Mono, Dual, Stereo, Joint stereo Bit rate Max.
PART OF THE DECLARATION OF CONFORMITY CE “WE , FTE MAXIMAL, DECLARE THAT THE PRODUCT MAX S400 HD PLUS LOW VOLTAGE DIRECTIVE 2006/95/EC rev 1.1 EMC DIRECTIVE 2004/108/EC” PAG.
ESPAÑA Mogoda, 110 Pol. Industrial Can Salvatella 08210 Barberà del Vallès (Barcelona) España Tel. 00 34 93 729 27 00 Fax. 00 34 93 729 30 73 ftemaximal@ftemaximal.com www.ftemaximal.com FRANCE 16 ZAE Les Mouilles 74570 Groisy Tel. 00 33 450 68 80 17 Fax. 00 33 450 68 84 68 sav@ftemaximal.fr www.ftemaximal.com ITALIA Via Edison, 29 42040 Calerno di Sant’Ilario d’Enza (RE) Tel. 00 39 05 22 90 97 01 Fax. 00 39 05 22 90 97 48 fte@fte.it www.ftemaximal.com DEUTSCHLAND BCN Distribuciones S.A.