HD21814150G, HD21814G and HD1814G Series Frymaster HD1814 Series Gas Fryers Installation & Operation Manual Frymaster, a member of the Commercial Food Equipment Service Association, recommends using CFESA Certified Technicians. 24-Hour Service Hotline 1-800-551-8633 www.frymaster.com E-mail: service@frymaster.
Please read all sections of this manual and retain for future reference. NOTICE This appliance is intended for professional use only and is to be operated by qualified personnel only. A Frymaster Dean Factory Authorized Service Agency (ASA) or other qualified professional should perform installation, maintenance, and repairs. Installation, maintenance, or repairs by unqualified personnel may void the manufacturer’s warranty. See Chapter 1 of this manual for definitions of qualified personnel.
DANGER Improper installation, adjustment, maintenance or service, and unauthorized alterations or modifications can cause property damage, injury, or death. Read the installation, operating and service instructions thoroughly before installing or servicing this equipment. Only qualified service personnel may convert this appliance to use a gas other than that for which it was originally configured. See Chapter 1 of this manual for definition of qualified service personnel.
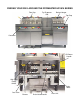
FINDING YOUR WAY AROUND THE FRYMASTER HD1814 SERIES Flue Cap Fry Dispenser Slot Basket Hanger Top Cap Controller Oil Return Handle High Limit Reset Switch Drain Tubes Gas Valve Burners Drain Valve Handle Filter Unit
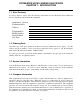
HD1814 Series Gas Fryers Installation & Operation Manual TABLE OF CONTENTS Page # 1. INTRODUCTION 1-1 1.1 After Purchase 1-1 1.2 Ordering Parts 1-1 1.3 Service Information 1-1 1.4 Computer Information 1-1 1.5 Safety Information 1-2 1.6 Service Personnel 1-3 2. IMPORTANT INFORMATION 2-1 2.1 Receiving and Unpacking Equipment 2-1 2.2 General 2-2 2.3 Principles of Operation 2-3 2.4 Rating Plate 2-3 2.5 Pre-Installation 2-3 2.6 Air Supply and Ventilation 2-5 2.
HD1814 Series Gas Fryers Installation & Operation Manual TABLE OF CONTENTS (CONT.) Page # 5. FILTRATION INSTRUCTIONS 5-1 5.1 Draining and Manual Filtering 5-1 5.2 General Filtration Information 5-2 5.3 Filtration Preparation 5-2 5.4 Daily Filtration Operation 5-6 5.5 Operating the Filter 5-8 6. PREVENTATIVE MAINTENANCE 6-1 6.1 General 6-1 7. TROUBLESHOOTING 7-1 7.1 General 7-1 7.2 Pilot Burner Malfunction 7-1 7.3 Main Burner Malfunctions 7-2 7.
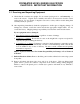
FRYMASTER HD1814 SERIES GAS FRYERS CHAPTER 1: INTRODUCTION 1.1 After Purchase In order to improve service, have the following chart filled in by the Frymaster Dean Authorized Service Technician who installed this equipment. Authorized Service Technician/ASA Address Telephone/Fax Model Number Serial Number Gas Type 1.2 Ordering Parts Customers may order parts directly from their local factory authorized service agency.
FRYMASTER HD1814 SERIES GAS FRYERS CHAPTER 1: INTRODUCTION 1.4 Computer Information (cont.) The user is cautioned that any changes or modifications not expressly approved by the party responsible for compliance could void the user's authority to operate the equipment. If necessary, the user should consult the dealer or an experienced radio and television technician for additional suggestions.
FRYMASTER HD1814 SERIES GAS FRYERS CHAPTER 1: INTRODUCTION 1.6 Service Personnel 1.6.1 Definitions A. Qualified and/or Authorized Operating Personnel 1. Qualified/authorized operating personnel are those who have carefully read the information in this manual and have familiarized themselves with the equipment functions, or have had previous experience with the operation of equipment covered in this manual. B. Qualified Installation Personnel 1.
FRYMASTER HD1814 SERIES GAS FRYERS CHAPTER 2: IMPORTANT INFORMATION 2.1 Receiving and Unpacking Equipment A. Check that the containers are upright. Use an outward prying motion - no hammering - to remove the cartons. Unpack fryers carefully and remove all accessories from the carton and/or frypots. Do not discard or misplace accessories, as they will be needed during final assembly and fryer operation. B. After unpacking, immediately check the equipment for visible signs of shipping damage.
FRYMASTER HD1814 SERIES GAS FRYERS CHAPTER 2: IMPORTANT INFORMATION 2.2 General Qualified, licensed, and/or authorized installation or service personnel only (as defined in Section 1.6) should perform the following: • Installation and service on Frymaster Dean equipment. • Conversion of this appliance from one gas type to another.
FRYMASTER HD1814 SERIES GAS FRYERS CHAPTER 2: IMPORTANT INFORMATION 2.3 Principles of Operation The incoming gas flows through orifices and is mixed with air in the burners to create the correct ratio for proper combustion. The mixture is ignited at the front end of each heat tube by the pilot light. Internal diffusers slow the flame as it goes through the burner tube. This slower and more turbulent flame gives much better heat transfer to the walls of the tubes, thereby heating the oil better. 2.
FRYMASTER HD1814 SERIES GAS FRYERS CHAPTER 2: IMPORTANT INFORMATION 2.5 Pre-Installation (cont.) DANGER The appliance area must be kept free and clear of combustible material at all times. B. Clearances: The fryer area must be kept free and clear of all combustibles. This unit is designcertified for the following installations: 1. Commercial installation only (not for household use). 2. Non-combustible floor installation equipped with factory-supplied 5-inch (13-cm) casters; 3.
FRYMASTER HD1814 SERIES GAS FRYERS CHAPTER 2: IMPORTANT INFORMATION 2.6 Air Supply and Ventilation DANGER This appliance must be installed with sufficient ventilation to prevent the occurrence of unacceptable concentrations of substances harmful to the health of personnel in the room in which it is installed. Keep the area around the fryer clear to prevent obstruction of combustion and ventilation airflow as well as for service and maintenance. A. Do not connect this fryer to an exhaust duct. B.
FRYMASTER HD1814 SERIES GAS FRYERS CHAPTER 3: INSTALLATION 3.1 Installing the Fryer There are no built-in leveling devices on fryers equipped with casters. The floor where the fryer is to be installed must be level. DANGER Fryers must be at room temperature and empty of oil during movement to avoid damage and possible bodily injury. DANGER Hot oil can cause severe burns. Avoid contact.
FRYMASTER HD1814 SERIES GAS FRYERS CHAPTER 3: INSTALLATION 3.2 Gas Connections (cont.) DANGER If gas odors are detected, the gas supply MUST be shut off at the main shut-off valve. The local gas company or ASA should be contacted immediately to rectify the problem. A. The size of the gas line used for installation is very important. If the line is too small, the gas pressure at the burner manifold will be low. This may cause slow recovery and delayed ignition.
FRYMASTER HD1814 SERIES GAS FRYERS CHAPTER 3: INSTALLATION 3.2 Gas Connections (cont.) B. Rigid Connections: Check any installer-supplied intake pipe(s) visually and clean threading chips, or any other foreign matter before installing into a service line. If the intake pipes are not clear of all foreign matter, the orifices will clog when gas pressure is applied. Seal pipe joints with a sealant resistive to LP gas. When using thread compound on gas piping, use very small amounts and only on male threads.
FRYMASTER HD1814 SERIES GAS FRYERS CHAPTER 3: INSTALLATION 3.2 Gas Connections (cont.) G. Only qualified service personnel should make adjustments to the regulators. H. Orifices: The fryer can be configured to operate on any available gas. The correct safety control valve, appropriate gas orifices, and pilot burner are installed at the factory. While the valve can be adjusted in the field, only qualified service personnel should make any adjustments with the proper test equipment. I.
FRYMASTER HD1814 SERIES GAS FRYERS CHAPTER 3: INSTALLATION 3.3.1 Specifications 3.3.1.1 Adjustments to Different Gas Types Gas Adjustments Natural LP 4" W.C.*/10 mbar* 11" W.C.*/27.5 mbar* Orifice Diameter Model Specific Model Specific Burner Marking None None 26N (P/N 810-0811) 16LP (P/N 810-2400) Gas Type Manifold Pressure† Pilot Marking * Gas pressure may vary per fryer model and altitude. Check the rating plate for specific gas pressures.
FRYMASTER HD1814 SERIES GAS FRYERS CHAPTER 3: INSTALLATION 3.3.2 Gas Conversion Procedures DANGER This appliance was configured at the factory for a specific type of gas. Converting from one gas type to another requires the installation of specific gas-conversion components. Switching to a different type of gas without installing the proper conversion components may result in fire or explosion.
FRYMASTER HD1814 SERIES GAS FRYERS CHAPTER 3: INSTALLATION 3.4 Electrical Connections The fryer when installed must be electrically grounded in accordance with local codes, or in the absence of local codes, with the National Electrical Code, ANSI/NFPA 70-(latest edition). DANGER This fryer is equipped with three-prong (grounding) plugs for protection against electrical shock and must be plugged directly into a properly grounded, three-prong receptacle.
FRYMASTER HD1814 SERIES GAS FRYERS CHAPTER 4: FRYER OPERATIONS 4.1 Initial Start-up WARNING The on-site supervisor is responsible for ensuring that operators are made aware of the inherent hazards of operating a hot oil frying system, particularly the aspects of system operation, oil filtration, draining and cleaning procedures. Cleaning: New units are wiped clean with solvents at the factory to remove any visible signs of dirt, oil, grease, etc.
FRYMASTER HD1814 SERIES GAS FRYERS CHAPTER 4: FRYER OPERATIONS 4.1.1 Pilot Lighting Procedures, Electronic Ignition Systems Initial Pilot Lighting: All Frymaster Dean fryers are tested, adjusted and calibrated to sea level conditions before leaving the factory. Adjustments to assure proper operation of pilot may be necessary on installation to meet local conditions, low gas pressure, differences in altitude and variations in gas characteristics.
FRYMASTER HD1814 SERIES GAS FRYERS CHAPTER 4: FRYER OPERATIONS 4.2 Final Preparation WARNING NEVER set a complete block of solid shortening on top of heating tubes. To do so will damage the heating tubes and frypot, and void the warranty. 4.2.1 Filling Fryer with Oil A. When using oil, fill the fryer to the bottom OIL LEVEL line scribed into the back of the frypot. B.
FRYMASTER HD1814 SERIES GAS FRYERS CHAPTER 5: FILTRATION INSTRUCTIONS WARNING Drawings and photos used in this manual are intended to illustrate operational, cleaning and technical procedures and may not conform to onsite management operational procedures. WARNING The on-site supervisor is responsible for ensuring that operators are made aware of the inherent hazards of operating a hot oil filtering system, particularly the aspects of oil filtration, draining and cleaning procedures. 5.
FRYMASTER HD1814 SERIES GAS FRYERS CHAPTER 5: FILTRATION OPERATION 3. Open the drain valve slowly to avoid splattering. If the drain valve becomes clogged with food particles, use the Fryer’s Friend (poker-like tool) to clear the blockage. DANGER NEVER attempt to clear a clogged drain valve from the front of the valve! Hot oil will rush out creating the potential for severe burns. DO NOT hammer on the drain valve with the cleanout rod or other objects.
FRYMASTER HD1814 SERIES GAS FRYERS CHAPTER 5: FILTRATION OPERATION 5.3.1 Filter Components Filter paper is held in place by a hold-down ring. Oil moves through the paper, leaving behind impurities. 1. Filter pan. 2. Filter support grid. 3. Filter paper. 4. Hold-down ring. 5. Crumb screen. A filter unit which utilizes disposable filter paper to filter oil.
FRYMASTER HD1814 SERIES GAS FRYERS CHAPTER 5: FILTRATION OPERATION 5.3.2 Assembling the Filter 1. Place the support grid in the bottom of filter pan. Support grid properly placed in filter pan. 2. Put one filter paper sheet on top of the support grid. Be sure the paper covers the filter pan bottom and laps two inches onto the pan wall. Ensure filter paper overlaps two inches on all sides and is evenly distributed under the holddown ring. 3. Position the hold-down ring on top of the filter paper.
FRYMASTER HD1814 SERIES GAS FRYERS CHAPTER 5: FILTRATION OPERATION 5.3.2 Assembling the Filter (cont.) 4. Sprinkle 8 ounces (227g) of filter powder on the filter sheet. Ensure the powder covers the filter paper evenly. 5. Place the crumb screen in the filter pan. Allow the crumb screen to rest on the top edges of the hold-down ring. Sprinkle the proper amount of filter powder evenly over the paper. Crumb screen properly placed. 6. Return filter pan to cabinet.
FRYMASTER HD1814 SERIES GAS FRYERS CHAPTER 5: FILTRATION OPERATION 5.3.3 Installing the Filter 1. Slide the filter inside the fryer cabinet. Ensure the male-female pickup tubes are fully engaged. Ensure the filter pan opening is directly under the center dump tube. The filter pan slides under the fryer (left), connecting with a male connector (right). Ensure that the pickup tube is securely coupled with this connector. Its location may vary based on model. 5.
FRYMASTER HD1814 SERIES GAS FRYERS CHAPTER 5: FILTRATION OPERATION 5.4.2 Filtering Tools Assemble tools to be used for filtering. These are supplied with the filter starter kit included with the fryer/filter system: • • • • Frypot/Filter Brush - used to clean frypot and filter pan sides and bottom, heating elements, and to dislodge sediment during filtration or oil change. Clean-out Rod (design may vary) - used to dislodge heavy debris in the drain tube (when needed). Filter Powder. Filter Paper.
FRYMASTER HD1814 SERIES GAS FRYERS CHAPTER 5: FILTRATION OPERATION 5.5 Operating the Filter 5.5.1 Pan Preparation and Operation See Section 5.3.2, Assembling the Filter, and Section 5.3.3, Installing the Filter, for the appropriate filter preparation procedure. CAUTION NEVER operate the filter unit unless cooking oil is at operating temperature (~350°F/ ~177°C). 1. Ensure the filter pan assembly is prepared as described in Section 5.3.2, Assembling the Filter, and ensure fryer is turned off. 2.
FRYMASTER HD1814 SERIES GAS FRYERS CHAPTER 5: FILTRATION OPERATION 5.5.1 Pan Preparation and Operation (cont.) 4. After ensuring the filter pan is correctly positioned under the drain tubes, move the red handle to the open position (right) to drain the frypot into the filter pan. Drain ONLY ONE frypot at a time. The filter pan is designed to hold the contents of one frypot only. Move the red drain valve handle into the open position. 5.
FRYMASTER HD1814 SERIES GAS FRYERS CHAPTER 5: FILTRATION OPERATION 5.5.2 Filter Operation 6. Oil will begin to pump from the filter pan into the frypot. If the frypot tubes, sides and bottom have sediment deposits, clean the frypot with the cleaning brush included with the fryer. Clean beneath and under the burner tubes, using care not to disturb the probes (arrow). Clean all sediment and suspended particles from the burner tubes and frypot as the oil begins to circulate.
FRYMASTER HD1814 SERIES GAS FRYERS CHAPTER 5: FILTRATION OPERATION 5.5.2 Filter Operation (cont.) 9. After all oil is pumped back into the frypot, bubbles will form, indicating air in the oil return lines. Allow the oil to bubble for 1015 seconds to ensure all oil is evacuated from the return lines. Push the yellow handle to close the oil return valve and deactivate the filter pump (see Step 5 above for additional reference).
FRYMASTER HD1814 SERIES GAS FRYERS CHAPTER 5: FILTRATION INSTRUCITONS 5.5.2 Filter Operation (cont.) 12. Do not allow crumbs to accumulate in the crumb tray. The crumb tray MUST be emptied into a fireproof container at the end of frying operations EACH DAY (see DANGER statement below). Empty the filter pan crumb tray into a fire-proof container at the end of frying operations each day. DO NOT ALLOW CRUMBS TO ACCUMULATE IN TRAY.
FRYMASTER HD1814 SERIES GAS FRYERS CHAPTER 6: PREVENTIVE MAINTENANCE 6.1 General DANGER Never attempt to clean the fryer during the cooking process or when the frypot is filled with hot oil. If water comes in contact with oil heated to cooking temperature, it will cause spattering of the oil, which can result in severe burns to nearby personnel. Any equipment works better and lasts longer when maintained properly and kept clean. Cooking equipment is no exception.
FRYMASTER HD1814 SERIES GAS FRYERS CHAPTER 6: PREVENTIVE MAINTENANCE 6.1.3 Periodic/ Annual The fryer should be inspected and adjusted periodically by qualified service personnel as part of a regular kitchen maintenance program. Frymaster Dean recommends that the fryer be inspected at least annually by a Factory Authorized Service Technician as follows: • Inspect fryer cabinet inside and out, front and rear, for excessive oil build-up. Verify that burners and associated components (i.e.
FRYMASTER HD1814 SERIES GAS FRYERS CHAPTER 6: PREVENTIVE MAINTENANCE 6.1.3 Periodic/ Annual (cont.) • Check filtration system integrity as follows: − With the filter pan empty, place each oil return handle, one at a time, in the "ON" position. Verify that the pump activates and that bubbles appear in the oil of the associated frypot. − Close all oil return valves (i.e., place all oil return handles in the "OFF" position).
FRYMASTER HD1814 SERIES GAS FRYERS CHAPTER 7: TROUBLESHOOTING 7.1 General DANGER Hot oil will cause severe burns. Never attempt to move this appliance when filled with hot oil or to transfer hot oil from one container to another. DANGER This equipment should be unplugged when servicing, except when electrical circuit tests are required. Use extreme care when performing such tests. This appliance may have more than one electrical power supply connection point. Disconnect all power cords before servicing.
FRYMASTER HD1814 SERIES GAS FRYERS CHAPTER 7: TROUBLESHOOTING 7.2 Pilot Burner Malfunction (cont.) 3. Check all connections for cleanliness and security. C. Pilot flame of proper size, but is unstable. thermopile completely at all times. Flame wavers and does not envelop the 1. Check for drafts that might be caused by air conditioning equipment or make-up air apparatus. Turn air-moving equipment off and recheck the pilot. 7.3 Main Burner Malfunctions A.
FRYMASTER HD1814 SERIES GAS FRYERS CHAPTER 7: TROUBLESHOOTING 7.3 Main Burner Malfunctions (cont.) D. Fryer will not reach the temperature setting and/or runs erratically. 1. Incorrect location of sensor probe or defective temperature sensor. 2. Loose wiring/wire connection E. Fryer oil temperature cannot be controlled; fryer runs at high-limit temperature. 1. Defective temperature probe; Call Authorized Service Agent.
FRYMASTER HD1814 SERIES GAS FRYERS CHAPTER 7: TROUBLESHOOTING 7.
FRYMASTER HD1814 SERIES GAS FRYERS CHAPTER 7: TROUBLESHOOTING 7.
FRYMASTER HD1814 SERIES GAS FRYERS CHAPTER 7: TROUBLESHOOTING 7.
Frymaster, L.L.C.