
3000 Controller
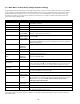
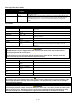

Table Of Contents

1-8
1.6 Main Menu: Product Setup (Single Setpoint Cooking)
Programming food items is shown below. The right column has the action necessary to continue. Exit from a programming
step at any time by pressing the Exit/Scan key until the display returns to its pre-programming status. Ensure the controller
is OFF and follow the steps below. To access menu strip, remove screws attaching bezel. Lower bezel and remove strip
from back of controller. Once menu strip is updated, reverse the steps. To unassign a product from a button set the cook
time to 0:00 and press EXIT/SCAN.
Left Display Right Display Action
OFF OFF
Press until the controller displays Main Menu for three seconds changing
to PRODUCT SETUP.
Product Setup
Blank
Press .
Product Setup Enter Code
Enter 1650.
Select Product
Blank
Press desired product button.
Long Name Product name or
button number
Enter product name with letter keys. Advance cursor with . Press to
advance to next product set up feature.
Short Name Abbreviated
Product name or
button number
Enter four character product name which alternates with the timer during a
cook. Press .
COOKING MODE SINGLE SETPOINT
Press . If multiple setpoint or segmented cooking is desired press
MULTIPLE SETPOINT and go to 1.8 and follow the instructions. (Default is
SINGLE SETPOINT)
1 Time 0:00 or
previously
entered time
Enter total cook time with numbered keys. Press .
1 TEMPR TEMPR
Enter cooking temperature. Press .
1 Sensitivity
Number
Enter the level of sensitivity, 0-9, for the product. Press . Refer to the
sensitivity chart on page 1-17.
1 alarm time (Shake
Time)
0:00 or
previously
entered time
Enter time in cook cycle for audible alarm for shaking. Press . If set to 0:00
skip to FILTER PROMPT.
1 ALARM NAME SHAKE
Press to scroll through the alarm names (ex. Shake, Stir). Press .
1 ALARM MODE (Shake
Alarm Mode)
AUTO
Press . Default is auto. If manual is desired press to scroll to Manual
shake alarm mode. Press . Alarm (Shake) Mode when set to auto, cancels
the alarm automatically after a few seconds. Manual requires user action.
1 ALARM TONE (Shake
Alarm tone)
Short
Press to scroll choice of shake alarm tones. Press . Default is SHORT.
2 alarm time 0:00
Press . Leave at 0:00 if a second alarm is not needed. Otherwise repeat
steps for 1 ALARM for 2
nd
and 3
rd
alarms.
Filter PROMPT
0 or previously
entered number.
Enter number of cook cycles before a filter prompt and press .
Instant On
5 or previously
set number
This is the time, in seconds, the fryer heats at 100%, after the product button
is pressed before the controller adjusts the temperature. Enter value and press
. (Default is 5. 0=OFF). NOTE: Instant on time may need to be
adjusted for light cooking loads.
HOLD TIME
0 or previously
entered time.
Enter time in minutes to hold product before discarding. Press .
Exit Exit
Press the button to save changes.
Select Product
Blank
For additional programming refer back to Product Setup above. To exit press
the EXIT SCAN button twice to OFF.
To access menu strip, remove screws attaching bezel. Lower bezel and remove strip from back of controller. Once the
menu strip is updated, reverse the steps to reassemble. To unassign a product from a button set the cook time to 0:00 and
press EXIT/SCAN.