FGP55 Rethermalizer Installation and Operation Manual Non-CE & Frymaster, a member of the Commercial Food Equipment Service Association, recommends using CFESA Certified Technicians.
Please read all sections of this manual and retain for future reference. NOTICE This appliance is intended for professional use only and is to be operated by qualified personnel only. A Frymaster Dean Factory Authorized Servicer (FAS) or other qualified professional should perform installation, maintenance, and repairs. Installation, maintenance, or repairs by unqualified personnel may void the manufacturer’s warranty.
DANGER The front ledge of the fryer is not a step. Do not stand on the fryer. Serious injury can result from slips or contact with the hot oil. CAUTION Do not store or use gasoline or other flammable vapors and liquids in the vicinity of this or any other appliance. CAUTION Instructions to be followed in the event the operator smells gas or otherwise detects a gas leak must be posted in a prominent location. This information can be obtained from the local gas company or gas supplier.
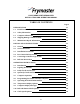
FGP55 SERIES RETHERMALIZER INSTALLATION AND OPERATION MANUAL TABLE OF CONTENTS Page # 1. 2. 3. INTRODUCTION 1-1 1.1 FGP55 Series Rethermalizer 1-1 1.2 Safety Information 1-1 1.3 Computer Information 1-2 1.4 Shipping Damage Claim Procedure 1-2 1.5 Maintenance/Repair Information 1-2 INSTALLATION INSTRUCTIONS 2-1 2.1 General 2-1 2.2 Service Personnel 2-2 2.3 Installation Instructions 2-2 2.4 Pre-Connection Preparations 2-4 2.5 Converting to Another Type of Gas 2-7 2.
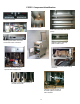
FGP55 Component Identification Computer controller Upper float switch. Cook vessel and lower float switch (arrow). Control box Water by-pass switch, fuses and reset button under control box. High-limit (upper) and temp probe in cook vessel. FGP 55 Gas fitting (from left), water hookup and drain. Gas valve and drain handle on spark-module equipped unit. Position of standing pilot (arrow) on unit with that feature. Housing for spark module on electronic ignition model and water solenoid.
FGP55 Rethermalizer Sequence of Operation 1. Ensure the unit is properly installed. Check the following: a. Rethermalizer is level under the vent hood. b. Gas supply is connected properly with the proper gas type (natural or propane) with the correct size lines. Have the installer check for proper gas pressure and for gas leaks. c. Water connected properly to the coupling at the rear of the unit. d. Ensure drain plumbing is routed to the disposal area. e.
FGP55 SERIES RETHERMALIZERS CHAPTER 1: INTRODUCTION 1.1 FGP55 Series Rethermalizer The Frymaster FGP55 is a hot water bath unit designed to rethermalize or reconstitute both refrigerated and frozen vacuum-bagged food products. The FGP55 is manufactured to operate on the type gas specified by the user, i.e., natural or propane gas. The instructions contained in this manual should be read thoroughly before attempting to operate this equipment. 1.
1.3 Computer Information This equipment has been tested and found to comply with the limits for a Class A digital device, pursuant to Part 15 of the FCC rules. While this device is a verified Class A device, it has been shown to meet the Class B limits. These limits are designed to provide reasonable protection against harmful interference when the equipment is operated in a commercial environment.
1.5 Maintenance/Repair Information (cont.) For non-routine maintenance or repairs, or for service information, contact your local Frymaster Authorized Servicer (FAS). Service information may also be obtained by calling the Frymaster Technical Services Department (1-800-551-8633).
FGP55 SERIES RETHERMALIZERS CHAPTER 2: INSTALLATION 2.1 General Proper installation is essential for the safe, efficient, trouble-free operation of this appliance. Any unauthorized alteration or improper installation of this equipment will void the Frymaster warranty. DANGER The electrical power supply for this appliance MUST be the same as indicated on the rating and serial number plate located on the inside of the fryer door.
2.2 Service Personnel 2.2.1 Definitions A. Qualified and/or Authorized Operating Personnel 1. Qualified or authorized operating personnel are those who have carefully read the information in this manual and have familiarized themselves with the equipment functions, or have had previous experience with the operation of equipment covered in this manual. B. Qualified Installation Personnel 1.
2.3.1 General Installation Requirements (cont.) One of the most important considerations of efficient operation is ventilation. Make sure the equipment is installed so that products of combustion are removed efficiently, and that the kitchen ventilation system does not produce drafts that interfere with proper burner operation. The equipment flue opening must not be placed close to the intake of the exhaust fan, and the flue must never be extended in a “chimney” fashion.
2.3.1 General Installation Requirements (cont.) FCC COMPLIANCE The user is cautioned that any changes or modifications to Frymaster computers not expressly approved by the party responsible for compliance could void the user’s authority to operate the equipment. Frymaster computers have been tested and found to comply with the limits for a Class A digital device, pursuant to Part 15 of the FCC rules. While these devices are verified as Class A devices, they have been shown to meet the Class B limits.
2.4 4. Pre-Connection Preparations (cont.) For rethermalizers equipped with casters, there are no built-in leveling devices. The floor where the rethermalizer is to be installed must be level. WARNING Inlet water pressure must not exceed 80 PSI. A regulator must be installed between rethermalizer water inlet and water supply when pressure exceeds 80 PSI. 5. Connect the water hose to the fitting at the rear of the unit.
2.4.1 Connecting to the Gas Supply (cont.) When configured for natural gas, this equipment requires a standard gas pipe size of ¾ inch (22 mm) ID for connections within 20 feet (6 m) of the supply line, provided no more than 4 fittings or elbows are used in the run. For a pipe run over 20 feet (6 m), increase the pipe size to 1 inch (28 mm). For use with LP (Propane) gas, the next smaller pipe size may be used. IF IN DOUBT ABOUT THE PIPE SIZE TO BE USED, CONSULT YOUR LOCAL GAS COMPANY.
2.5 Converting to Another Gas Type This equipment is configured at the factory for either natural gas or LP (propane) gas. If you desire to switch from one type of gas to the other, a gas conversion kit must be installed by a Factory Authorized Service Center technician. DANGER Switching to a different type of gas without installing the proper conversion kit may result in fire or explosion! NEVER attach your fryer to a gas supply for which it is not configured. 2.
2.6 Boil-Out Instructions (cont.) 4. Boil the solution for no less than one hour. To remove deposits, scrub the sides of the vat with a long-handle, natural bristle brush, being careful not to damage the temperaturesensing probe. Do not allow the water level to drop below the level line in the vessel during boil-out operation (although AutoFill will maintain the proper solution level, always check during the boil-out procedure). 5.
FGP55 SERIES RETHERMALIZERS CHAPTER 3: OPERATING INSTRUCTIONS 3.1 Introduction The FGP55 rethermalizer is offered with a standing pilot with Piezo ignitor or electronic ignition. The unit is equipped with a low-level float switch, which allows ignition of the burners only after the proper water level is reached. An auto-refill float switch maintains the normal water level.
3.2 Lighting Instructions (cont.) Follow these instructions to light a unit with electronic ignition: 1. Turn the gas valve knob to the ON position. OFF 2. Press the switch to turn the computer ON. If the vessel is not filled to the proper level with water, the AutoFill feature will add water to the proper level. ON 3. An illuminated dot between digits 1 and 2 in either LED display indicates that the burners are lit. 4. If the burners fail to light, press the Repeat the preceding steps.
3.3 Daily Checks and Services (cont.) Clean the temperature probe and high-limit, located on the burner tube in the cook vessel. Using a Scotchbrite™ or similar mildly abrasive pad and a solution of detergent and water, clean the inside of the cookpot. Clean all food-contact surfaces with a proper dilution of a sanitizing detergent. Rinse the cookpot thoroughly with clean water at least twice. 3.4 Quarterly Checks and Services Check Computer Magic III.5 Setpoint Accuracy 1. Fill the cookpot with water.
3.5 Computer Operation ITEM 1 DESCRIPTION Lighted Displays— display of various functions and operations. 2 Power Switches— either switch turns power ON or OFF 3 Program Lock and Temperature Check Switch— locks program in computer and/or displays vessel temperature when depressed. 4 Programming Switch— used when reprogramming the computer memory.
3.5 Computer Operation (cont.) The FGP55 CM-III.5 computer has 10 programmable product buttons, a Simmer Mode switch, and a Boil Mode switch. The computer also has two Power switches. Either switch may be pressed to turn the unit ON or OFF. The product buttons are multi-functional. In the programming mode, each button can be programmed for a distinct rethermalizing time for a particular product.
3.6 Programming the FGP55 CM-III.5 Computer (cont.) NOTE 2: The unit comes from the factory configured to display in degrees Fahrenheit. To toggle back and forth between Fahrenheit and Celsius, press the switch, then enter the code 1 6 5 8 by pressing the corresponding product buttons. Next, press the switch to lock in the new display option. 3. Enter the number 1 6 5 0 by pressing the corresponding product buttons.
3.6 Programming the FGP55 CM-III.5 Computer (cont.) SH2 will appear. Program the length of the second stir time as above being sure that the time entered is greater than that for stir time "1" or else is "0". SH3 will appear. Program the length of the third stir time in the same manner as for stir times "1" and "2", being sure that the time entered is greater than that for stir time "2" or else is "0". CAUTION Remember: Stir time "2" must be greater than stir time "1" (or else be "0").
3.7 Operating the FGP55 Rethermalizer (cont.) If no stir times have been programmed, Stir will not appear during the rethermalizing cycle. To cancel the alarm, press the indicated product button. CAUTION Pressing the product button twice while the alarm is active will cancel the rethermalizing cycle as well as the alarm. c. At the end of the rethermalizing cycle, an audible alarm will sound, will be displayed, and the associated product button will flash. To cancel the alarm, press the flashing button. 3.
3.9 FGP55 Computer Display Messages (cont.) (four dashes) – Indicates that the water temperature is within the proper rethermalizing range (i.e., within ±11F of setpoint). – Indicates that there is a heating problem. Call your local Factory Authorized Service Center or the 24-Hour Hotline (1-800-551-8633). – Indicates that the rethermalizer has detected a problem in the temperature control circuits. Call your local Factory Authorized Service Center or the 24-Hour Hotline (1-800551-8633). 3.
THIS PAGE INTENTIONALLY LEFT BLANK
Frymaster, L.L.C.