
User Manual

FrSky Electronic Co., Ltd www.frsky-rc.com Contact us : frsky@frsky-rc.com
Add:F-4,Building C, Zhongxiu Technology Park, No.3 Yuanxi Road, Wuxi, 214125, Jiangsu, China Technical Support: sales4tech@gmail.com
Note: After binding proce dure is completed, resupply the powe r and check if the receive r is truly
communicating with the transmitter.
Binding procedure
Binding is the process of uniquely associating a receiver to a transmitter RF module. A transmitter external RF
module can be bound to multiple receivers (not to be used simultaneously). A receiver can only be bound to one
RF module.
1. Put the transmitter RF module into binding mode
Turn on X-Lite, go to the MENU-MODEL SETUP—PAGE 2, choose External RF—Mode R9M—LBT, and select
Bind (OpenTX 2.2.2 and its improved versions are strongly recommended).
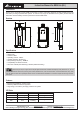
2. Connect the battery to the receiver while holding its F/S button. The RED LED on the receiver will flash, indicating
the binding process is completed.
3. Reboot the receiver and go back to normal mode of the transmitter RF module. The flashing of GREEN LED on
the receiver indicating the receiver is receiving commands from the transmitter. Binding of the
receiver/transmitter
module will not have to be repeated unless one of the two is replaced.
More information please refer to the introduction manual for transmitter.
• No Pulse: on loss of signal the receiver produces no pulses on any channel. To apply this type, select it in the
menu and wait 9 seconds for the failsafe to take effect.
• Hold: the model will hold the last position after signal lost. To apply this type, select it in the menu and wait 9
seconds for failsafe to take effect.
• Custom: the customized position of each individual channel. The model will move to the preset position after
signal lost. Move the cursor to “Set” and press ENTER, you will see FAILSAFE SETTING screen below. Move the
cursor to the chann
el you want to set failsafe on, and press ENTER. When moving the corresponding sticks or
switches, you will see the channel bar moving. Move the channel bar to the place you want for failsafe and long
press ENTER to finish the setting. Wait 9 seconds before failsafe taking effect.
How to Set Failsafe mode (on the transmitter)
There are 3 failsafe modes: No Pulse, Hold, Custom
Note: If failsafe is not set, the model will hold the last position after signal is lost, thus it may fly away
or cause injury.
Range Check
A pre-flight range check should be done before each flying session. Reflections from nearby metal fences, concrete
buildings or trees can cause loss of signal during range check and flight. Under Range Check mode, RF power will
decrease and Range distance will reduce to 1/30-1/10 that of Normal model.
1. Place the model at least 60cm (two feet) above non-metal contaminated ground (e.g. on a wooden bench). The
receiver antenna should be in vertical position.
2. Turn on the transmitter and the receiver, go to MODEL SETUP—External RF—Mode R9M—Range.
FrSky is continuously adding features and improvements to our products. To get the most from your product, please check
the download section of the FrSky website www.frsky-rc.com for the latest update firmware and manuals
Instruction Manual for R9M Lite (EU)