
User Manual


www.frsky-rc.com
28/03/2011
For those instances when the model flies out of range of the transmitter for more than a brief instant, the
receiver provides a settable failsafe function on all servo channels. There are two implementations of this
failsafe function. The ROM A version is shipped with all receivers.
8.1 ROM A version
To use the failsafe function, follow the steps below.
8.1.1 Bind the receiver first (see section 6.2 above).
8.1.2 Move the transmitter controls for all channels to the desired position whenever failsafe occurs.
8.1.3 Press briefly the F/S button of the receiver (less than 1 second), the transmitter module will make a
long “beep”, indicating the failsafe position is stored in the receiver. These settings will be
remembered until the receiver is every rebound to the transmitter.
8.2 ROM B version
This version is provided as a user installed firmware upgrade. The firmware is available from the download
section of the FrSky website. With this version you can set failsafe position on the Transmit module at any
time during your flight.
8.2.1 Bind the receiver first (see section 6.2 above).
8.2.1.1 Set the transmitter controls to the desired failsafe position of all channels
8.2.1.2 Press briefly the F/S button of the Transmitter
module (less than 1 second), the transmitter module
will make a long “beep”, indicating the failsafe position is remembered by the receiver, even when
flying. The same action can be achieved when the model is on the ground by pushing the F/S
button on either the transmitter or the receiver.
8.3 If you want to disable the failsafe function, with either ROM version, re-bind the receiver to the
transmitter. This will set the failsafe feature in the normal off state.
Note: Note that if you accidently press the “F/S Range” button of the transmitter module during your flight
(with ROM B), you will update the failsafe positions inadvertently.
9 Alarm operation
9.1 Alarm states
The transmitter module monitors the receiver voltages and notifies the user by audible alarm. The alarm
thresholds and direction (either above or below threshold) can be programmed into the transmitter module
using a standard PC and a special cable available from FrSky.
9.1.1 The signals being measured depend on the version of the receiver. For the earlier D8R or D8R (V1),
there are two analog input pins, called A1 and A2. For the later D8R (V2) one of the previous pair of
pins has been dedicated to the measurement of internal receiver voltage. The remaining A2 is still
available.
9.1.2 As with the RSSI, there are three alarm states. The result of a voltage passing the programmed
threshold for these three alarm states is the same as shown in the table in section 7.
9.1.3 The alarms are derived from the following sources.
Rx interface 1: Analog Port 1 on Rx
Rx interface 2: Analog Port 2 on Rx
Rx interface 3: RSSI of Rx
Note: Both Analog Ports have a settable alarm point while the RSSI alarm setting is set at the factory.
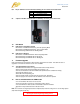
9.2 Telemetry Connector Pin Definition
9.2.1 The pin definition on the D8R (V2) receiver telemetry port is as shown in the table below.
RXD +5V GND
AD2 × GND
The pin, at position +5V, is connected internally to receiver TXD and should not be used with user circuitry.
AD1 is connected internally to the battery voltage. The maximum battery voltage reportable is 13.2V
although the maximum safe receiver power voltage is 10V. The AD2 pin is the user analog voltage input (0-
3.3V). The RXD pin is the serial input pin for a user bit stream (9600 Baud 0 -> 3.3V signaling levels)
4